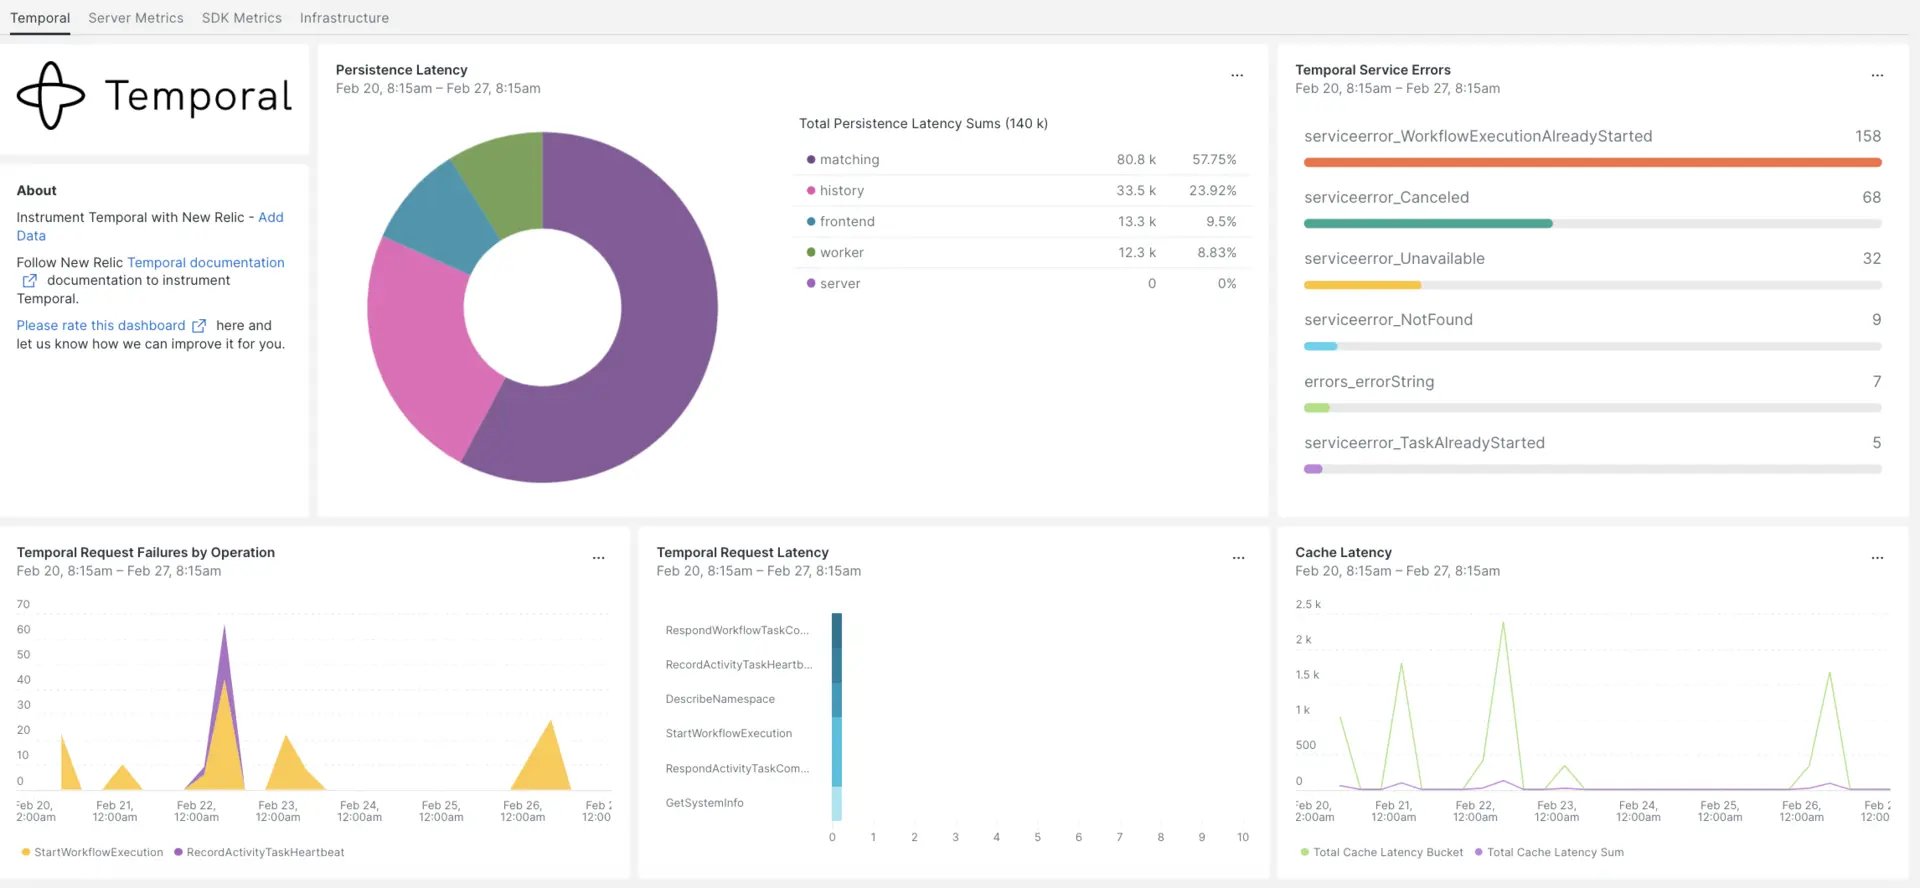
임시 통합은 임시 데이터의 성능을 모니터링하여 쓰기 분산, 내결함성 및 확장 가능한 애플리케이션의 문제를 진단하는 데 도움을 줍니다. Temporal 통합은 가장 중요한 Temporal SDK 앱 지표가 포함된 사전 구축된 대시보드를 제공합니다.

New Relic과의 통합을 설정한 후 즉시 사용 가능한 것과 같은 대시보드에서 데이터를 확인하십시오.
인프라 에이전트 설치
임시 통합을 사용하려면 먼저 동일한 호스트에 인프라 에이전트를 설치 해야 합니다. 클라이언트 에이전트 모니터는 호스트 자체를 모니터링하는 반면, 다음 단계에서 설치하게 될 통합은 데이터베이스 및 측정 지표와 같은 임시 데이터로 모니터링을 확장합니다.
Temporal 측정항목 노출
다음 단계에서는 기본 구성 파일 docker-compose.yml 을 사용하여 Temporal Server의 로컬 인스턴스를 실행합니다.
아직 설치하지 않은 경우 호스트에
docker및docker-compose설치합니다.bash$sudo apt install docker$sudo apt install docker-compose저장소를 복제합니다.
bash$git clone https://github.com/temporalio/docker-compose.git디렉터리를 프로젝트 루트로 변경합니다.
bash$sudo nano docker-compose/docker-compose.ymlPrometheus 엔드포인트와 포트를
docker-compose.yml파일에 추가합니다.Environment:- PROMETHEUS_ENDPOINT=0.0.0.0:8000ports:- 8000:8000docker-compose up명령어를 실행하여 인스턴스를 빌드합니다.bash$sudo docker-compose up다음 URL에서 인스턴스가 올바르게 실행되고 있는지 확인하세요.
- 임시 서버는
localhost:7233에서 사용할 수 있습니다. - 임시 웹 UI는 다음에서 사용할 수 있습니다.
http://YOUR_DOMAIN:8080 - Temporal 서버 측정항목은 다음에서 사용할 수 있습니다
http://YOUR_DOMAIN:8000/metrics
- 임시 서버는
Java SDK 지표 노출
이제 Prometheus가 스크랩할 SDK 클라이언트 지표를 노출하겠습니다.
프로젝트 기본 폴더에
MetricsWorker.java파일을 만듭니다.//...// You need to import the following packages to set up metrics in Java.// See the Developer's guide for packages required for the other SDKs.import com.sun.net.httpserver.HttpServer;import com.uber.m3.tally.RootScopeBuilder;import com.uber.m3.tally.Scope;import com.uber.m3.util.Duration;import com.uber.m3.util.ImmutableMap;// See the Micrometer documentation for configuration details on other supported monitoring systems.// This example shows how to set up the Prometheus registry and stats reported.PrometheusMeterRegistry registry = new PrometheusMeterRegistry(PrometheusConfig.DEFAULT);StatsReporter reporter = new MicrometerClientStatsReporter(registry);// set up a new scope, report every 10 secondsScope scope = new RootScopeBuilder().tags(ImmutableMap.of("workerCustomTag1","workerCustomTag1Value","workerCustomTag2","workerCustomTag2Value")).reporter(reporter).reportEvery(com.uber.m3.util.Duration.ofSeconds(10));// For Prometheus collection, expose the scrape endpoint at port 8077. See Micrometer documentation for details on starting the Prometheus scrape endpoint. For example,HttpServer scrapeEndpoint = MetricsUtils.startPrometheusScrapeEndpoint(registry, 8077); //note: MetricsUtils is a utility file with the scrape endpoint configuration. See Micrometer docs for details on this configuration.// Stopping the starter stops the HTTP server that exposes the scrape endpoint.//Runtime.getRuntime().addShutdownHook(new Thread(() -> scrapeEndpoint.stop(1)));//Create Workflow service stubs to connect to the Frontend Service.WorkflowServiceStubs service = WorkflowServiceStubs.newServiceStubs(WorkflowServiceStubsOptions.newBuilder().setMetricsScope(scope) //set the metrics scope for the WorkflowServiceStubs.build());//Create a Workflow service client, which can be used to start, signal, and query Workflow Executions.WorkflowClient yourClient = WorkflowClient.newInstance(service,WorkflowClientOptions.newBuilder().build());//...프로젝트 디렉터리로 이동하여 프로젝트를 빌드합니다.
bash$./gradlew build작업자를 시작합니다.
bash$./gradlew -q execute -PmainClass=<YOUR_METRICS_FILE>노출된 Prometheus Scrape 엔드포인트에서 작업자 지표를 확인하세요:
http://YOUR_DOMAIN:8077/metrics.메모
SDK 지표 설정에 대한 자세한 내용은 Temporal 공식 문서를 참조하세요.
NRI-Prometheus 구성
성공적인 설치 후, 다음 NRI-Prometheus 설정을 만드세요:
다음 경로에 이름이
nri-prometheus-temporal-config.yml인 파일을 만듭니다.bash$cd /etc/newrelic-infra/integrations.d/다음은 구성 파일의 예입니다. 플레이스홀더 URL을 업데이트하세요.
integrations:- name: nri-prometheusconfig:standalone: false# Defaults to true. When standalone is set to `false`, `nri-prometheus` requires an infrastructure agent to send data.emitters: infra-sdk# When running with infrastructure agent emitters will have to include infra-sdkcluster_name: Temporal_Server_Metrics# Match the name of your cluster with the name seen in New Relic.targets:- description: Temporal_Server_Metricsurls: ["http://<YOUR_DOMAIN>:8000/metrics", "http://<YOUR_DOMAIN>:8077/metrics"]# tls_config:# ca_file_path: "/etc/etcd/etcd-client-ca.crt"# cert_file_path: "/etc/etcd/etcd-client.crt"# key_file_path: "/etc/etcd/etcd-client.key"verbose: false# Defaults to false. This determines whether or not the integration should run in verbose mode.audit: false# Defaults to false and does not include verbose mode. Audit mode logs the uncompressed data sent to New Relic and can lead to a high log volume.# scrape_timeout: "YOUR_TIMEOUT_DURATION"# `scrape_timeout` is not a mandatory configuration and defaults to 30s. The HTTP client timeout when fetching data from endpoints.scrape_duration: "5s"# worker_threads: 4# `worker_threads` is not a mandatory configuration and defaults to `4` for clusters with more than 400 endpoints. Slowly increase the worker thread until scrape time falls between the desired `scrape_duration`. Note: Increasing this value too much results in huge memory consumption if too many metrics are scraped at once.insecure_skip_verify: false# Defaults to false. Determins if the integration should skip TLS verification or not.timeout: 10s
임시 로그 구성
임시 로그를 구성하려면 아래 설명된 단계를 따르세요.
다음 docker 명령을 실행하여 실행 중인 컨테이너의 상태를 확인하세요.
bash$sudo docker psTemporalio/UI 컨테이너의 컨테이너 ID를 복사하고 다음 명령을 실행합니다.
bash$sudo docker logs -f <container_id> &> /tmp/temporal.log &그런 다음
/tmp/디렉터리에temporal.log이라는 로그 파일이 있는지 확인합니다.
뉴렐릭에게 로그인 전달
우리의 로그 포워딩을 사용하여 임시 로그를 뉴렐릭으로 전달할 수 있습니다.
Linux 시스템에서는
logging.yml이라는 로그 파일이 다음 경로에 있는지 확인하세요.bash$cd /etc/newrelic-infra/logging.d/위 경로에서 로그 파일을 찾으면 다음 스크립트를
logging.yml파일에 포함합니다.logs:- name: temporal.logfile: /tmp/temporal.logattributes:logtype: temporal_logs- bash$sudo systemctl restart newrelic-infra.service
데이터가 뉴렐릭 계정 으로 전송되기 시작할 때까지 몇 분 정도 기다리세요.
데이터 찾기
Temporal 이라는 사전 구축된 대시보드 템플릿을 선택하여 Temporal 지표를 모니터링할 수 있습니다. 사전 구축된 대시보드 템플릿을 사용하려면 다음 단계를 따르세요.
one.newrelic.com 에서, + Integrations & Agents 페이지로 이동합니다.
대시보드 를클릭합니다.
검색창에 Temporal 를 입력합니다.
임시 대시보드가 나타나면 클릭하여 설치하세요.
임시 대시보드는 맞춤형 대시보드로 간주되며 대시보드 UI 에서 찾을 수 있습니다. 대시보드 사용 및 편집에 대한 문서는 대시보드 문서 를 참조하세요.
다음은 Temporal 요청 대기 시간 합계를 확인하는 NRQL 쿼리입니다:
SELECT sum(temporal_request_latency_sum) FROM Metric WHERE scrapedTargetURL = 'http://<YOUR_DOMAIN>:8000/metrics'