このページでは、Pathpointの更新バージョンについて説明します。一般提供バージョンについては、New Relic Pathpointの概要を参照してください。
フローはPathpointで構築する単位であり、1つのビジネスジャーニーをステージ、レベル、ステップ、およびそれらの健全性を報告するシグナルに分割したものです。このページでは、UIでフローを構築する方法、作成後にフローを管理する方法、およびその設計を計画する方法について説明します。
フローの構築
フローの作成
新しいフローを作成するには、Flowsページの右上にある+ Add a flowをクリックします。Create a flowダイアログで、Blank flowを選択して新しいフローをゼロから構築するか、Import a flowを選択して既存のJSON設定からフローを作成します。
空のフロー
Pathpoint flowダイアログにより、現在選択しているアカウントにフローが作成されます。以下のフィールドを入力します。
- Flow name (必須):フローおよびFlowsページに表示される名前。
- Category (オプション):Eコマースやオンボーディングなど、フローを整理するのに役立つビジネスカテゴリです。
- Description (オプション):「モバイルアプリの購入フロー」などの、フローの短い説明。
- Refresh data every:フローが健全性データを更新する頻度。1、5、10、15、または30分を選択します。デフォルトは1分です。
Saveをクリックして、フローを作成します。これによりフローがドラフトモードで開き、ジャーニーの構造を構築できます。
フローのインポート
すでにJSON形式のフロー設定がある場合は、手動で構築する代わりにそこからフローを作成できます。これは、アカウント間でフローを移動したり、バージョン管理から復元したり、同僚がエクスポートした設定から開始したりする場合に役立ちます。
JSONファイルを入力フィールドにドラッグするか、Upload JSONをクリックするか、JSONを直接貼り付けて、必要に応じてその場で編集してください。
Select what to importで、引き継ぐ設定の範囲を選択します:
- Structure only:シグナルやKPIを含めずに、ステージ、レベル、ステップをインポートします。シグナルを継承せずにフローの形状を再利用するには、これを使用します。
- Everything:シグナルとKPIとともに構造をインポートします。
Saveをクリックして、フローを作成します。
注記
設定にアクセス権のないシグナルが含まれている場合、それらのシグナルはフローに追加されますが非表示のままになり、影響を受けるステージの上部にMissing signalsインジケーターが表示されます。それらのシグナルへのアクセス権を持つユーザーは、それらを表示し、フローでの使用方法を編集できます。
すでに構築したフローのJSONを取得するには、そのフローを開き、...メニューからView as codeを選択します。View as codeをご覧ください。
ステージの追加と設定
ドラフトモードは、ステージ、レベル、ステップがすでに構築された状態で開きます。ステージ名をクリックして名前を変更します。
新しいステージを追加するには、ステージヘッダーの+アイコンをクリックして、Add a stageを選択します。
KPIをステージに直接追加するには、+アイコンをクリックして、Add a KPIを選択します。詳細についてはKPIをご覧ください。
ステージを設定するには、ステージヘッダーの歯車アイコンをクリックし、Adjust settingsを選択します。ステージの設定項目は以下のとおりです。
Stage link (オプション):ダッシュボードやドキュメントなど、ステージの追加コンテキストを提供するURLを追加します。
Stage shape:ジャーニーにおける役割を反映するように、ステージの視覚的な形状を設定します(「None」、「Start」、「Connect」、または「Stop」)。
Health setup:ステージのヘルスを決定する方法を選択します:
- Rollup of all levels:ステージのステータスは、すべてのレベルの中で最も深刻なステータスを反映します。いずれかのレベルで問題が発生したときに、ステージをすぐに反応させたい場合は、これを使用します。
- Alert policy and conditions:ステージの稼働ステータスを決定するためのカスタムアラートポリシーと条件を設定します。この方法では、集計状態に基づいてステージの稼働ステータスの変更をトリガーする特定の条件を定義できます。ステージのKPIが閾値を超えたことに基づいて、ステージをクリティカル状態にしたい場合にこれを使用します。
ステージを削除するには、歯車アイコンをクリックし、Deleteを選択します。
レベルとステップの追加と設定
レベルを追加するには、ステージの下部にある+ Add a levelをクリックします。レベルは、ステージ内の位置に基づいて自動的に番号が付けられます。
レベルにステップを追加するには、レベル内の+アイコンをクリックします。ステップの名前を変更するには、ステップ名をクリックして直接入力します。
ステップを設定するには、ステップの...メニューをクリックし、Settingsを選択します。ステップの設定項目は以下のとおりです。
Step link (オプション):ダッシュボードやドキュメントなど、ステップに追加のコンテキストを提供するためのURLを追加します。
Status configuration:ステップの稼働ステータスの決定方法を選択します。
- Exclude step from level status:チェックを入れると、ステップは自身のヘルスを表示し続けますが、レベルのヘルスのロールアップには寄与しません。
- Rollup the worst status:ステップのヘルスは、すべてのシグナルの中で最も深刻なステータスを反映します。オプションでApply only whenを有効にして、ステータスの変更が有効になる前の閾値を設定します。
- Rollup the best status: ステップのヘルスは、いずれかのシグナルの最良のステータスを反映します。
- Included signals:ステップのステータス決定に含めるシグナルを選択します。デフォルトはすべてのシグナルです。クエリが存在する場合、クエリを介して定義されたシグナルは含まれません。
ステップにシグナルを追加するには、ステップ内の+ Add signalsをクリックします。これによりSelect signalsオーバーレイが開き、ステップのヘルスを決定するシグナルを参照して選択できます。
シグナルを手動で選択
探しているシグナルのタイプに応じてEntitiesまたはAlertsタブを使用し、名前でシグナルを参照または検索します。シグナルの横にあるチェックボックスをオンにして、ステップに追加します。シグナルを削除するには、テーブルでチェックを外すか、Selected signalsリストでシグナルの横にあるxをクリックします。
動的フィルターを使用
シグナルを1つずつ選択する代わりに、フィルターを使用してシグナルのセットを動的にターゲットにすることができます。動的フィルターは、フローが読み込まれるたびにスコープ内のシグナルを決定します。これは、シグナルのセットが時間の経過とともに変化する可能性がある場合に便利です。
動的フィルターを使用するには、目的のフィルター条件を適用してAdd this filterをクリックします。フィルター定義は、現在一致しているシグナルとともにSelected signalsリストに追加されます。
動的フィルターを削除するには、Selected signalsリストのフィルター定義の横にあるxをクリックします。
重要
動的フィルターは作成後に編集することはできません。フィルターを変更するには、フィルターを削除して再作成します。
また、動的フィルターはアラート条件(domain = 'AIOPS' AND type = 'CONDITION')をターゲットにすることはできません。ステップにアラート条件を含めるには、代わりに手動で選択してください。
ステップを削除するには、...メニューをクリックし、Deleteを選択します。レベルを削除するには、レベルの横にあるxアイコンをクリックします。
フローを保存して編集する
構築が完了したら、右上のSaveをクリックして変更を保存し、ドラフトモードを終了します。代わりに変更を破棄するには、Discard changesをクリックします。
保存したフローに戻るには、フロービューの右上にあるEditをクリックします。変更は、保存するまで下書きのままになります。
ドラフトモードでは、上記のステージの追加と設定およびレベルとステップの追加と設定で説明されているのと同じアクションを使用して、フローのステージ、レベル、ステップ、およびシグナルを更新できます。
大規模なフローを編集する際のノイズを管理するには、右上にあるCollapse allトグルを使用してすべてのシグナルを非表示にし、フロー構造のみを表示します。これにより、個々のシグナルに気を取られることなく、ステージ、レベル、ステップに集中しやすくなります。
準備ができたら、右上のSaveをクリックして変更を保存し、Flowビューに戻ります。
編集の競合を解決する
複数のユーザーが同時にフローを編集できます。編集している間に他のユーザーが保存した場合、保存しようとするとYou're editing an older versionダイアログが表示されます。保存したユーザーの名前が表示され、2つのオプションが提示されます:
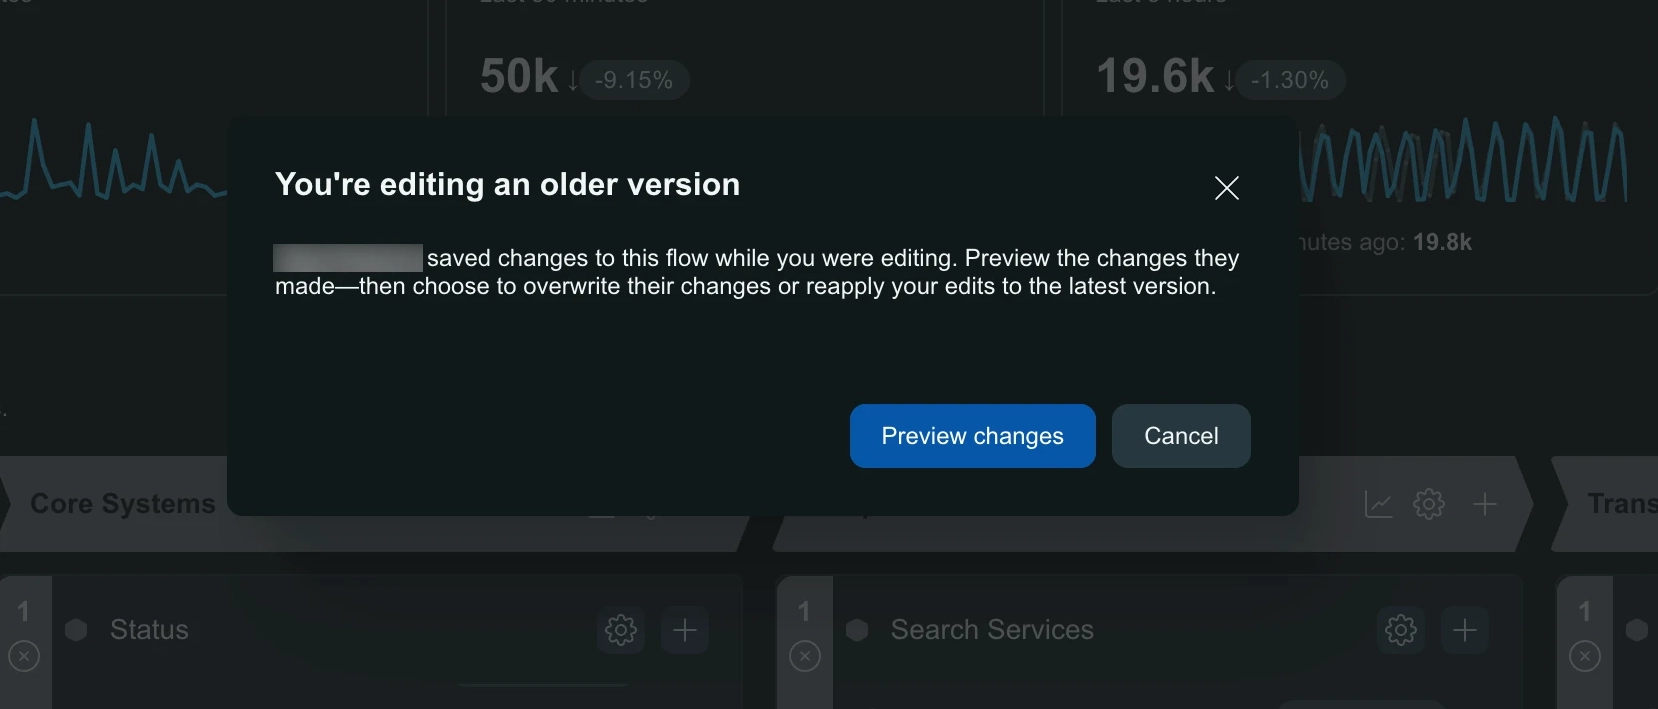
- Preview changes:バージョンが表示されるため、どのように進めるかを決定できます。
- Cancel:変更をそのままにして下書きモードに戻ります。
プレビューでは、バナーに次の3つの進め方が表示されます:
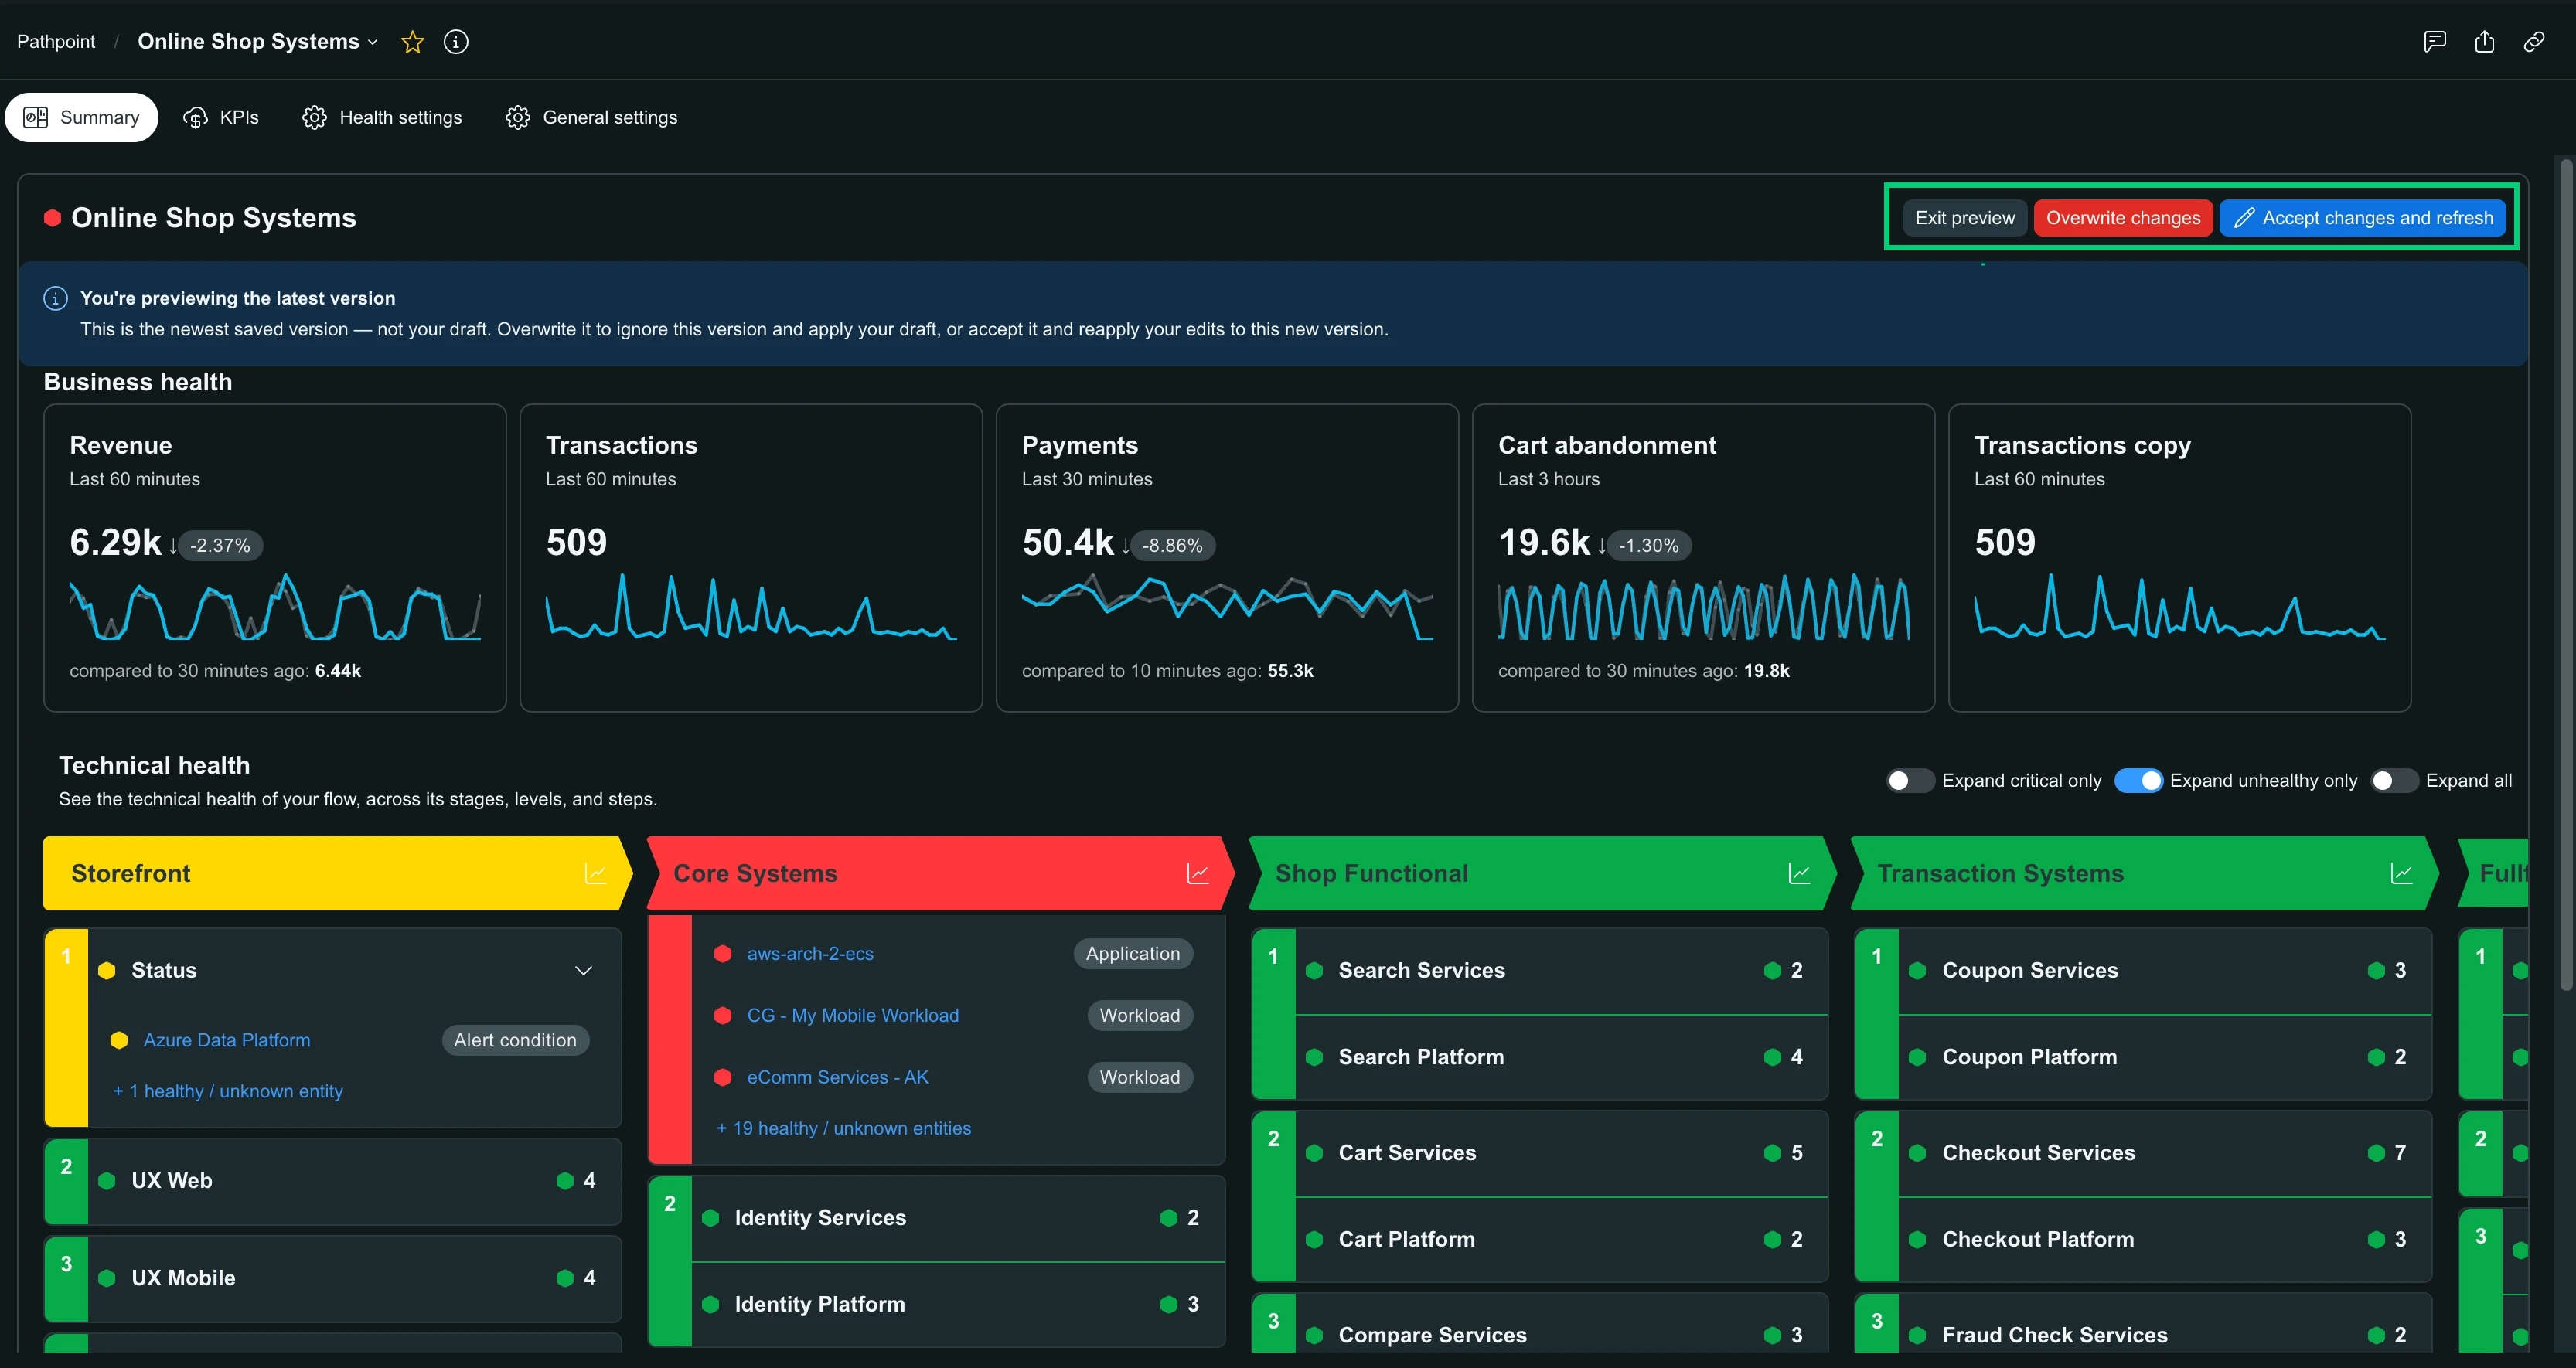
- Exit preview:変更をそのままにして下書きモードに戻ります。
- Overwrite changes:自分のバージョンを保存し、相手のバージョンを置き換えます。
- Accept changes and refresh:変更を破棄し、そのユーザーのバージョンを読み込みます。
ヒント
APIは、フローのversionフィールドを通じて同じチェックを適用します。フローの更新をご覧ください。
プログラミングによるフローの作成と管理
UIでフローを構築するだけでなく、コードとして作成および管理することもできます:
- NerdGraph:APIを通じてフローを作成、読み取り、更新、複製、削除します。NerdGraphチュートリアル:Pathpointフローの作成と管理を参照してください。
- Terraform:フローをインフラストラクチャ・アズ・コードとして管理することで、Pathpointのセットアップが他の設定とともにバージョン管理下に置かれます。
newrelic_pathpoint_flowリソースを参照してください。
すでに構築したフローのコードを取得するには、フローを開いて...メニューからView as codeを選択してください。これにより、フローのTerraformの設定と、それを作成、更新、読み取るNerdGraphのミューテーションおよびクエリが提供されます。View as codeをご覧ください。
フローの複製
フローを複製するには、Flowsページの任意の行にある...メニューをクリックし、Duplicateを選択します。
これにより、Duplicate a flowダイアログが開きます。保存する前に以下を更新できます:
- Flow name (必須): デフォルトでは、元の名前に"Copy"が追加されます。
- Select an account:複製を作成するアカウント。デフォルトは現在のアカウントであるため、これを使用してフローを別のアカウントにコピーします。
- Category:元のフローから継承されます。
- Description:元のフローから継承されます。
- Refresh data every:元のフローから継承されます。
複製するものを選択します:
- Add Structure (stages, levels, steps):シグナルやKPIを含まず、ステージ、レベル、ステップのみをコピーします。
- Everything (structure, signals, flow KPIs):シグナルやKPIとともに構造をコピーします。
重要
フローを別のアカウントに複製する場合、KPIはコピーされません。
Saveをクリックして複製を作成します。
フローの管理
General settingsタブでは、フローのコアプロパティの更新、チームとの連携の維持、およびフローの削除を行うことができます。
フロー設定の更新
Editをクリックして、以下のプロパティを更新します:
- Flow name:フローおよびFlowsページに表示される名前。
- Category:フローに関連付けられたビジネスカテゴリです。
- Description:フローの簡単な説明です。
- Refresh data every:フローがヘルスデータを更新する頻度です。
このタブには、誰がいつフローを作成したか、誰が最後に編集したかも表示されます。
連絡先
チームがこのフローに接続し続けられるように、メールまたはSlackチャンネルを追加します。連絡先を追加するには、Add contactをクリックします。
リンク
ランブック、リポジトリ、その他の関連ドキュメントを追加して、フローに追加のコンテキストを提供します。Add linksをクリックしてリンクを追加します。
フローを削除
フローを削除するには、一般設定の右下にあるDelete flowをクリックします。Flowsページの任意の行にある...メニューをクリックして、Delete flowを選択することもできます。
注意
フローの削除は永続的であり、元に戻すことはできません。
フローの計画
フローを構築する前に、設計を計画し、いくつかの例を確認して、どのシグナルを使用するかを検討すると役立ちます。
アクセス許可
Pathpointで実行できることは、次の3つの要素に依存します:ユーザー・タイプ、ロールによって付与される権限、およびアクセスできるアカウント。
ロールベースのアクセス制御
Pathpointには、権限リストのNew Relic Oneの下に独自の機能があります。アカウントをスコープとしているため、ユーザーのPathpointアクセスは、そのロールが対象とするアカウントに適用されます。
重要
以下のすべてのPathpoint権限を取得できるのは、フルプラットフォームユーザーのみです。基本ユーザーとコアユーザーは取得できないため、割り当てられたロールに関係なくアクセスは制限されたままになります。
Pathpoint機能には3つの権限があります。
許可 | へのアクセスを許可します |
|---|---|
Read | フローとその健全性データの表示 |
Modify | ステージ、レベル、ステップ、シグナル、KPIを含む、フローの作成と既存のフローの編集 |
Delete | フローの削除 |
これらの権限を付与するには、組織管理者がそれらをカスタムロールに追加し、そのロールをグループに割り当てます。ロールUIを見つけるには、one.newrelic.comに移動し、ユーザーメニューをクリックしてから、Administration > Access management > Rolesに移動します。