The license_key setting is required. Also, we highly recommend setting the app_name so that your app has a meaningful name instead of the default My Application.
Configuration methods and precedence
The primary method to configure the Node.js agent is the agent configuration file (newrelic.js). You can also configure most settings with environment variables. You can also adjust some settings with server-side configuration.
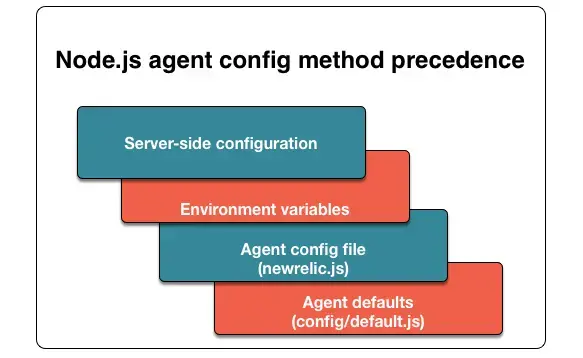
The Node.js agent uses this order of precedence for configuration methods:
Node.js configuration hierarchy: Server-side configuration settings override environment variables. Environment variables override the agent config file. The config file overrides the agent defaults.
Here are detailed descriptions of each configuration method:
The config file (newrelic.js) contains every Node.js agent setting. When you install the Node.js agent, you must copy newrelic.js into your app's root directory. Most settings are empty by default; they inherit their values from config/default.js.
If your application is running on CommonJS, simply change the configuration file type to (newrelic.cjs). This filetype is supported as of v7.5.0 of the Node.js agent.
All configuration settings in newrelic.js have equivalent environment variables. These are useful, for example, if your agent runs in a PaaS environment such as Heroku or Microsoft Azure. Node.js agent environment variables always start with NEW_RELIC_.
These environment variables are documented below under individual config options as the Environ variable. There are also two rarely used settings that can only be configured via environment variables. If you are unsure how to specify more complex types as environment variables, use the reference guide.
Owners and Admins can view and configure a few settings directly in New Relic. Where available, the UI labels for server-side config are listed in this document under individual config options as the Server-side label.
Exports variables
This section defines the Node.js agent variables in the order they typically appear in the exports.config = { section of your app's newrelic.js configuration file.
Data for all applications with the same name will be merged in the New Relic UI, so set this carefully. We highly recommend that you replace the default name with a descriptive name to avoid confusion and unintended aggregation of data.
Tip
For Azure users, the Node.js agent will use APP_POOL_ID if it is set, so you can use the name you chose for your Azure Web Server without setting it twice.
Set to false to stop the agent from starting up. This is useful when debugging your code requires temporarily disabling the agent. It prevents the agent from bootstrapping its instrumentation or setting up all its pieces, which prevents the agent from starting up and connecting to New Relic's servers.
If true, enables capture of all HTTP headers, except for those filtered by exclude rules. If false, collected headers are limited to those defined in Node.js agent attributes.
Any header-related include/exclude rules must be in camelCase form to be filtered.
If the data compression threshold is reached in the payload, the agent compresses data, using gzip compression by default. The config option compressed_content_encoding can be set to deflate to use deflate compression.
Additional certificates to trust for SSL connections, specified as an array of strings in PEM format. This affects both connections to an HTTPS proxy and connections to New Relic.
Tip
You can also configure the agent to read its certificates from a file:
A URL specifying the proxy server to connect to the Internet. For example, proxy: 'http://user:pass@10.0.0.1:8000/'. Important considerations:
The proxy config file setting overrides the other config file proxy settings (proxy_host, proxy_port, proxy_user, proxy_pass) if used. Similarly, the NEW_RELIC_PROXY_URL environment variable overrides the other environment variable proxy settings (NEW_RELIC_PROXY_HOST, NEW_RELIC_PROXY_PORT, NEW_RELIC_PROXY_USER, and NEW_RELIC_PROXY_PASS) if used.