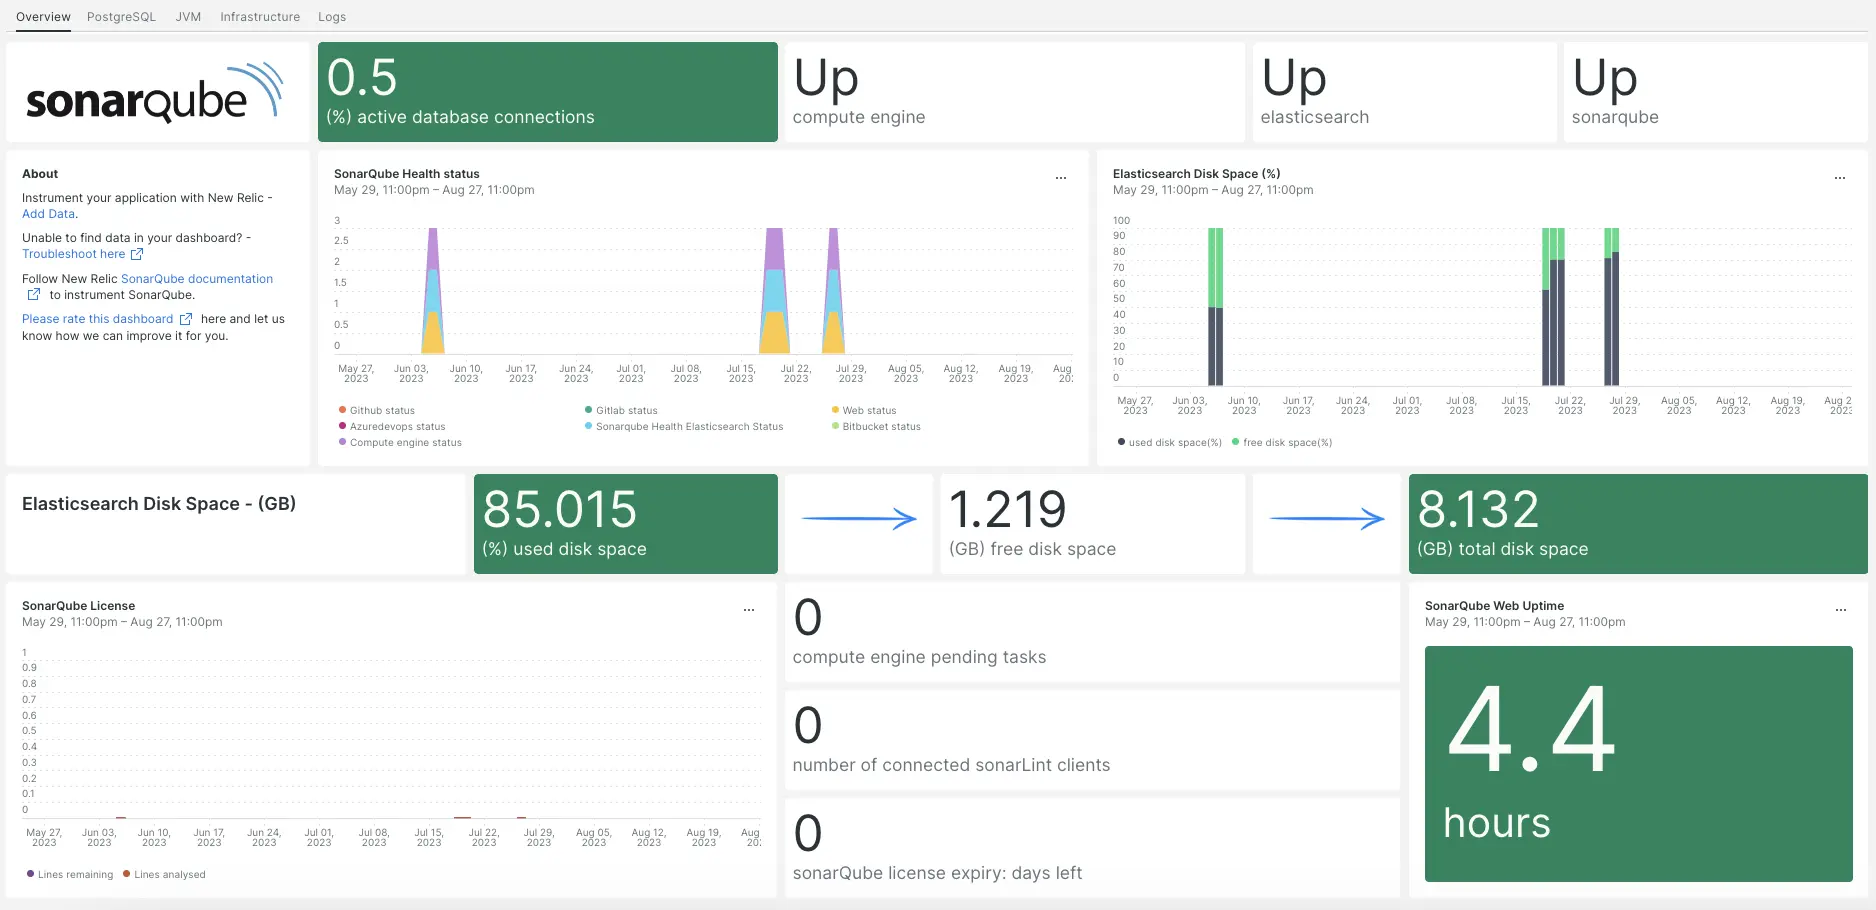
Nossa integração SonarQube monitora o desempenho do seu aplicativo SonarQube, ajudando você a diagnosticar e otimizar o código. Nossa integração SonarQube faz uso de nosso agente de infraestrutura, integração PosgreSQL, NRI-Prometheus e NRI-JMX e fornece um dashboard pré-construído com suas métricas SonarQube mais importantes.

Depois de configurar a nossa integração SonarQube, fornecemos-lhe um dashboard para a sua métrica SonarQube.
Instalar o agente de infraestrutura
Para usar a integração do SonarQube, primeiro é necessário instalar o agente de infraestrutura no mesmo host. Toda a nossa integração no host requer o agente de infraestrutura, que ajuda a expor e reportar métricas para New Relic.
Instale a integração PostgreSQL
Para usar a integração SonarQube, você precisa primeiro instalar nossa integração PostgreSQL.
Confira nossos requisitos de integração do PostgreSQL em nossa documentação antes de instalar a integração. Confirme sua compatibilidade e retorne a este documento.
Abra a página de início rápido do PostgreSQL PostgreSQL início instalação rápida.
Clique em
Install now
para iniciar a instalação de início rápido do PostgreSQL.
Configurar NRI-Prometheus
Execute o seguinte comando para criar um arquivo de configuração NRI-Prometheus:
bash$touch /etc/newrelic-infra/integrations.d/nri-prometheus-config.ymlCole o seguinte trecho no novo arquivo de configuração. Certifique-se de atualizar
cluster_nameeurlscom seus campos relevantes:integrations:- name: nri-prometheusconfig:# When standalone is set to false nri-prometheus requires an infrastructure agent to work and send data. Defaults to truestandalone: false# When running with infrastructure agent emitters will have to include infra-sdkemitters: infra-sdk# The name of your cluster. It's important to match other New Relic products to relate the data.cluster_name: "YOUR_CLUSTER_NAME"targets:- description: Sonarqube metrics listurls: ["http://user_name:password@YOUR_HOST_IP:9000/api/monitoring/metrics"]# tls_config:# ca_file_path: "/etc/etcd/etcd-client-ca.crt"# cert_file_path: "/etc/etcd/etcd-client.crt"# key_file_path: "/etc/etcd/etcd-client.key"# Whether the integration should run in verbose mode or not. Defaults to falseverbose: false# Whether the integration should run in audit mode or not. Defaults to false.# Audit mode logs the uncompressed data sent to New Relic. Use this to log all data sent.# It does not include verbose mode. This can lead to a high log volume, use with careaudit: false# The HTTP client timeout when fetching data from endpoints. Defaults to 30s.# scrape_timeout: "30s"# Length in time to distribute the scraping from the endpointsscrape_duration: "5s"# Number of worker threads used for scraping targets.# For large clusters with many (>400) endpoints, slowly increase until scrape# time falls between the desired `scrape_duration`.# Increasing this value too much will result in huge memory consumption if too# many metrics are being scraped.# Default: 4# worker_threads: 4# Whether the integration should skip TLS verification or not. Defaults to falseinsecure_skip_verify: truetimeout: 10s
Instalar e configurar a integração JMX
Para usar a integração SonarQube, você também precisa instalar nossa integração de monitoramento JMX. A integração JMX coleta dados do SonarQube, que posteriormente transformaremos em painel e dados consultáveis.
Adicione o seguinte trecho de código a
/opt/sonarqube/conf/sonar.properties:# SonarQube Web Server JMX configuration.sonar.web.javaOpts=-Dcom.sun.management.jmxremote \-Dcom.sun.management.jmxremote.port=9010 \-Dcom.sun.management.jmxremote.authenticate=false \-Dcom.sun.management.jmxremote.ssl=false# SonarQube Compute Engine JMX configuration.sonar.ce.javaOpts=-Dcom.sun.management.jmxremote \-Dcom.sun.management.jmxremote.port=9011 \-Dcom.sun.management.jmxremote.authenticate=false \-Dcom.sun.management.jmxremote.ssl=falseAdicione o seguinte trecho de código a
/etc/newrelic-infra/integrations.d/jvm-sonarqube-web-metrics.yml/:collect:- domain: SonarQubeevent_type: JVMSampleSonarQubeWebMetricsbeans:- query: name=AsyncExecutionattributes:- QueueSize- WorkerCount- LargestWorkerCount- query: name=Databaseattributes:- MigrationStatus- PoolActiveConnections- PoolMaxActiveConnections- PoolIdleConnections- PoolMaxIdleConnections- PoolMinIdleConnections- PoolInitialSize- PoolMaxWaitMillis- PoolRemoveAbandoned- PoolRemoveAbandonedTimeoutSeconds- query: name=SonarQubeattributes:- Version- ServerId- LogLevelAdicione o seguinte trecho de código a
/etc/newrelic-infra/integrations.d/jvm-sonarqube-compute-engine-metrics.yml:collect:- domain: SonarQubeevent_type: JVMSampleSonarQubeComputeEngineMetricsbeans:- query: name=ComputeEngineDatabaseConnectionattributes:- PoolInitialSize- PoolActiveConnections- PoolMaxActiveConnections- PoolIdleConnections- PoolMaxIdleConnections- PoolMinIdleConnections- PoolMaxWaitMillis- PoolRemoveAbandoned- PoolRemoveAbandonedTimeoutSeconds- query: name=ComputeEngineTasksattributes:- PendingCount- LongestTimePending- InProgressCount- ErrorCount- SuccessCount- ProcessingTime- WorkerMaxCount- WorkerCount- WorkerUuids- EnabledWorkerUuidsAdicione o seguinte trecho de código a
/etc/newrelic-infra/integrations.d/jmx-sonarqube-compute-engine-config.yml:integrations:- name: nri-jmxenv:COLLECTION_FILES: /etc/newrelic-infra/integrations.d/jvm-sonarqube-compute-engine-metrics.ymlJMX_HOST: <YOUR_HOST>JMX_PASS: adminJMX_PORT: 9010JMX_USER: adminCONNECTION_URL: service:jmx:rmi://<YOUR_IP>:9010/jndi/rmi://<YOUR_IP>:9010/jmxrmiREMOTE_MONITORING: "true"interval: 15slabels:env: stagingAdicione o seguinte trecho de código a
/etc/newrelic-infra/integrations.d/jmx-sonarqube-web-config.yml:integrations:- name: nri-jmxenv:COLLECTION_FILES: /etc/newrelic-infra/integrations.d/jvm-sonarqube-web-metrics.ymlJMX_HOST: <YOUR_HOST>JMX_PASS: adminJMX_PORT: 9011JMX_USER: adminCONNECTION_URL: service:jmx:rmi://<YOUR_IP>:9011/jndi/rmi://<YOUR_IP>:9011/jmxrmiREMOTE_MONITORING: "true"interval: 15slabels:env: staging
Encaminhar log do SonarQube para New Relic
Siga estas etapas para encaminhar o log do SonarQube para New Relic:
Crie um arquivo de log denominado
logging.ymlno seguinte caminho:bash$cd /etc/newrelic-infra/logging.dAdicione o seguinte script ao arquivo
logging.yml:logs:- name: sonar_logsfile: /opt/sonarqube/logs/sonar.logattributes:logtype: sonar_logs- name: ce_logsfile: /opt/sonarqube/logs/ce.logattributes:logtype: sonar_ce_logs- name: es_logsfile: /opt/sonarqube/logs/es.logattributes:logtype: sonar_es_logs- name: web_logsfile: /opt/sonarqube/logs/web.logattributes:logtype: sonar_web_logs
Reinicie o agente do New Relic Infrastructure
Reinicie seu agente de infraestrutura:
$sudo systemctl restart newrelic-infra.serviceEm alguns minutos, seu aplicativo enviará métricas para one.newrelic.com.
Encontre seus dados
Você pode escolher nosso modelo dashboard pré-construído chamado SonarQube para monitor seu aplicativo métrico SonarQube. Siga estas etapas para usar nosso modelo dashboard pré-construído:
De one.newrelic.com, vá para a página
+ Integrations & Agents
.
Clique em
Dashboards
.
Na barra de pesquisa, digite
sonarqube.O dashboard do SonarQube deve aparecer. Clique nele para instalá-lo.
Seu dashboard do SonarQube é considerado um painel personalizado e pode ser encontrado na interface Dashboards. Para obter documentos sobre como usar e editar o painel, consulte nossos documentos dashboard .
Aqui estão alguns exemplos de consulta NRQL para dados Postfix:
Qual é o próximo?
Para saber mais sobre como construir uma consulta NRQL e gerar um painel, confira estes documentos:
- Introdução ao criador de consulta para criação de consultas básicas e avançadas.
- Introdução aos dashboards para personalizar seu dashboard e realizar diversas ações.
- Gerencie seu dashboard para ajustar o modo de exibição dos painéis ou para adicionar mais conteúdo ao seu dashboard.