Monitor your Java app

New Relic supports the most popular Java app servers, frameworks, virtual machines, and tools. Once installed, the APM agent monitors your app's performance and gives you insight into that performance. You can use this doc to get started manually, or you can install the Java agent through the New Relic UI.
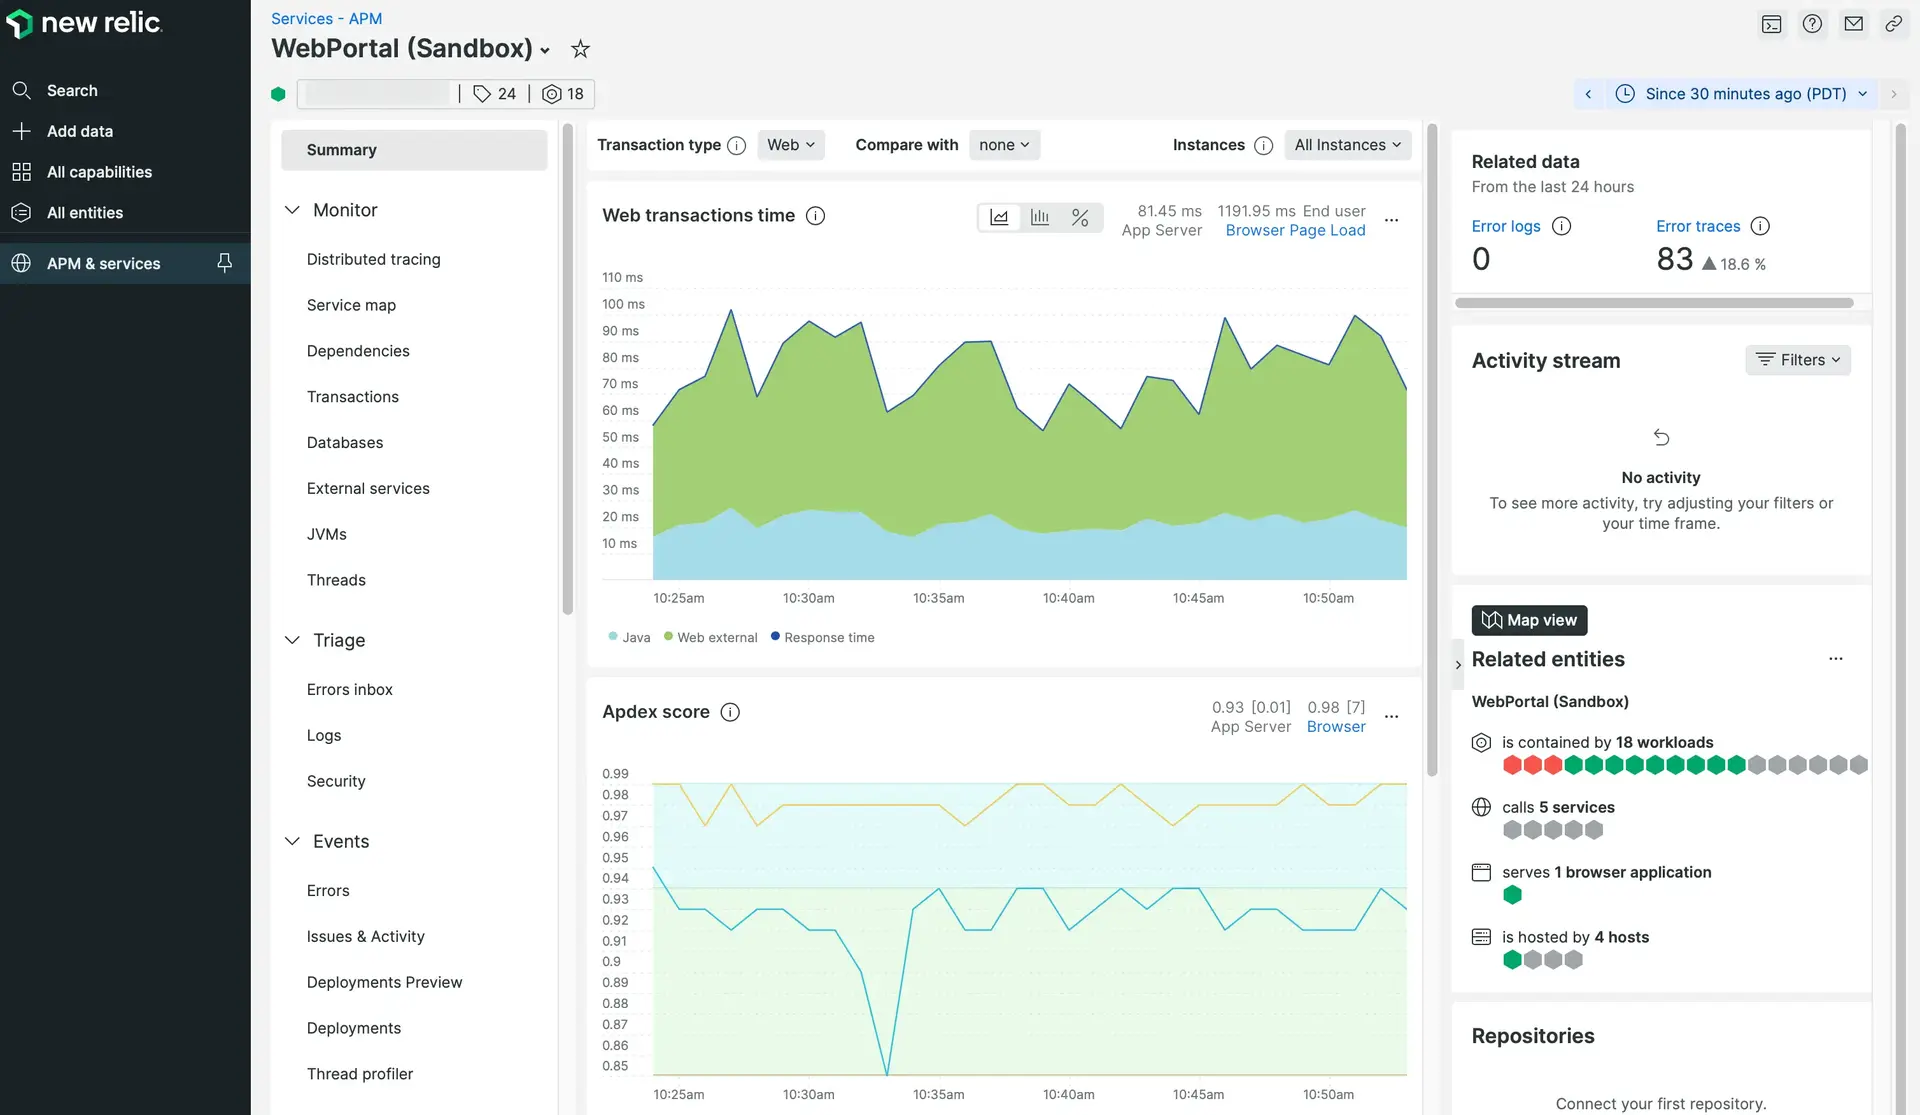
A screenshot of example Java APM dashboards

To get the most out of this page, select your app deployment and framework. You need a New Relic account to finish the installation process. Want more context? See our intro to APM, or learn how to solve your app's performance issues with our My app is slow tutorial.

Tip

Is your application running on a Kubernetes cluster? Try out our installation method using the Kubernetes APM auto-attach.

Tell us about your Java app

Where is your app deployed?

Choose your download option

Download the Java APM agent with this curl command and then unzip it.

bash
$
curl -O https://download.newrelic.com/newrelic/java-agent/newrelic-agent/current/newrelic-java.zip

Download the Java APM agent with this curl command and then unzip it.

Invoke-WebRequest -Uri https://download.newrelic.com/newrelic/java-agent/newrelic-agent/current/newrelic-java.zip -OutFile newrelic-java.zip

From Java agent release notes, download newrelic-java.zip to a temporary directory and unzip it.

Get your license key

In order to finish installing the APM agent, you need a valid New Relic license key.

Go to the API keys page in the UI and click Create a key, and then create an ingest-license key type. Alternately, if you have an existing license key, click ..., then click Copy key.

If you don't already have a New Relic account, sign up to get your license key. It's free, forever!

If you'd like to read more about how we use APIs and API keys, see New Relic API keys.

Set your app name and license key

Set your app name and license key. Then download your custom config file.

When using the config file, we recommend you change the default newrelic.yml permissions to read/write only for the owner of the application server process.

See our docs for more advanced config options.

...
1
# This file configures the New Relic agent. New Relic monitors
2
# Java applications with deep visibility and low overhead. For more details and additional
3
# configuration options visit https://docs.newrelic.com/docs/agents/java-agent/configuration/java-agent-configuration-config-file.
4
#
5
# <%= generated_for_user %>
6
#
7
# This section is for settings common to all environments.
8
# Do not add anything above this next line.
9
common: &default_settings
10
11
# ============================== APP NAME ===============================
12
# Set the name of your application as you'd like it to show up in the New Relic UI.
13
# If enable_auto_app_naming is false, the agent reports all data to this application.
14
# Otherwise, the agent reports only background tasks (transactions for non-web applications)
15
# to this application. To report data to more than one application
16
# (useful for rollup reporting), separate the application names with ";".
17
# For example, to report data to "My Application" and "My Application 2" use this:
18
# app_name: My Application;My Application 2
19
# This setting is required. Up to 3 different application names can be specified.
20
# The first application name must be unique.
21
app_name: My app name
22
23
# ============================== LICENSE KEY ===============================
24
# You must specify the license key associated with your New Relic
25
# account. For example, if your license key is 12345 use this:
26
# license_key: '12345'
27
# The key binds your agent's data to your account in the New Relic UI.
28
license_key: 12345
29
30
# Agent enabled
31
# Use this setting to disable the agent instead of removing it from the startup command.
32
# Default is true.
33
agent_enabled: true
34
35
# To enable high security, set this property to true. When in high
36
# security mode, the agent will use SSL and obfuscated SQL. Additionally,
37
# request parameters and message parameters will not be sent to New Relic.
38
high_security: false
39
40
# Set to true to enable support for auto app naming.
41
# The name of each web app is detected automatically
42
# and the agent reports data separately for each one.
43
# This provides a finer-grained performance breakdown for
44
# web apps in New Relic.
45
# Default is false.
46
enable_auto_app_naming: false
47
48
# Set to true to enable component-based transaction naming.
49
# Set to false to use the URI of a web request as the name of the transaction.
50
# Default is true.
51
enable_auto_transaction_naming: true
52
53
# The agent uses its own log file to keep its logging
54
# separate from that of your application. Specify the log level here.
55
# This setting is dynamic, so changes do not require restarting your application.
56
# The levels in increasing order of verboseness are:
57
# off, severe, warning, info, fine, finer, finest
58
# Default is info.
59
log_level: info
60
61
# Log all data sent to and from New Relic in plain text.
62
# This setting is dynamic, so changes do not require restarting your application.
63
# Default is false.
64
audit_mode: false
65
66
# The number of backup log files to save.
67
# Default is 1.
68
log_file_count: 1
69
70
# The maximum number of kbytes to write to any one log file.
71
# The log_file_count must be set greater than 1.
72
# Default is 0 (no limit).
73
log_limit_in_kbytes: 0
74
75
# Override other log rolling configuration and roll the logs daily.
76
# Default is false.
77
log_daily: false
78
79
# The name of the log file.
80
# Default is newrelic_agent.log.
81
log_file_name: newrelic_agent.log
82
83
# The log file directory.
84
# Default is the logs directory in the newrelic.jar parent directory.
85
#log_file_path:
86
87
# Provides the ability to forward application logs to New Relic, generate log usage metrics,
88
# and decorate local application log files with agent metadata for use with third party log forwarders.
89
# The application_logging.forwarding and application_logging.local_decorating should not be used together.
90
application_logging:
91
92
# Provides control over all the application logging features for forwarding, local log
93
# decorating, and metrics features. Set as false to disable all application logging features.
94
# Default is true.
95
enabled: true
96
97
# The agent will automatically forward application logs to New Relic in
98
# a format that includes agent metadata for linking them to traces and errors.
99
forwarding:
100
101
# When true, application logs will be forwarded to New Relic. The default is true.
102
enabled: true
103
104
# Application log events are collected up to the configured amount. Afterwards,
105
# events are sampled to maintain an even distribution across the harvest cycle.
106
# Default is 10000. Setting to 0 will disable.
107
#max_samples_stored: 10000
108
109
# The agent will generate metrics to indicate the number of
110
# application log events occurring at each distinct log level.
111
metrics:
112
113
# When true, application log metrics will be reported. The default is true.
114
enabled: true
115
116
# The agent will add linking metadata to each log line in your application log files.
117
# This feature should only be used if you want to use a third party log forwarder, instead
118
# of the agent's built-in forwarding feature, to send your application log events to New Relic.
119
#local_decorating:
120
121
# When true, the agent will decorate your application log files with linking metadata. The default is false.
122
#enabled: false
123
124
# Proxy settings for connecting to the New Relic server:
125
# If a proxy is used, the host setting is required. Other settings
126
# are optional. Default port is 8080. The username and password
127
# settings will be used to authenticate to Basic Auth challenges
128
# from a proxy server. Proxy scheme will allow the agent to
129
# connect through proxies using the HTTPS scheme.
130
#proxy_host: hostname
131
#proxy_port: 8080
132
#proxy_user: username
133
#proxy_password: password
134
#proxy_scheme: https
135
136
# Limits the number of lines to capture for each stack trace.
137
# Default is 30
138
max_stack_trace_lines: 30
139
140
# Provides the ability to configure the attributes sent to New Relic. These
141
# attributes can be found in transaction traces, traced errors,
142
# transaction events, and page views.
143
attributes:
144
145
# When true, attributes will be sent to New Relic. The default is true.
146
enabled: true
147
148
#A comma separated list of attribute keys whose values should
149
# be sent to New Relic.
150
#include:
151
152
# A comma separated list of attribute keys whose values should
153
# not be sent to New Relic.
154
#exclude:
155
156
# Transaction tracer captures deep information about slow
157
# transactions and sends this to the New Relic service once a
158
# minute. Included in the transaction is the exact call sequence of
159
# the transactions including any SQL statements issued.
160
transaction_tracer:
161
162
# Transaction tracer is enabled by default. Set this to false to turn it off.
163
# This feature is not available to Lite accounts and is automatically disabled.
164
# Default is true.
165
enabled: true
166
167
# Threshold in seconds for when to collect a transaction
168
# trace. When the response time of a controller action exceeds
169
# this threshold, a transaction trace will be recorded and sent to
170
# New Relic. Valid values are any float value, or (default) "apdex_f",
171
# which will use the threshold for the "Frustrated" Apdex level
172
# (greater than four times the apdex_t value).
173
# Default is apdex_f.
174
transaction_threshold: apdex_f
175
176
# When transaction tracer is on, SQL statements can optionally be
177
# recorded. The recorder has three modes, "off" which sends no
178
# SQL, "raw" which sends the SQL statement in its original form,
179
# and "obfuscated", which strips out numeric and string literals.
180
# Default is obfuscated.
181
record_sql: obfuscated
182
183
# Set this to true to log SQL statements instead of recording them.
184
# SQL is logged using the record_sql mode.
185
# Default is false.
186
log_sql: false
187
188
# Threshold in seconds for when to collect stack trace for a SQL
189
# call. In other words, when SQL statements exceed this threshold,
190
# then capture and send to New Relic the current stack trace. This is
191
# helpful for pinpointing where long SQL calls originate from.
192
# Default is 0.5 seconds.
193
stack_trace_threshold: 0.5
194
195
# Determines whether the agent will capture query plans for slow
196
# SQL queries. Only supported for MySQL and PostgreSQL.
197
# Default is true.
198
explain_enabled: true
199
200
# Threshold for query execution time below which query plans will
201
# not be captured. Relevant only when `explain_enabled` is true.
202
# Default is 0.5 seconds.
203
explain_threshold: 0.5
204
205
# Use this setting to control the variety of transaction traces.
206
# The higher the setting, the greater the variety.
207
# Set this to 0 to always report the slowest transaction trace.
208
# Default is 20.
209
top_n: 20
210
211
# Error collector captures information about uncaught exceptions and
212
# sends them to New Relic for viewing.
213
error_collector:
214
215
# This property enables the collection of errors. If the property is not
216
# set or the property is set to false, then errors will not be collected.
217
# Default is true.
218
enabled: true
219
220
# Use this property to exclude specific exceptions from being reported as errors
221
# by providing a comma separated list of full class names.
222
# The default is to exclude akka.actor.ActorKilledException. If you want to override
223
# this, you must provide any new value as an empty list is ignored.
224
ignore_errors: akka.actor.ActorKilledException
225
226
# Use this property to exclude specific http status codes from being reported as errors
227
# by providing a comma separated list of status codes.
228
# The default is to exclude 404s. If you want to override
229
# this, you must provide any new value because an empty list is ignored.
230
ignore_status_codes: 404
231
232
# Transaction events are used for histograms and percentiles. Non-aggregated data is collected
233
# for each web transaction and sent to the server on harvest.
234
transaction_events:
235
236
# Set to false to disable transaction events.
237
# Default is true.
238
enabled: true
239
240
# Events are collected up to the configured amount. Afterwards, events are sampled to
241
# maintain an even distribution across the harvest cycle.
242
# Default is 2000. Setting to 0 will disable.
243
max_samples_stored: 2000
244
245
# Distributed tracing lets you see the path that a request takes through your distributed system.
246
# This replaces the legacy Cross Application Tracing feature.
247
distributed_tracing:
248
249
# Set to false to disable distributed tracing.
250
# Default is true.
251
enabled: true
252
253
# Agent versions 5.10.0+ utilize both the newrelic header and W3C Trace Context headers for distributed tracing.
254
# The newrelic distributed tracing header allows interoperability with older agents that don't support W3C Trace Context headers.
255
# Agent versions that support W3C Trace Context headers will prioritize them over newrelic headers for distributed tracing.
256
# If you do not want to utilize the newrelic header, setting this to true will result in the agent excluding the newrelic header
257
# and only using W3C Trace Context headers for distributed tracing.
258
# Default is false.
259
exclude_newrelic_header: false
260
261
# New Relic's distributed tracing UI uses Span events to display traces across different services.
262
# Span events capture attributes that describe execution context and provide linking metadata.
263
# Span events require distributed tracing to be enabled.
264
span_events:
265
266
# Set to false to disable Span events.
267
# Default is true.
268
enabled: true
269
270
# Determines the number of Span events that can be captured during an agent harvest cycle.
271
# Increasing the number of Span events can lead to additional agent overhead. A maximum value may be imposed server side by New Relic.
272
# Default is 2000
273
max_samples_stored: 2000
274
275
# Provides the ability to filter the attributes attached to Span events.
276
# Custom attributes can be added to Span events using the NewRelic.getAgent().getTracedMethod().addCustomAttribute(...) API.
277
attributes:
278
279
# When true, attributes will be sent to New Relic. The default is true.
280
enabled: true
281
282
# A comma separated list of attribute keys whose values should be sent to New Relic.
283
#include:
284
285
# A comma separated list of attribute keys whose values should not be sent to New Relic.
286
#exclude:
287
288
# Cross Application Tracing adds request and response headers to
289
# external calls using supported HTTP libraries to provide better
290
# performance data when calling applications monitored by other New Relic agents.
291
#
292
# Distributed tracing is replacing cross application tracing as the default
293
# means of tracing between services. To continue using cross application
294
# tracing, enable it with `cross_application_tracer.enabled = true` and
295
# `distributed_tracing.enabled = false`
296
cross_application_tracer:
297
298
# Set to false to disable cross-application tracing.
299
# Default is true.
300
enabled: true
301
302
303
# Thread profiler measures wall clock time, CPU time, and method call counts
304
# in your application's threads as they run.
305
# This feature is not available to Lite accounts and is automatically disabled.
306
thread_profiler:
307
308
# Set to false to disable the thread profiler.
309
# Default is true.
310
enabled: true
311
312
# New Relic Real User Monitoring (RUM) gives you insight into the performance real users are
313
# experiencing with your website. This is accomplished by measuring the time it takes for
314
# your users' browsers to download and render your web pages by injecting a small amount
315
# of JavaScript code into the header and footer of each page.
316
browser_monitoring:
317
318
# By default the agent automatically inserts API calls in compiled JSPs to
319
# inject the monitoring JavaScript into web pages. Not all rendering engines are supported.
320
# See https://docs.newrelic.com/docs/agents/java-agent/instrumentation/new-relic-browser-java-agent#manual_instrumentation
321
# for instructions to add these manually to your pages.
322
# Set this attribute to false to turn off this behavior.
323
auto_instrument: true
324
325
# Class transformer can be used to disable all agent instrumentation or specific instrumentation modules.
326
# All instrumentation modules can be found here: https://github.com/newrelic/newrelic-java-agent/tree/main/instrumentation
327
class_transformer:
328
329
# This instrumentation reports the name of the user principal returned from
330
# HttpServletRequest.getUserPrincipal() when servlets and filters are invoked.
331
com.newrelic.instrumentation.servlet-user:
332
enabled: false
333
334
com.newrelic.instrumentation.spring-aop-2:
335
enabled: false
336
337
# This instrumentation reports metrics for resultset operations.
338
com.newrelic.instrumentation.jdbc-resultset:
339
enabled: false
340
341
# Classes loaded by classloaders in this list will not be instrumented.
342
# This is a useful optimization for runtimes which use classloaders to
343
# load dynamic classes which the agent would not instrument.
344
classloader_excludes:
345
groovy.lang.GroovyClassLoader$InnerLoader,
346
org.codehaus.groovy.runtime.callsite.CallSiteClassLoader,
347
com.collaxa.cube.engine.deployment.BPELClassLoader,
348
org.springframework.data.convert.ClassGeneratingEntityInstantiator$ObjectInstantiatorClassGenerator,
349
org.mvel2.optimizers.impl.asm.ASMAccessorOptimizer$ContextClassLoader,
350
gw.internal.gosu.compiler.SingleServingGosuClassLoader,
351
352
# Real-time profiling using Java Flight Recorder (JFR).
353
# This feature reports dimensional metrics to the ingest endpoint configured by
354
# metric_ingest_uri and events to the ingest endpoint configured by event_ingest_uri.
355
# Both ingest endpoints default to US production but they will be automatically set to EU
356
# production when using an EU license key. Other ingest endpoints can be configured manually.
357
# Requires a JVM that provides the JFR library.
358
jfr:
359
360
# Set to true to enable Real-time profiling with JFR.
361
# Default is false.
362
enabled: false
363
364
# Set to true to enable audit logging which will display all JFR metrics and events in each harvest batch.
365
# Audit logging is extremely verbose and should only be used for troubleshooting purposes.
366
# Default is false.
367
audit_logging: false
368
369
# User-configurable custom labels for this agent. Labels are name-value pairs.
370
# There is a maximum of 64 labels per agent. Names and values are limited to 255 characters.
371
# Names and values may not contain colons (:) or semicolons (;).
372
labels:
373
374
# An example label
375
#label_name: label_value
376
377
378
# Application Environments
379
# ------------------------------------------
380
# Environment specific settings are in this section.
381
# You can use the environment to override the default settings.
382
# For example, to change the app_name setting.
383
# Use -Dnewrelic.environment=<environment> on the Java startup command line
384
# to set the environment.
385
# The default environment is production.
386
387
# NOTE if your application has other named environments, you should
388
# provide configuration settings for these environments here.
389
390
development:
391
<<: *default_settings
392
app_name: My Application (Development)
393
394
test:
395
<<: *default_settings
396
app_name: My Application (Test)
397
398
production:
399
<<: *default_settings
400
401
staging:
402
<<: *default_settings
403
app_name: My Application (Staging)

Create your New Relic directory

In your app’s directory structure, create a new directory for the New Relic files you downloaded. We recommend putting your files into /opt/newrelic.

If you put them elsewhere, make sure the New Relic .jar files, aren’t on the classpath or in directories listed in java.endorsed.dirs.

Move your New Relic files to their directory

Move the files you downloaded (including your custom config file) into your New Relic directory.

Finish your installation

If you haven’t done so, select the framework your Java app is using.

You're all done!

Look for your app name on the APM Summary page (it can take a few minutes).

(Stretch your legs. It can take a few minutes.)

Did this doc help with your installation?

What's next?


Now that you've installed the Java agent, learn how to solve performance issues with our tutorial series.

See your app data in the UI.

Look for your app name on the APM Summary page (it can take a few minutes).

Read the documentation about APM.

For example, read about the Summary page, the JVM metrics page, and the Transactions page.

Still not seeing data?

Use our diagnostics tool to help you troubleshoot.