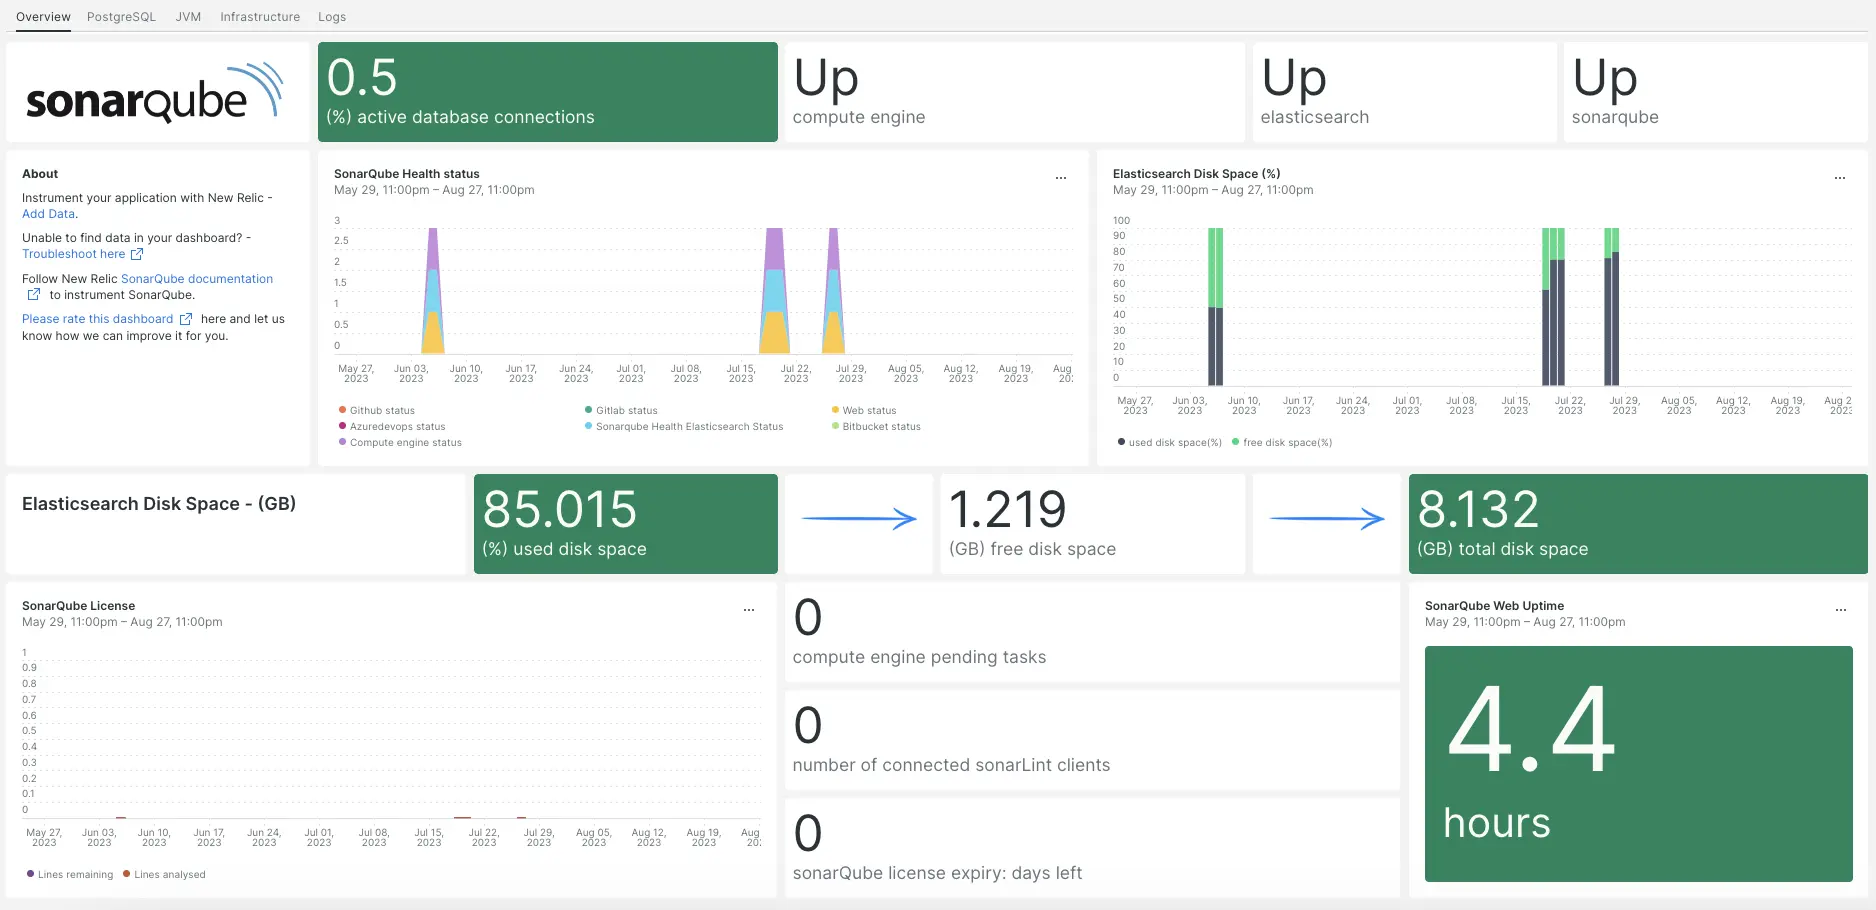
Nuestra integración SonarQube monitorea el rendimiento de tu aplicación SonarQube, ayudándote a diagnosticar y optimizar el código. Nuestra integración SonarQube hace uso de nuestro agente de infraestructura, integración PosgreSQL, NRI-Prometheus y NRI-JMX y le brinda un dashboard prediseñado con su métrica SonarQube más importante.

Después de configurar nuestra integración SonarQube, te brindamos un dashboard para tu SonarQube métrica.
Instalar el agente de infraestructura
Para utilizar la integración de SonarQube, primero debe instalar el agente de infraestructura en el mismo host. Toda nuestra integración en el host requiere el agente de infraestructura, que ayuda a exponer e informar métricamente a New Relic.
Instalar la integración de PostgreSQL
Para utilizar la integración de SonarQube, primero debe instalar nuestra integración PostgreSQL.
Consulte nuestros requisitos de integración de PostgreSQL en nuestra documentación antes de instalar la integración. Confirme su compatibilidad y luego regrese a este documento.
Abra la página de inicio rápido de PostgreSQL Instalación rápida de inicio de PostgreSQL.
Haga clic en
Install now
para iniciar la instalación de inicio rápido de PostgreSQL.
Configurar NRI-Prometheus
Ejecute el siguiente comando para crear un archivo de configuración de NRI-Prometheus:
bash$touch /etc/newrelic-infra/integrations.d/nri-prometheus-config.ymlPegue el siguiente fragmento en el nuevo archivo de configuración. Asegúrese de actualizar
cluster_nameyurlscon sus campos relevantes:integrations:- name: nri-prometheusconfig:# When standalone is set to false nri-prometheus requires an infrastructure agent to work and send data. Defaults to truestandalone: false# When running with infrastructure agent emitters will have to include infra-sdkemitters: infra-sdk# The name of your cluster. It's important to match other New Relic products to relate the data.cluster_name: "YOUR_CLUSTER_NAME"targets:- description: Sonarqube metrics listurls: ["http://user_name:password@YOUR_HOST_IP:9000/api/monitoring/metrics"]# tls_config:# ca_file_path: "/etc/etcd/etcd-client-ca.crt"# cert_file_path: "/etc/etcd/etcd-client.crt"# key_file_path: "/etc/etcd/etcd-client.key"# Whether the integration should run in verbose mode or not. Defaults to falseverbose: false# Whether the integration should run in audit mode or not. Defaults to false.# Audit mode logs the uncompressed data sent to New Relic. Use this to log all data sent.# It does not include verbose mode. This can lead to a high log volume, use with careaudit: false# The HTTP client timeout when fetching data from endpoints. Defaults to 30s.# scrape_timeout: "30s"# Length in time to distribute the scraping from the endpointsscrape_duration: "5s"# Number of worker threads used for scraping targets.# For large clusters with many (>400) endpoints, slowly increase until scrape# time falls between the desired `scrape_duration`.# Increasing this value too much will result in huge memory consumption if too# many metrics are being scraped.# Default: 4# worker_threads: 4# Whether the integration should skip TLS verification or not. Defaults to falseinsecure_skip_verify: truetimeout: 10s
Instalar y configurar la integración JMX.
Para utilizar la integración de SonarQube, también debe instalar nuestra integración de monitoreo JMX. La integración JMX extrae los datos de SonarQube, que luego convertiremos en un panel y en datos consultables.
Agregue el siguiente fragmento de código a
/opt/sonarqube/conf/sonar.properties:# SonarQube Web Server JMX configuration.sonar.web.javaOpts=-Dcom.sun.management.jmxremote \-Dcom.sun.management.jmxremote.port=9010 \-Dcom.sun.management.jmxremote.authenticate=false \-Dcom.sun.management.jmxremote.ssl=false# SonarQube Compute Engine JMX configuration.sonar.ce.javaOpts=-Dcom.sun.management.jmxremote \-Dcom.sun.management.jmxremote.port=9011 \-Dcom.sun.management.jmxremote.authenticate=false \-Dcom.sun.management.jmxremote.ssl=falseAgregue el siguiente fragmento de código a
/etc/newrelic-infra/integrations.d/jvm-sonarqube-web-metrics.yml/:collect:- domain: SonarQubeevent_type: JVMSampleSonarQubeWebMetricsbeans:- query: name=AsyncExecutionattributes:- QueueSize- WorkerCount- LargestWorkerCount- query: name=Databaseattributes:- MigrationStatus- PoolActiveConnections- PoolMaxActiveConnections- PoolIdleConnections- PoolMaxIdleConnections- PoolMinIdleConnections- PoolInitialSize- PoolMaxWaitMillis- PoolRemoveAbandoned- PoolRemoveAbandonedTimeoutSeconds- query: name=SonarQubeattributes:- Version- ServerId- LogLevelAgregue el siguiente fragmento de código a
/etc/newrelic-infra/integrations.d/jvm-sonarqube-compute-engine-metrics.yml:collect:- domain: SonarQubeevent_type: JVMSampleSonarQubeComputeEngineMetricsbeans:- query: name=ComputeEngineDatabaseConnectionattributes:- PoolInitialSize- PoolActiveConnections- PoolMaxActiveConnections- PoolIdleConnections- PoolMaxIdleConnections- PoolMinIdleConnections- PoolMaxWaitMillis- PoolRemoveAbandoned- PoolRemoveAbandonedTimeoutSeconds- query: name=ComputeEngineTasksattributes:- PendingCount- LongestTimePending- InProgressCount- ErrorCount- SuccessCount- ProcessingTime- WorkerMaxCount- WorkerCount- WorkerUuids- EnabledWorkerUuidsAgregue el siguiente fragmento de código a
/etc/newrelic-infra/integrations.d/jmx-sonarqube-compute-engine-config.yml:integrations:- name: nri-jmxenv:COLLECTION_FILES: /etc/newrelic-infra/integrations.d/jmx-sonarqube-web-config.ymlJMX_HOST: <YOUR_HOST>JMX_PASS: adminJMX_PORT: 9010JMX_USER: adminCONNECTION_URL: service:jmx:rmi://<YOUR_IP>:9010/jndi/rmi://<YOUR_IP>:9010/jmxrmiREMOTE_MONITORING: "true"interval: 15slabels:env: stagingAgregue el siguiente fragmento de código a
/etc/newrelic-infra/integrations.d/jmx-sonarqube-web-config.yml:integrations:- name: nri-jmxenv:COLLECTION_FILES: /etc/newrelic-infra/integrations.d/jmx-sonarqube-compute-engine-config.ymlJMX_HOST: <YOUR_HOST>JMX_PASS: adminJMX_PORT: 9011JMX_USER: adminCONNECTION_URL: service:jmx:rmi://<YOUR_IP>:9011/jndi/rmi://<YOUR_IP>:9011/jmxrmiREMOTE_MONITORING: "true"interval: 15slabels:env: staging
Reenviar el registro de SonarQube a New Relic
Siga estos pasos para reenviar el registro de SonarQube a New Relic:
Cree un archivo de log denominado
logging.ymlen la siguiente ruta:bash$cd /etc/newrelic-infra/logging.dAgregue el siguiente script al archivo
logging.yml:logs:- name: sonar_logsfile: /opt/sonarqube/logs/sonar.logattributes:logtype: sonar_logs- name: ce_logsfile: /opt/sonarqube/logs/ce.logattributes:logtype: sonar_ce_logs- name: es_logsfile: /opt/sonarqube/logs/es.logattributes:logtype: sonar_es_logs- name: web_logsfile: /opt/sonarqube/logs/web.logattributes:logtype: sonar_web_logs
Reinicie el agente New Relic Infrastructure
Reinicie su agente de infraestructura:
$sudo systemctl restart newrelic-infra.serviceEn un par de minutos, tu aplicación enviará métrica a one.newrelic.com.
Encuentra tus datos
Puede elegir nuestra plantilla dashboard prediseñadas llamada SonarQube para monitor su aplicación métrica SonarQube. Siga estos pasos para utilizar nuestra plantilla dashboard prediseñadas:
Desde one.newrelic.com, vaya a la página
+ Add data
.
Haga clic en
Dashboards
.
En la barra de búsqueda, escriba
sonarqube.Debería aparecer el dashboard de SonarQube. Haga clic en él para instalarlo.
Su dashboard de SonarQube se considera un panel personalizado y se puede encontrar en la UI Dashboards. Para obtener documentos sobre el uso y edición del panel, consulte nuestros documentos dashboard .
Aquí hay algunos ejemplos de consulta NRQL para datos de Postfix:
¿Que sigue?
Para obtener más información sobre cómo crear una consulta NRQL y generar un panel, consulte estos documentos:
- Introducción al generador de consultas para crear consultas básicas y avanzadas.
- Introducción al panel para personalizar tu dashboard y realizar diferentes acciones.
- Administre su dashboard para ajustar el modo de visualización de su panel o para agregar más contenido a su dashboard.