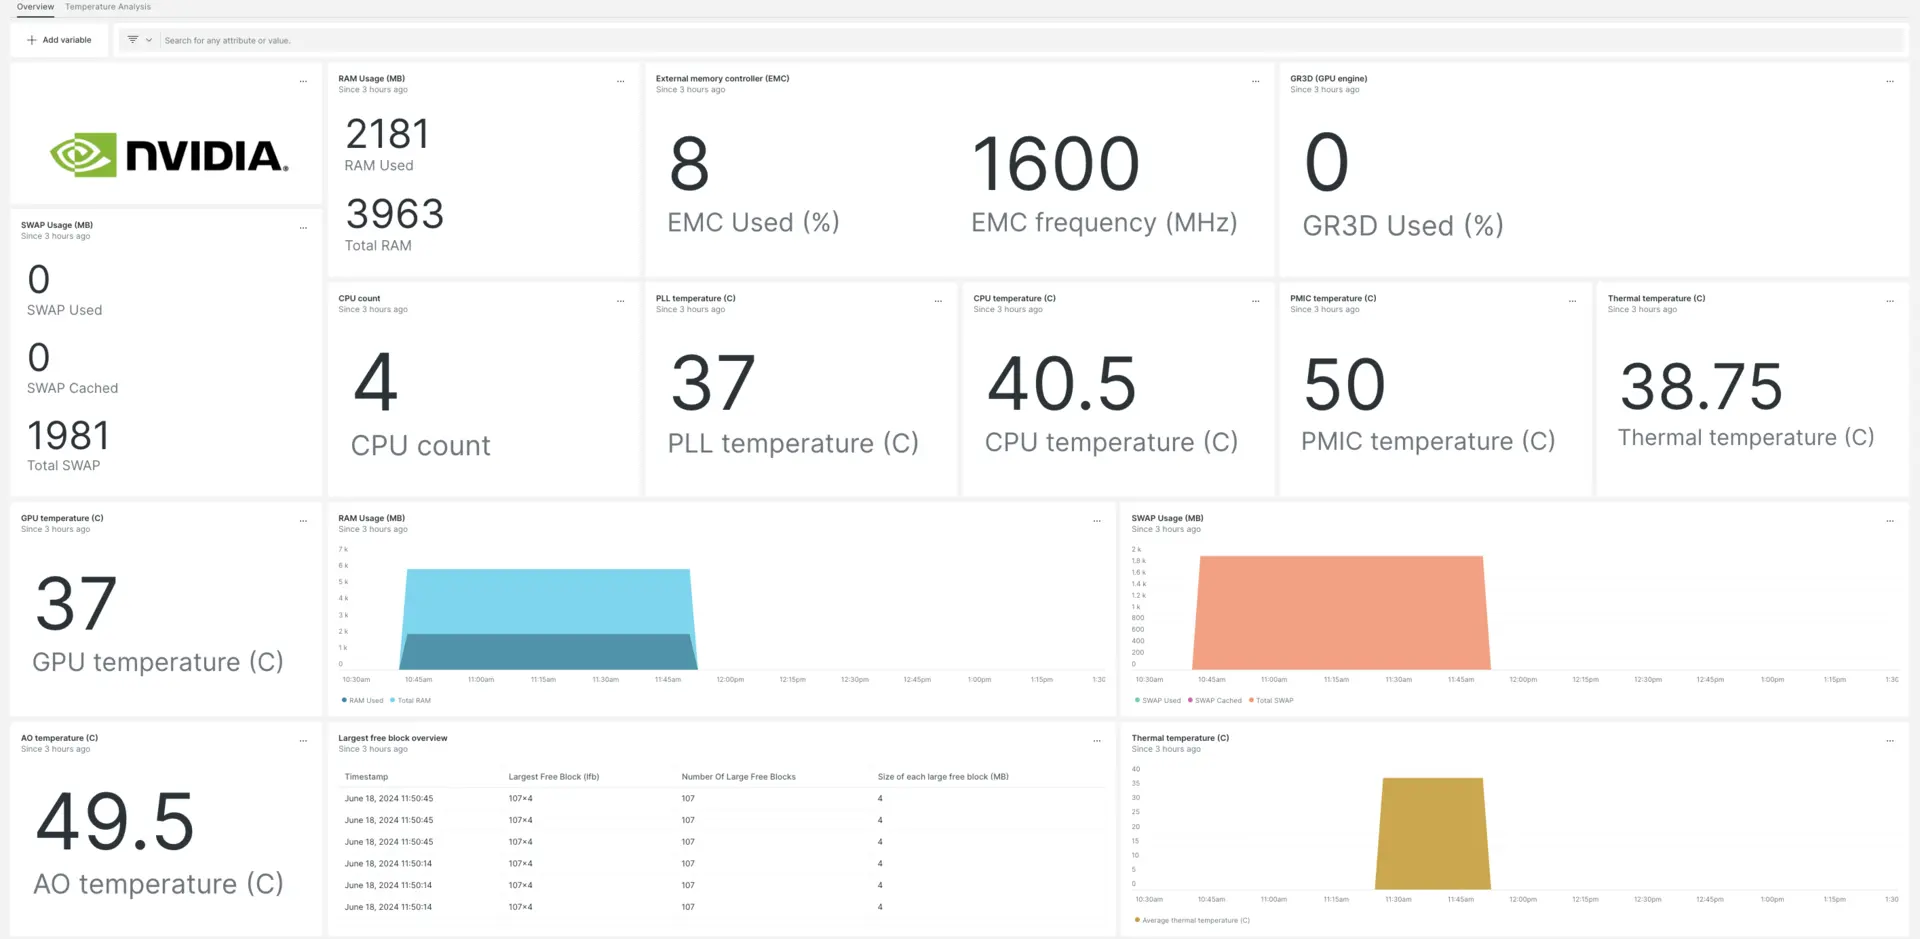
Nuestra integración NVIDIA Jetson recopila y envía datos sobre su utilidad tegrastats a New Relic, donde puede monitor las lecturas de CPU, GPU, RAM y temperatura de su dispositivo NVIDIA Jetson.

Luego de configurar nuestra integración NVIDIA Jetson, te brindamos un dashboard para tu métrica NVIDIA Jetson.
Instale la integración de NVIDIA Jetson
Siga estos pasos para recopilar datos sobre su dispositivo NVIDIA Jetson:
Instalar el agente de infraestructura
Para emplear la integración de NVIDIA Jetson, primero debe instalar el agente de infraestructura en su host. El agente de infraestructura monitorea el propio host, mientras que la propia integración extiende su monitoreo para incluir datos específicos de NVIDIA Jetson.
Almacenar tegrastats en un archivo
Desde su entorno de shell, cambie al directorio tegrastats y ejecute este comando para almacenar NVIDIA Jetson métrica en intervalos de 5 segundos:
$sudo tegrastats --interval 5000 --logfile tegrastatsHabilite la integración de NVIDIA Jetson con nri-flex
Para configurar la integración de NVIDIA Jetson, siga estos pasos:
Cree un archivo llamado
nvidia-jetson-config.ymly almacénelo en el directorio de integración:bash$sudo nano /etc/newrelic-infra/integrations.d/nvidia-jetson-config.ymlHabilite al agente para capturar datos de NVIDIA Jetson agregando el siguiente fragmento a su archivo
nvidia-jetson-config.yml:integrations:- name: nri-flexconfig:name: JetsonMetricsapis:- event_type: jetsonTegrastatscommands:- run: tail -n 3 path/to/tegrastatssplit: horizontalset_header: [ram_used, ram_total]regex_match: truesplit_by: "RAM (\\d+)/(\\d+)"- run: tail -n 3 path/to/tegrastatssplit: horizontalset_header: [lfb_num, lfb_size]regex_match: truesplit_by: "\\(lfb (\\d+)x(\\d+)MB\\)"- run: tail -n 3 path/to/tegrastatssplit: horizontalset_header: [swap_used, swap_total, swap_cached]regex_match: truesplit_by: "SWAP (\\d+)/(\\d+) \\(cached (\\d+)MB\\)"- run: tail -n 3 path/to/tegrastatssplit: horizontalset_header: [iram_used, iram_total, lfb_block]regex_match: truesplit_by: "IRAM (\\d+)/(\\d+)kB\\(lfb (\\d+)kB\\)"- run: tail -n 3 path/to/tegrastatssplit: horizontalset_header: [cpu1_usage, cpu1_freq]regex_match: truesplit_by: "CPU \\[(\\d+)%@(\\d+)"- run: tail -n 3 path/to/tegrastatssplit: horizontalset_header: [cpu2_usage, cpu2_freq]regex_match: truesplit_by: ",(\\d+)%@(\\d+)"- run: tail -n 3 path/to/tegrastatssplit: horizontalset_header: [cpu3_usage, cpu3_freq]regex_match: truesplit_by: ",(\\d+)%@(\\d+)"- run: tail -n 3 path/to/tegrastatssplit: horizontalset_header: [cpu4_usage, cpu4_freq]regex_match: truesplit_by: ",(\\d+)%@(\\d+)\\]"- run: tail -n 3 path/to/tegrastatssplit: horizontalset_header: [emc_freq_pct, emc_freq_val]regex_match: truesplit_by: "EMC_FREQ (\\d+)%@(\\d+)"- run: tail -n 3 path/to/tegrastatssplit: horizontalset_header: [gr3d_freq_pct, gr3d_freq_val, ape, pll_temp]regex_match: truesplit_by: "GR3D_FREQ (\\d+)%@(\\d+) APE (\\d+) PLL@(\\d+)C"- run: tail -n 3 path/to/tegrastatssplit: horizontalset_header: [cpu_temp, pmic_temp, gpu_temp]regex_match: truesplit_by: "CPU@(\\d+\\.?\\d*)C? PMIC@(\\d+\\.?\\d*)C? GPU@(\\d+\\.?\\d*)C?"- run: tail -n 3 path/to/tegrastatssplit: horizontalset_header: [ao_temp, thermal_temp]regex_match: truesplit_by: "AO@(\\d+\\.?\\d*)C? thermal@(\\d+\\.?\\d*)C?"- run: tail -n 3 path/to/tegrastatssplit: horizontalset_header: [pom_in_currect, pom_in_peak]regex_match: truesplit_by: "POM_5V_IN (\\d+)/(\\d+)"- run: tail -n 3 path/to/tegrastatssplit: horizontalset_header: [pom_gpu_used, pom_gpu_total]regex_match: truesplit_by: "POM_5V_GPU (\\d+)/(\\d+)"- run: tail -n 3 path/to/tegrastatssplit: horizontalset_header: [pom_cpu_used, pom_cpu_total]regex_match: truesplit_by: "POM_5V_CPU (\\d+)/(\\d+)"
Reinicie el agente New Relic Infrastructure
Resetear su agente de infraestructura ejecutando este comando en su entorno de shell:
$sudo systemctl restart newrelic-infra.serviceEspere un par de minutos mientras su aplicación envía métrica a one.newrelic.com.
Encuentra tus datos
Puede emplear nuestra plantilla dashboard prediseñadas para monitor sus datos de NVIDIA Jetson. Siga estos pasos para emplear nuestra plantilla dashboard prediseñadas:
Desde one.newrelic.com, vaya a la página + Integrations & Agents y luego haga clic Dashboards
Busque NVIDIA Jetson en la barra de búsqueda y luego seleccione NVIDIA Jetson para instalar el dashboard.
Vea su dashboard yendo a one.newrelic.com > All Capabilities > Dashboards.
Para obtener documentos sobre el uso y edición del panel, consulte nuestros documentos dashboard .
Consulta tus datos con NRQL
Con los datos de reportes de NVIDIA Jetson, también puedes crear consultas para obtener más información sobre el rendimiento de tu dispositivo:
Desde cualquier página en one.newrelic.com, Haz clic en consultar tus datos en la parte inferior de tu browser.
Construya su consulta. Por ejemplo, esta es una consulta NRQL de ejemplo para ver la temperatura de la GPU:
SELECT latest(gpu_temp) as 'GPU temperature (C)' from jetsonTegrastats
¿Que sigue?
Para obtener más información sobre cómo crear una consulta NRQL y generar un panel, consulte estos documentos:
- Introducción al generador de consultas para crear consultas básicas y avanzadas.
- Introducción al panel para personalizar tu dashboard y realizar diferentes acciones.
- Administre su dashboard para ajustar el modo de visualización de su panel o para agregar más contenido a su dashboard.