If you're using a containerized image for a Lambda function and want to monitor your application, you'll need to add a pre-built New Relic Lambda layer to your Dockerfile that matches your function's runtime.
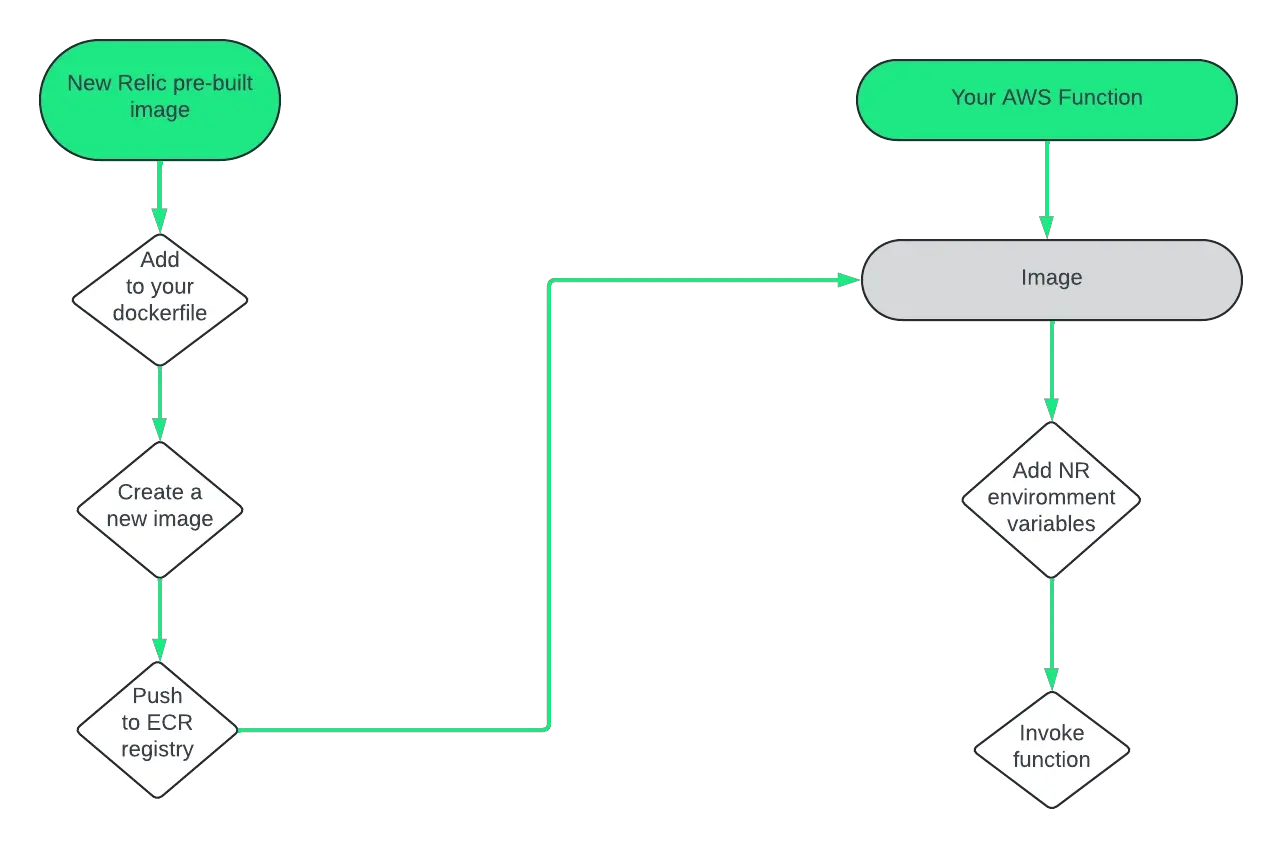
Here's a diagram showing the process of adding New Relic to the Dockerfile so you can monitor your function:

If you're using a containerized image for your Lambda function you can add New Relic to your image.
Here's a guide to adding our pre-built layer to your code.
Add New Relic to your Dockerfile
New Relic offers pre-built images that include our layer's different runtimes: Java, Node.js, Python, and extension-only.
Select the layer compatible with your specific Lambda function's runtime and region:
In your multi-stage Dockerfile, use New Relic's prebuilt image as an intermediate build stage. Then, copy New Relic's agent and extension from our prebuilt image into your final build stage.
Dockerfile examples based on runtime
# Define the New Relic pre-built imageFROM public.ecr.aws/newrelic-lambda-layers-for-docker/newrelic-lambda-layers-java:21 AS layer# Define the base imageFROM public.ecr.aws/lambda/java:21# Copy New Relic Layer codeCOPY /opt/ /opt/# Rest of your Dockerfile...# CMD override to one of New Relic's handler wrappersCMD [ "com.newrelic.java.HandlerWrapper::handleRequest" ]# CMD [ "com.newrelic.java.HandlerWrapper::handleStreamsRequest" ]Try out working example of a Java containerized Lambda function using SAM.
# Define the New Relic pre-built imageFROM public.ecr.aws/newrelic-lambda-layers-for-docker/newrelic-lambda-layers-python:311 AS layer# Define the base imageFROM public.ecr.aws/lambda/python:3.11# Copy New Relic Layer codeCOPY /opt/ /opt/# Rest of your Dockerfile...# CMD override to New Relic's handler wrapperCMD [ "newrelic_lambda_wrapper.handler" ]Try out working example of a Python containerized Lambda function using SAM.
# Define the New Relic pre-built imageFROM public.ecr.aws/newrelic-lambda-layers-for-docker/newrelic-lambda-layers-nodejs:20 AS layer# Define the base imageFROM public.ecr.aws/lambda/nodejs:20# Copy New Relic Layer codeCOPY /opt/ /opt/# Rest of your Dockerfile...# CMD override to New Relic's handler wrapperCMD [ "newrelic-lambda-wrapper.handler" ]# If your lambda function is ESM, use the New Relic's Node.js ESM handler wrapper# CMD ["/opt/nodejs/node_modules/newrelic-esm-lambda-wrapper/index.handler"]Try out working example of a Node.js containerized Lambda function using SAM.
# Define the New Relic pre-built imageFROM public.ecr.aws/newrelic-lambda-layers-for-docker/newrelic-lambda-layers-ruby:33 AS layer# Define the base imageFROM public.ecr.aws/lambda/ruby:3.3# Copy New Relic Layer codeCOPY /opt/ /opt/# Rest of your Dockerfile...# CMD override to New Relic's handler wrapperCMD [ "newrelic_lambda_wrapper.handler" ]FROM public.ecr.aws/newrelic-lambda-layers-for-docker/newrelic-lambda-layers-dotnet:x86_64 AS layer# Define the base imageFROM public.ecr.aws/lambda/dotnet:8# Copy New Relic Layer codeCOPY /opt/ /opt/# Rest of your Dockerfile...# CMD override not needed since the dotnet layer does not have a handler wrapperFROM public.ecr.aws/newrelic-lambda-layers-for-docker/newrelic-lambda-layers-lambdaextension:x86 as layer# Any lambda base image can be used# Copy New Relic Layer codeCOPY /opt/ /opt/# Rest of your Dockerfile...# CMD override not needed since the extension layer does not have an agent
Create an image
- After you add the reference to New Relic's pre-built image to your Dockerfile, you'll need to build a new image from the modified Dockerfile. This new image will have your original code and New Relic's pre-built image. To do this, we recommend following the steps listed in the AWS guide, Create a Lambda function using a container image.
- Push the new image to your AWS Elastic Container Registry repository for your function to use.
Create a new Lambda function
Using the image you pushed to AWS ECR, create a new Lambda function. For more information on creating this function, we recommend going back to the AWS guide: Create a Lambda function.
Configure your Lambda function
- Configure the Lambda function with the same settings as your original function, but ensure you add any required environment variables for New Relic Lambda monitoring. See our Environment variables for more information.
- Update your function's handler to point to the newly attached layer in
cmdoverride for your function. You can do that using the instructions in these two docs: