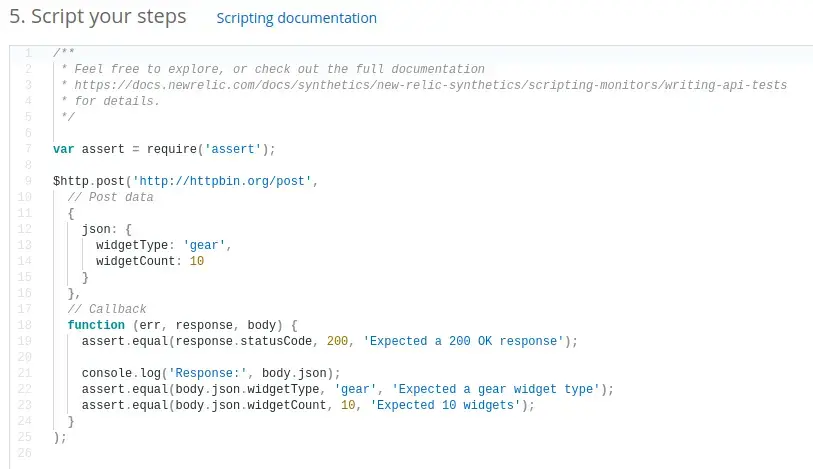
스크립팅된 API 모니터는 API 엔드포인트를 검사하여 올바르게 작동하는지 확인합니다. 스크립트된 API 모니터를 생성하려면 one.newrelic.com > Synthetic monitoring > Create a monitor 으로 이동한 다음 Endpoint availability 타일을 선택합니다.
팁
다른 API 테스트 예제를 보고 공유하려면 지원 포럼 또는 합성 모니터링 빠른 시작 라이브러리 의 합성 스크립트 섹션을 방문하십시오.
API get 모듈 사용
API 테스트는 $http 객체를 통해 사용할 수 있는 got module에 의해 구동됩니다. $http 개체는 기본 사용 사례에 대해 모니터에 이전 버전과의 호환성을 제공하여 got와 함께 사용자 정의 request와 같은 경험을 제공합니다. Node.js 16 및 최신 스크립트 API 런타임에서 직접 request 사용하려고 시도하는 모든 고객에 대해 $http 객체가 제공하는 request와 유사한 환경도 반환됩니다.
$http 객체를 사용하는 한 결과 타이밍 세부정보가 제공됩니다. $http 객체가 다루지 않는 스크립팅된 API 사용 사례의 경우 $har 객체를 사용하여 맞춤 타이밍 세부정보를 보고 할 수 있습니다.
중요
최대 실행 시간 3분 후 New Relic은 스크립트를 수동으로 중지합니다.

one.newrelic.com > Synthetic monitoring > Create monitor: 펼쳐보기 편집기는 펼쳐보기 명령을 단순화하기 위한 기능, 선택기 및 기타 요소를 제안합니다(GitHub에서 사용 가능).
요청 옵션 구성
스크립트를 시작하려면:
- get options 객체 를 저장할 변수(예:
options)를 선언합니다. - URL 끝점 및 사용자 지정 헤더와 같은 요청 옵션을 정의합니다.
팁
지원되는 옵션의 전체 목록은 GitHub의 got 문서에서 옵션 가져오기를 참조하세요.
다음은 options 객체에 있는 선택적 메타데이터의 예입니다.
GET 요청 보내기
GET 요청을 하려면 $http.get 메소드를 사용하여 요청을 제출하십시오. 요청 옵션 을 정의하고 $http.get 을 사용하여 요청한 다음 응답을 검증 하여 엔드포인트가 올바른 결과를 반환하는지 확인하십시오.
다음 예에서는 다음을 수행하는 방법을 보여줍니다.
- GET 요청에 대한 재시도 및 시간 초과 처리
- json 응답 본문을 구문 분석합니다.
- 애플리케이션 상태를 확인합니다.
- 결과를 사용자 정의 속성에 저장합니다.
/** * Script Name: Advanced Example - Node 16.10.0 * Author:      New Relic * Version:     1.0 */
const assert = require("assert")
// Get secure credentialsconst applicationId = $secure.APP_IDconst apiKey = $secure.API_KEY
// The URL for the API endpoint to get information about a specific applicationconst URL = `https://api.newrelic.com/v2/applications/${applicationId}.json`
// Define headers, including the API key for authenticationconst headers = {  "X-Api-Key": apiKey,  "Custom-Header": "CustomValue", // Example of a custom header}
// Define got options for retries and timeoutsconst options = {  headers: headers,  timeout: {    request: 10000, // Set a global timeout of 10000 milliseconds for the request  },  retry: {    limit: 3, // Retry a failed request up to 3 times    statusCodes: [408, 413, 429, 500, 502, 503, 504], // Common status codes to retry on    errorCodes: [      "ETIMEDOUT",      "ECONNRESET",      "EADDRINUSE",      "ECONNREFUSED",      "EPIPE",      "ENOTFOUND",      "ENETUNREACH",      "EAI_AGAIN",    ],    methods: ["GET"], // Only retry for GET requests  },  hooks: {    beforeRetry: [      (options, error, retryCount) => {        console.error(          `Retrying after error ${error.code}, retry #: ${retryCount}`        )      },    ],  },}
// Make the GET request with a callback$http.get(URL, options, function (error, response, body) {  if (error) {    // Handle the error case    console.error(`Request failed: ${error.message}`)    return  }
  // Assert the response status code is 200  assert.equal(response.statusCode, 200, "Expected HTTP status code 200")
  // Log the status code to the console  console.log("Request Status Code:", response.statusCode)
  // If further processing of the response body is needed, it can be done here  // For example, parsing JSON response (if response is in JSON format)  const jsonData = typeof body === "string" ? JSON.parse(body) : body
  // Log the parsed JSON to the console  console.log("Parsed JSON data:", jsonData)
  // Check the application's health status  const healthStatus = jsonData.application.health_status  assert.equal(healthStatus, "green", "Expected the application's health status to be 'green'")
  // If the assertion passes, the script will continue; otherwise, it will fail the monitor
// This shows up in SyntheticCheck as `custom.healthStatus` $util.insights.set("healthStatus", healthStatus)})POST 요청 보내기
POST 요청을 하려면 $http.post 메소드를 사용하여 요청을 제출하십시오. 요청 옵션 을 정의하고 $http.post 을 사용하여 요청한 다음 응답을 검증 하여 엔드포인트가 올바른 결과를 반환하는지 확인하십시오.
중요
스크립트 환경에는 쓰기 금지된 디렉터리가 포함되어 있습니다. 스크립트에 파일 저장이 필요한 경우 파일 이름 앞에 다음 경로를 추가하세요.
runtime/input-output/input/runtime/input-output/output/
결과 검증
결과를 확인하려면 assert 모듈을 가져와 테스트 사례를 정의하세요. assert 메서드를 호출하여 엔드포인트의 응답을 확인합니다. assert 기능이 실패하면 전체 모니터가 실패한 검사로 간주됩니다. 이는 경고 알림 을 트리거하고 측정항목에 영향을 줄 수 있습니다.
중요
종합 모니터링은 예외가 발생하는 것을 허용하지 않습니다. 예외가 발생하면 스크립트가 실패합니다. assert 모듈을 사용하여 결과를 확인하고 console.log() 을 사용 하여 합성 콘솔에 결과를 기록합니다 .