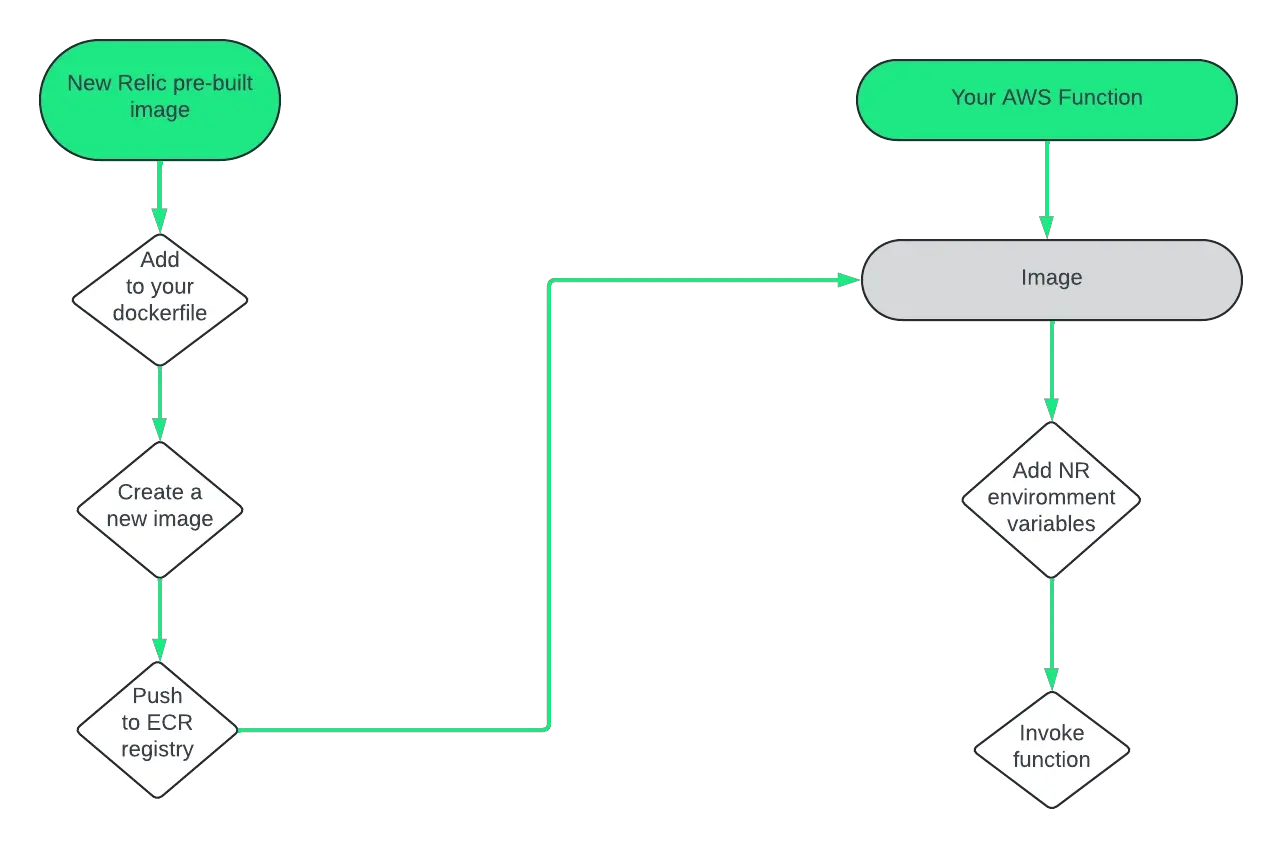
Lambda 함수에 컨테이너화된 이미지를 사용하고 런타임을 모니터링하려면 함수의 런타임과 일치하는 미리 빌드된 Lambda 계층을 Dockerfile에 추가해야 합니다.
다음은 함수를 모니터링할 수 있도록 Dockerfile에 New Relic을 추가하는 프로세스를 보여주는 다이어그램입니다.

Lambda 함수에 컨테이너화된 이미지를 사용하는 경우 이미지에 뉴렐릭을 추가할 수 있습니다.
다음은 사전 구축된 레이어를 코드에 추가하는 방법에 대한 가이드입니다.
Dockerfile에 뉴렐릭 추가
뉴렐릭은 레이어의 다양한 런타임(Java, Node.js, Python 및 확장 전용입니다.
특정 Lambda 함수의 런타임 및 지역과 호환되는 계층을 선택합니다.
다단계 Dockerfile에서 New Relic의 사전 빌드된 이미지를 중간 빌드 단계로 사용하세요. 그런 다음 사전 빌드된 이미지의 New Relic 에이전트 및 확장을 최종 빌드 단계에 복사하세요.
런타임 기반 Dockerfile 예제
# Define the New Relic pre-built imageFROM public.ecr.aws/newrelic-lambda-layers-for-docker/newrelic-lambda-layers-java:21 AS layer# Define the base imageFROM public.ecr.aws/lambda/java:21# Copy New Relic Layer codeCOPY /opt/ /opt/# Rest of your Dockerfile...# CMD override to one of New Relic's handler wrappersCMD [ "com.newrelic.java.HandlerWrapper::handleRequest" ]# CMD [ "com.newrelic.java.HandlerWrapper::handleStreamsRequest" ]SAM을 사용하여 Java 컨테이너화된 Lambda 함수의 동작 예제를 시험해 보세요.
# Define the New Relic pre-built imageFROM public.ecr.aws/newrelic-lambda-layers-for-docker/newrelic-lambda-layers-python:311 AS layer# Define the base imageFROM public.ecr.aws/lambda/python:3.11# Copy New Relic Layer codeCOPY /opt/ /opt/# Rest of your Dockerfile...# CMD override to New Relic's handler wrapperCMD [ "newrelic_lambda_wrapper.handler" ]SAM을 사용하여 Python 컨테이너화된 Lambda 함수의 실제 예제를 시험해 보세요.
# Define the New Relic pre-built imageFROM public.ecr.aws/newrelic-lambda-layers-for-docker/newrelic-lambda-layers-nodejs:20 AS layer# Define the base imageFROM public.ecr.aws/lambda/nodejs:20# Copy New Relic Layer codeCOPY /opt/ /opt/# Rest of your Dockerfile...# CMD override to New Relic's handler wrapperCMD [ "newrelic-lambda-wrapper.handler" ]# If your lambda function is ESM, use the New Relic's Node.js ESM handler wrapper# CMD ["/opt/nodejs/node_modules/newrelic-esm-lambda-wrapper/index.handler"]SAM을 사용하여 Node.js 컨테이너화된 Lambda 함수의 동작 예제를 시험해보세요.
# Define the New Relic pre-built imageFROM public.ecr.aws/newrelic-lambda-layers-for-docker/newrelic-lambda-layers-ruby:33 AS layer# Define the base imageFROM public.ecr.aws/lambda/ruby:3.3# Copy New Relic Layer codeCOPY /opt/ /opt/# Rest of your Dockerfile...# CMD override to New Relic's handler wrapperCMD [ "newrelic_lambda_wrapper.handler" ]FROM public.ecr.aws/newrelic-lambda-layers-for-docker/newrelic-lambda-layers-dotnet:x86_64 AS layer# Define the base imageFROM public.ecr.aws/lambda/dotnet:8# Copy New Relic Layer codeCOPY /opt/ /opt/# Rest of your Dockerfile...# CMD override not needed since the dotnet layer does not have a handler wrapperFROM public.ecr.aws/newrelic-lambda-layers-for-docker/newrelic-lambda-layers-lambdaextension:x86 as layer# Any lambda base image can be used# Copy New Relic Layer codeCOPY /opt/ /opt/# Rest of your Dockerfile...# CMD override not needed since the extension layer does not have an agent
이미지 만들기
- New Relic의 사전 빌드된 이미지에 대한 참조를 Dockerfile에 추가한 후 수정된 Dockerfile에서 새 이미지를 빌드해야 합니다. 이 새 이미지에는 원본 코드와 New Relic의 사전 빌드된 이미지가 포함됩니다. 이렇게 하려면 AWS 가이드 컨테이너 이미지를 사용하여 Lambda 함수 생성 에 나열된 단계를 따르는 것이 좋습니다.
- 함수가 사용할 새 이미지를 AWS Elastic 컨테이너 레지스트리 에 푸시합니다.
새로운 Lambda 함수 생성
AWS ECR에 푸시한 이미지를 사용하여 새 Lambda 함수를 생성합니다. 이 함수 생성에 대한 자세한 내용을 보려면 AWS 가이드: Lambda 함수 생성 을 참조하는 것이 좋습니다.
Lambda 함수 구성
원래 함수와 동일한 설정으로 Lambda 함수를 구성하지만 Lambda 모니터링에 필요한 환경 변수를 추가해야 합니다. 자세한 내용은 환경 변수를 참조하세요.
함수의
cmd재정의에서 새로 연결된 레이어를 가리키도록 함수 핸들러를 업데이트합니다. 다음 두 문서의 지침을 사용하여 그렇게 할 수 있습니다.
데이터 찾기 및 사용
AWS Lambda 함수를 로그아웃한 후 뉴렐릭 APM 인터페이스에서 데이터를 찾아 사용할 수 있습니다. 데이터는 여러 주요 영역으로 구성되며, 각 영역은 Lambda 함수의 성능과 상태에 대한 다양한 정보를 제공합니다.
APM 인터페이스에서는 분산 추적, 서비스 맵, 트랜잭션, 오류 분석 등 Lambda 함수의 다양한 측면을 살펴볼 수 있습니다. 이러한 각 영역에서는 Lambda 함수의 성능, 지연 시간 및 오류율에 대한 자세한 내용을 제공하므로 문제를 신속하게 식별하고 해결할 수 있습니다.
팁
이제 호출 환경이 APM 프로세서 트레이스와 통합되었습니다. 이를 통해 특정 AWS RequestId 사용하여 APM 트레이스를 드릴다운하여 특정 Lambda 실행에 대한 자세한 정보를 얻을 수 있습니다.
뉴렐릭 APM 인터페이스에서 Lambda 함수를 보려면:
- https://one.newrelic.com > APM & Services 으)로 이동합니다.
- 검색 기준을
isLambdaFunction = true으로 설정합니다. - 표시된 목록에서 Lambda 함수를 선택하여 데이터를 확인하세요.