機能の可用性
Fleet Control for Kubernetesクラスタは一般提供 (GA) されています。 ホスト上のエージェントの管理のサポートは現在パブリック プレビュー段階です。
サポートされているエージェントとその環境の完全なリストについては、エージェントのタイプの互換性に関するドキュメントを参照してください。
パブリック プレビュー機能は、弊社のプレリリース ポリシーに従って提供されます。
セットアップ ガイドを使用して最初のフリートを作成したら、日常の作業のほとんどをFleet Control UIから実行します。 これらの操作はAPIを介してプログラムで実行することもできますが、このページではフリート、デプロイメント、設定を管理するためのUIワークフローに焦点を当てます。
表内のデータの並べ替え
Fleet Control UI 全体のデータ テーブルの多くは並べ替え可能です。特定の列でテーブルを並べ替えるには、列ヘッダーにマウスを置きます。薄い灰色の上矢印または下矢印が表示された場合は、ヘッダーをクリックして、その列のデータに基づいてテーブル行を並べ替えることができます。
艦隊ページ
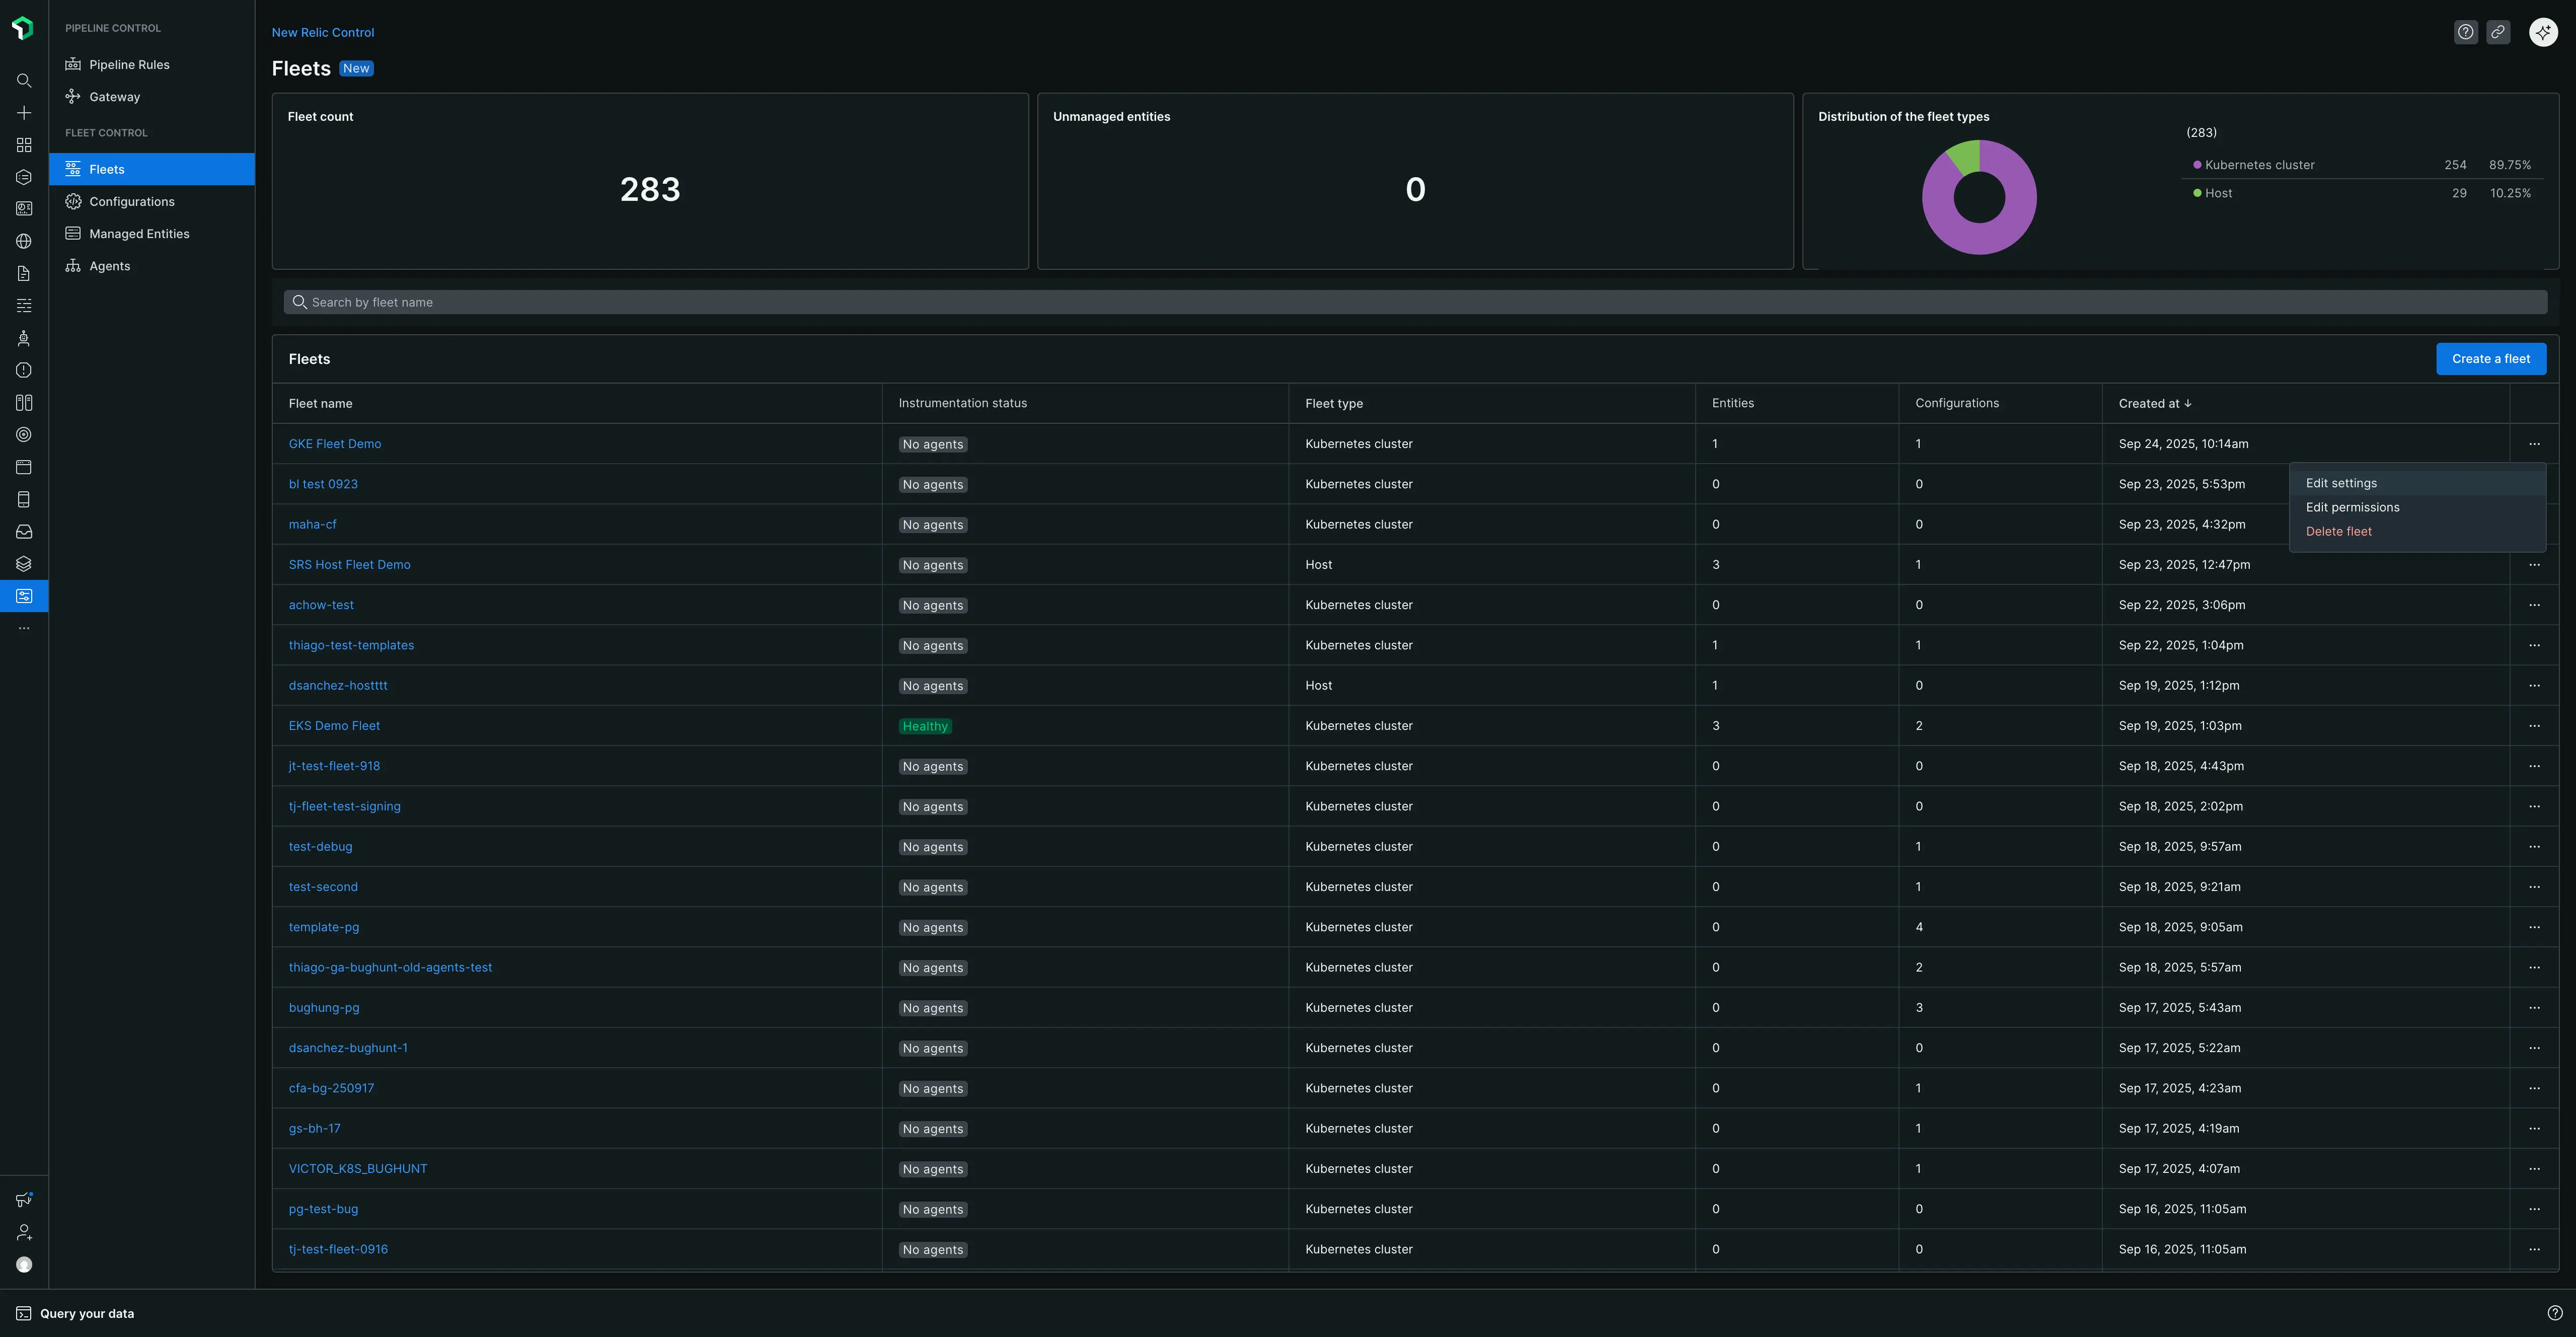
New Relic Control → Fleetsに移動すると、メインの Fleets ページが表示され、Fleet Control 環境全体の概要が表示されます。ここから、次のことができます。
- 艦隊の検索:検索バーを使用して、名前で特定の艦隊を検索します。
- 概要数を表示:フリートの合計数と割り当てられていない管理対象エンティティの数を確認します。
- フリートの分布を参照:タイプごとにフリートの内訳を表示します (たとえば、 Kubernetesクラスタとホスト)。
艦隊行動
メインの艦隊ページで、艦隊の右端にある省略記号 ( ... ) をクリックすると、アクション メニューが表示されます。
設定の編集:艦隊の名前と説明を変更できます。
権限の編集:関連付けられたグループまたはロールを変更することで、フリートに対するきめ細かなアクセス制御 (FGA) を管理できます。
艦隊の削除:艦隊を完全に削除します。艦隊を削除する前に、次の条件を満たしている必要があります。
- すべての管理対象エンティティをフリートから削除する必要があります。
- フリートは現在進行中のデプロイメントを行うことはできません。
フリート権限(きめ細かなアクセス)
Fleet Control 、きめ細かいアクセス (FGA) を使用して、アドミニストレーターが特定のフリートの管理を特定のユーザーまたはグループに委任できるようにします。 これは、広範な組織レベルの権限を付与せずに、チームが独自のフリートを管理できるようにしたい場合に役立ちます。
アクセスを委任する主な方法は、特定のフリートのユーザー グループに定義済みのFleet Managerロールを割り当てることです。これにより、そのグループのユーザーは、デプロイメントの作成、設定の管理、管理対象エンティティの追加または削除など、そのフリートを完全に制御できるようになります。
管理者の前提条件
フリート権限を設定するには、Organization Manager[組織マネージャー]とAuthDomain Manager [AuthDomain マネージャーの]ロールが必要です。
セットアップワークフロー
このプロセスには 2 つの主な手順が含まれます。まず、アドミニストレーターがユーザー グループを作成し、次にそのグループに特定のフリートのFleet Managerロールを割り当てます。
ステップ1: ユーザーグループを作成する
- 左側のナビゲーション メニューの下部でユーザー名をクリックし、 Administration[管理]を選択します。
- Administration [管理]ページで、Access Management [アクセス管理]を選択します。
- Groups[グループ]タブに移動し、 Create a new group[新しいグループの作成]をクリックします。
- グループに意味のある名前を付けます (例:
k8s-platform-team-fleet-managers)。 - 「メンバー」セクションで、フリート管理を委任するユーザーを追加します。
- Add user to the group[ユーザーをグループに追加]をクリックします。ここでアカウントレベルまたは組織レベルのロールを割り当てる必要はありません。権限はフリート レベルで付与されます。
ステップ2: フリートにグループとロールを割り当てる
新しいフリートを作成するとき、または既存のフリートを編集するときに、権限を割り当てることができます。
既存のフリートに権限を割り当てるには:
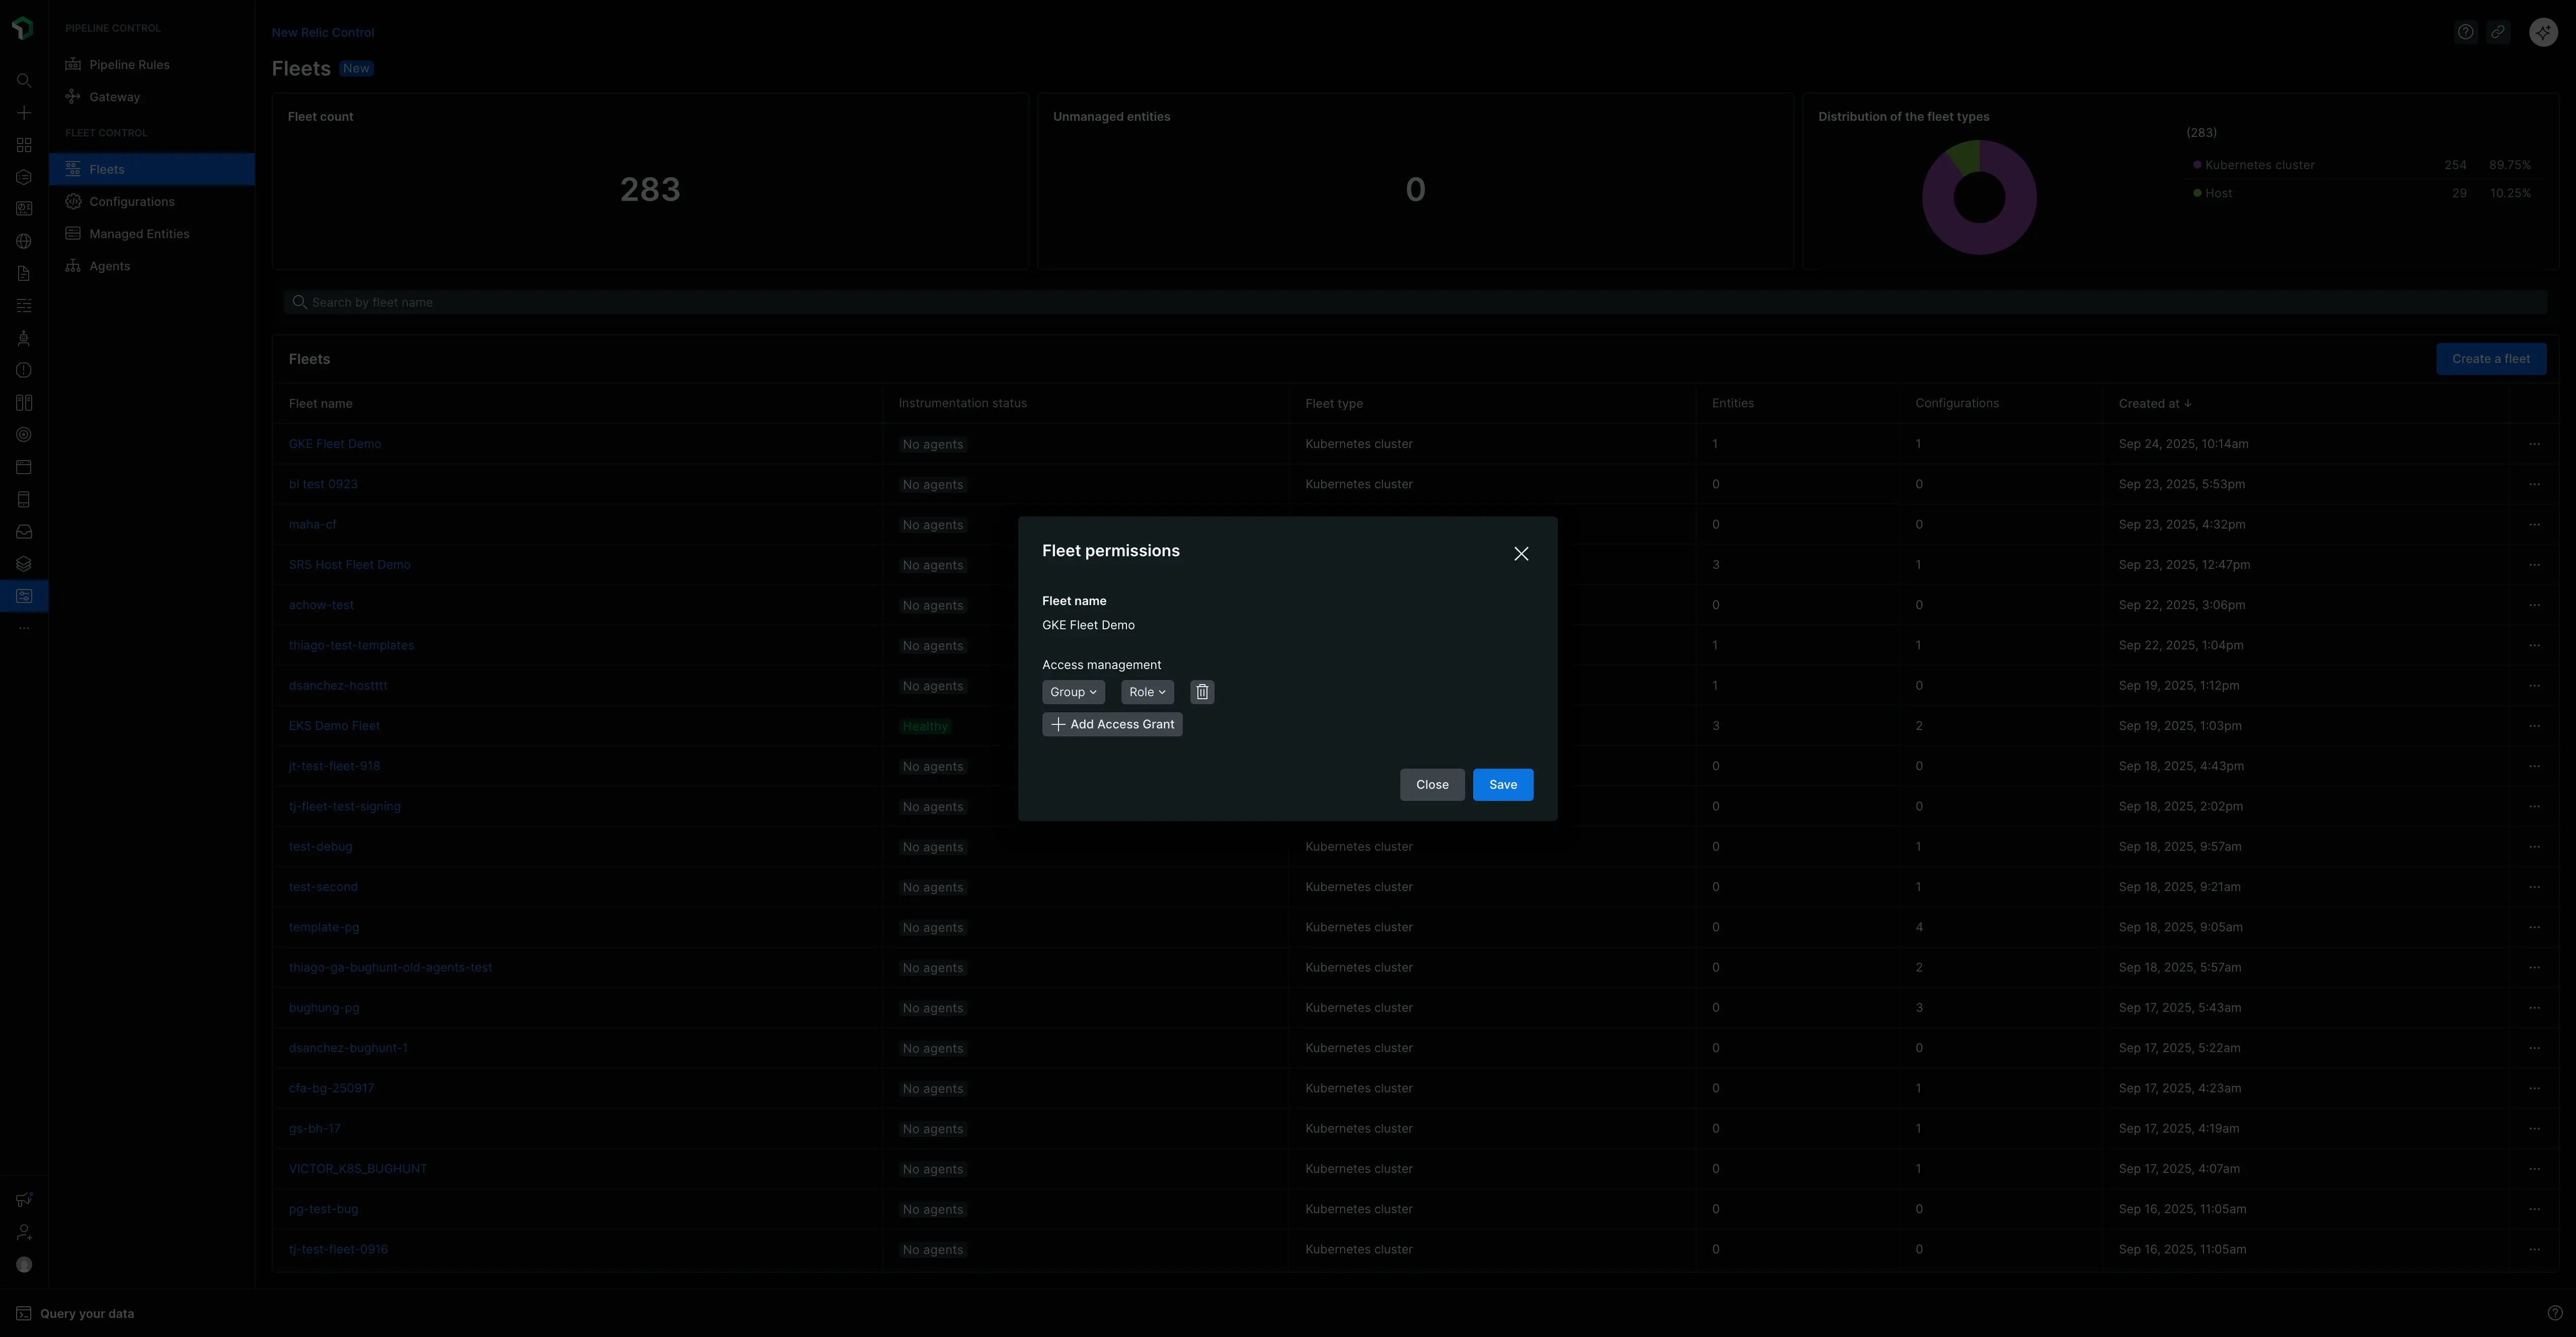
メインのFleets[フリート]ページから、管理するフリートを見つけます。
行末の省略記号 (
...) をクリックし、Edit permissions [権限の編集を]選択します。Fleet Permissions [フリート権限]モーダルで:
- グループを選択:前の手順で作成したユーザー グループを選択します。
- 役割を選択:**Fleet Manager** [フリート マネージャー]役割を選択します。
Save[保存]をクリックします。選択したグループ内のユーザーには、このフリートに対する完全な管理権限が付与されます。
フリート作成中に権限を割り当てるには:
- セットアップ ガイドのフリート作成手順に従ってください。
- Create Fleet [フリートの作成]をクリックする前に、Access management [アクセス管理]セクションを展開します。
- ドロップダウンを使用して、希望するGroup [グループ]とFleet Manager [フリート マネージャーの]役割を選択します。
- Create Fleet[フリートの作成]をクリックします。
特定の艦隊の管理
艦隊名をクリックすると、詳細な管理ページに移動します。
重要: フリート設定ルール
フリートは、管理対象のすべてのエンティティ間で一貫性を確保するように設計されています。これを実現するには、次の 2 つの重要なルールが適用されます。
エージェント タイプごとに 1 つの設定: 1 つのフリート内では、エージェントのタイプごとに 1 つの設定のみを持つことができます。 たとえば、フリート内に 3 つのKubernetesクラスタがある場合、それらすべてがNew Relic Infrastructureエージェントに対して同じ 1 つの設定を使用する必要があります。 フリート内の設定に対するエージェント タイプのカーディナリティは常に 1:1 です。
独占的なインフラストラクチャ計装:このシステムはNew Relic Infrastructure Agent とOpenTelemetry Collector (NRDOT) のNew Relic Distribution の両方を同じフリートにデプロイすることを防ぎます。 この検証は、インフラストラクチャ監視のために管理対象エンティティを誤って二重計数することを防ぐのに役立ちます。
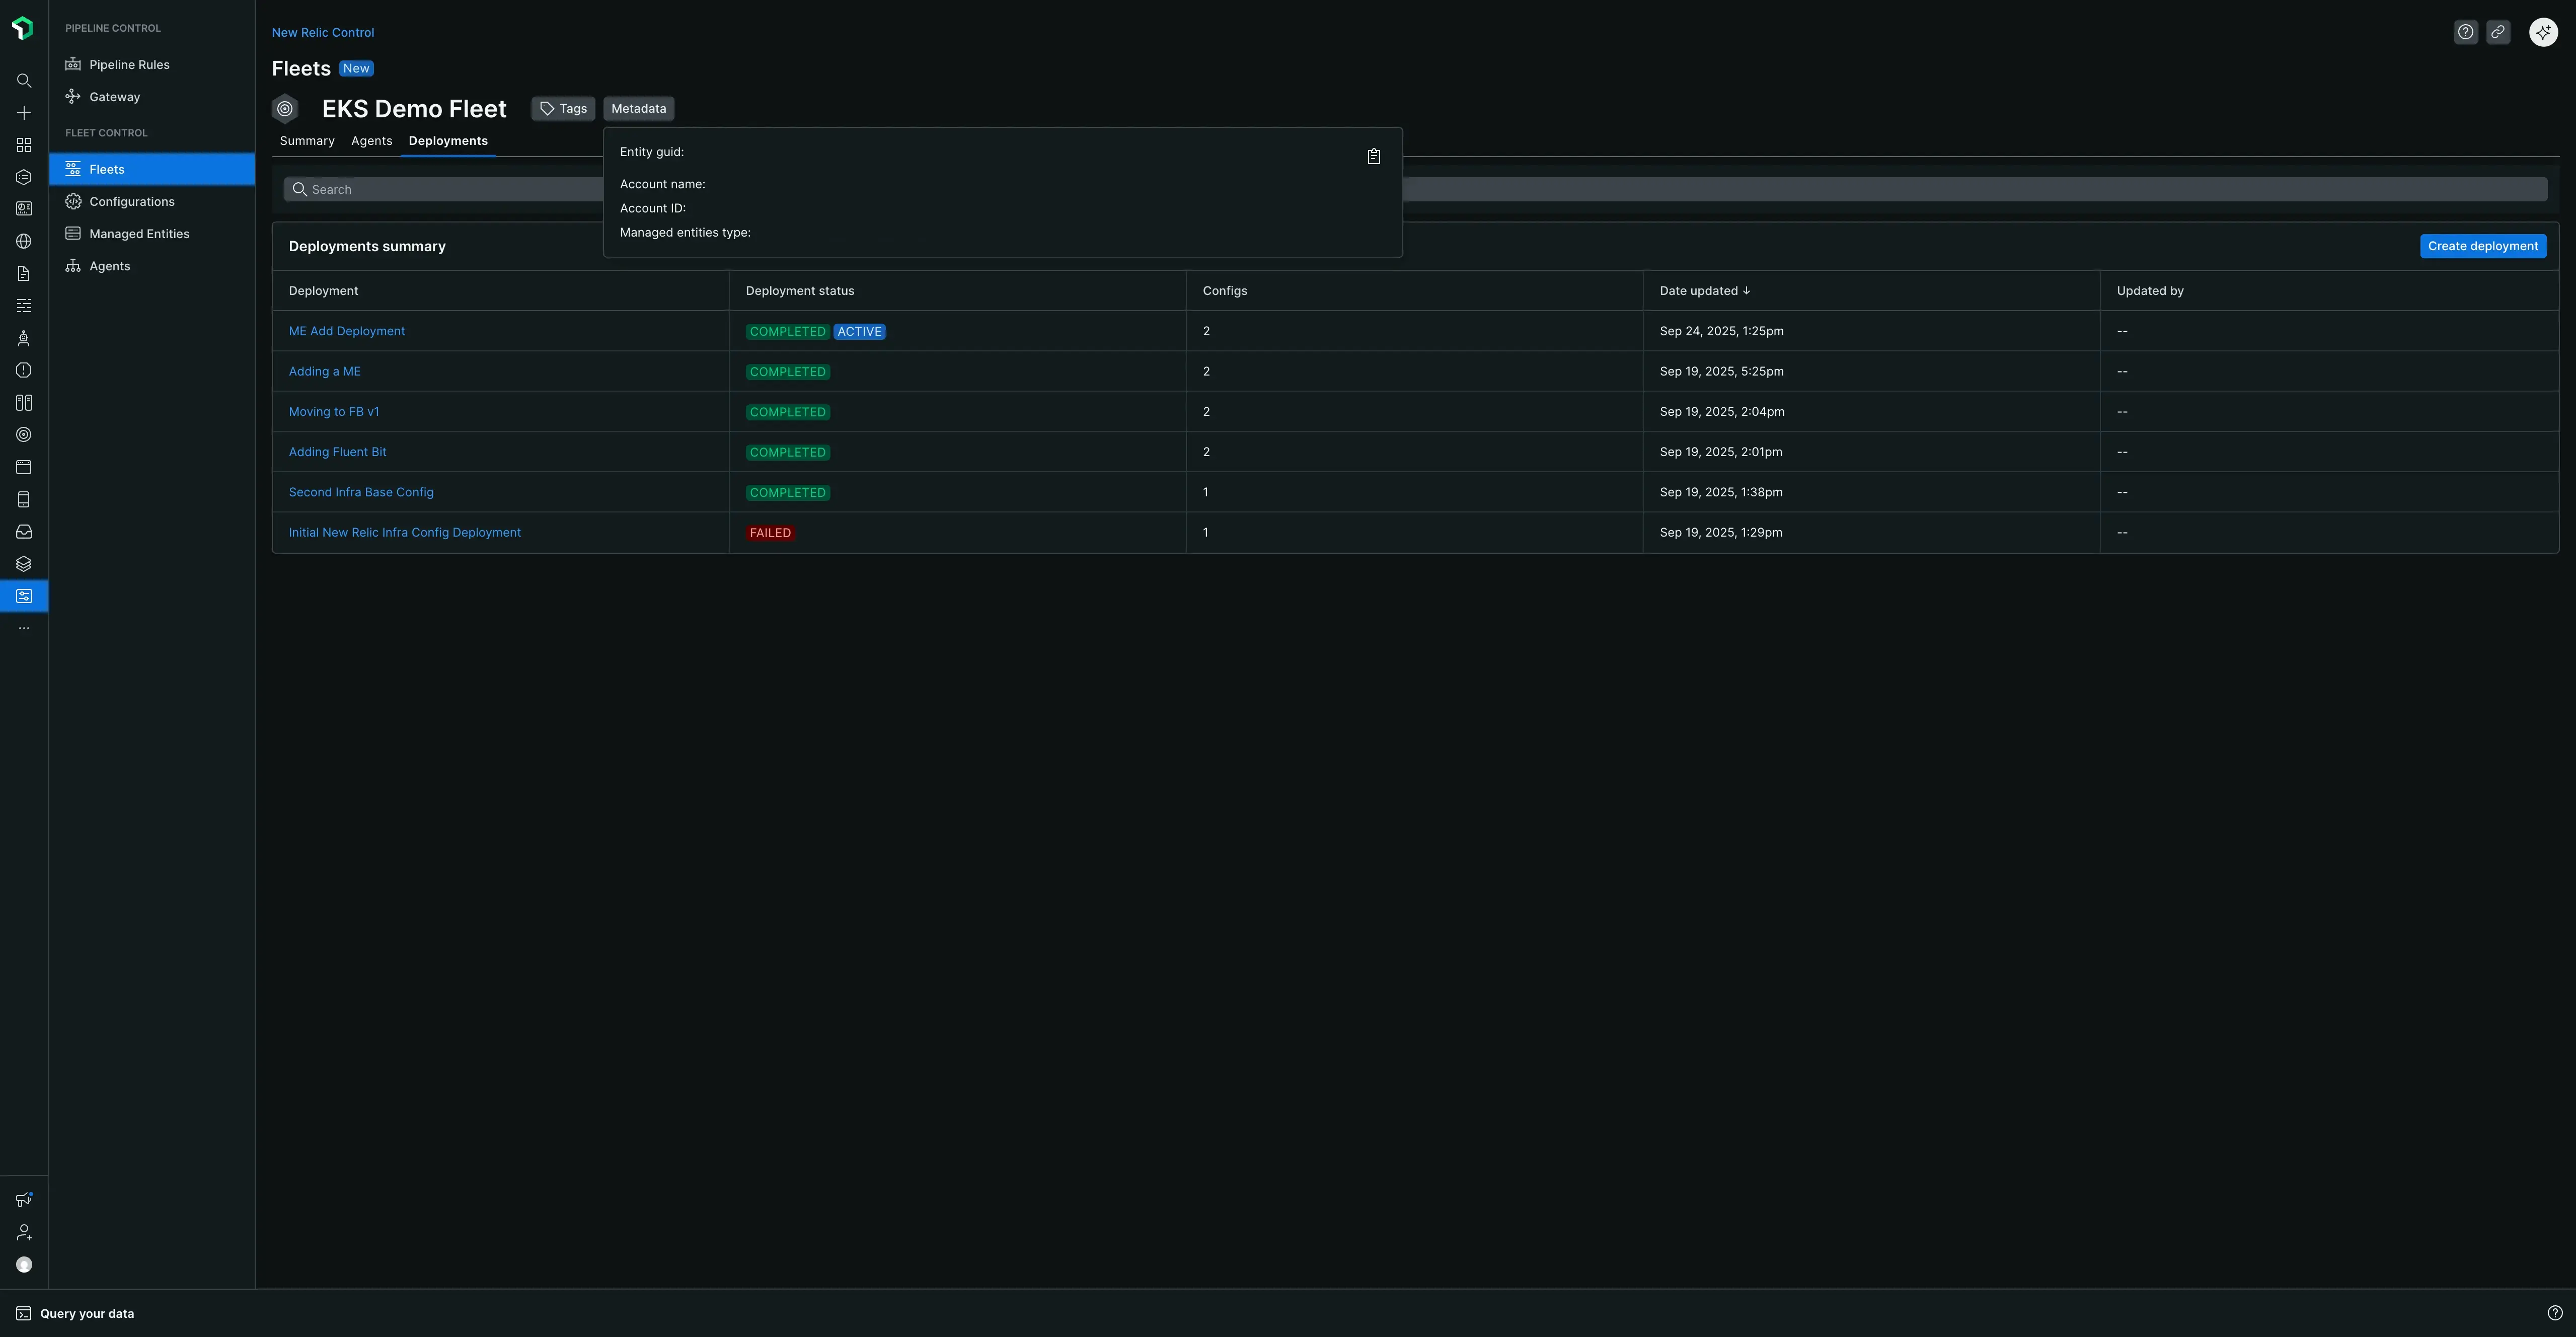
フリートヘッダー: タグとメタデータ
ページの上部のヘッダーには、フリートの名前と、クリック可能なTags [タグ]およびMetadata [メタデータ]ボタンが表示されます。これらにより、艦隊の重要な識別情報に素早くアクセスできるようになります。
- タグ:これをクリックすると、フリートに関連付けられたキーの値ペアのデータ (
accountId、フリートのdescription、作成または更新のタイムスタンプなど) の包括的なセットが表示されます。 - メタデータ:これをクリックすると、
Entity guid、Account ID、Managed entities typeなど、New Relic エンティティとしてのフリートの主要な識別詳細が表示されます。
詳細管理ページは、 Summary[概要] 、 Agents[エージェント] 、 Deployments[デプロイメント] の3 つのメインタブで構成されています。
概要タブ
このタブには、艦隊の現在の状態のスナップショットが 3 つのテーブルに整理されて表示されます。
- アクティブなデプロイメント テーブル:最新のデプロイメントの名前、含まれるエージェント/構成の数、および最終更新日が表示されます。
- エージェント表:エージェントのタイプ、それに関連付けられている設定とバージョン、設定の作成日をリストします。
- 管理されたエンティティ テーブル:フリートに割り当てられたすべてのエンティティ、そのアカウント、タイプ、および現在の計装ステータスをリストします。 また、 New Relicプラットフォームの他の場所 ( Kubernetesクラスタ エクスプローラーなど) にあるエンティティのメイン ページに移動するView entity [View エンティティ]リンクも含まれています。
エージェントタブ
このタブには、フリート内の管理対象エンティティで実行されているすべてのエージェントの詳細ビューが表示されます。このタブの上部にある検索バーを使用して、特定のエージェントを名前またはタイプで検索できます。
重要な点として、New Relic Agent Control スーパーバイザーもエージェント タイプとしてここにリストされています。各エージェントについて、関連する管理対象エンティティ、計装ステータス、リモート設定ステータス、および最後にハートビートを受信した時刻を確認できます。
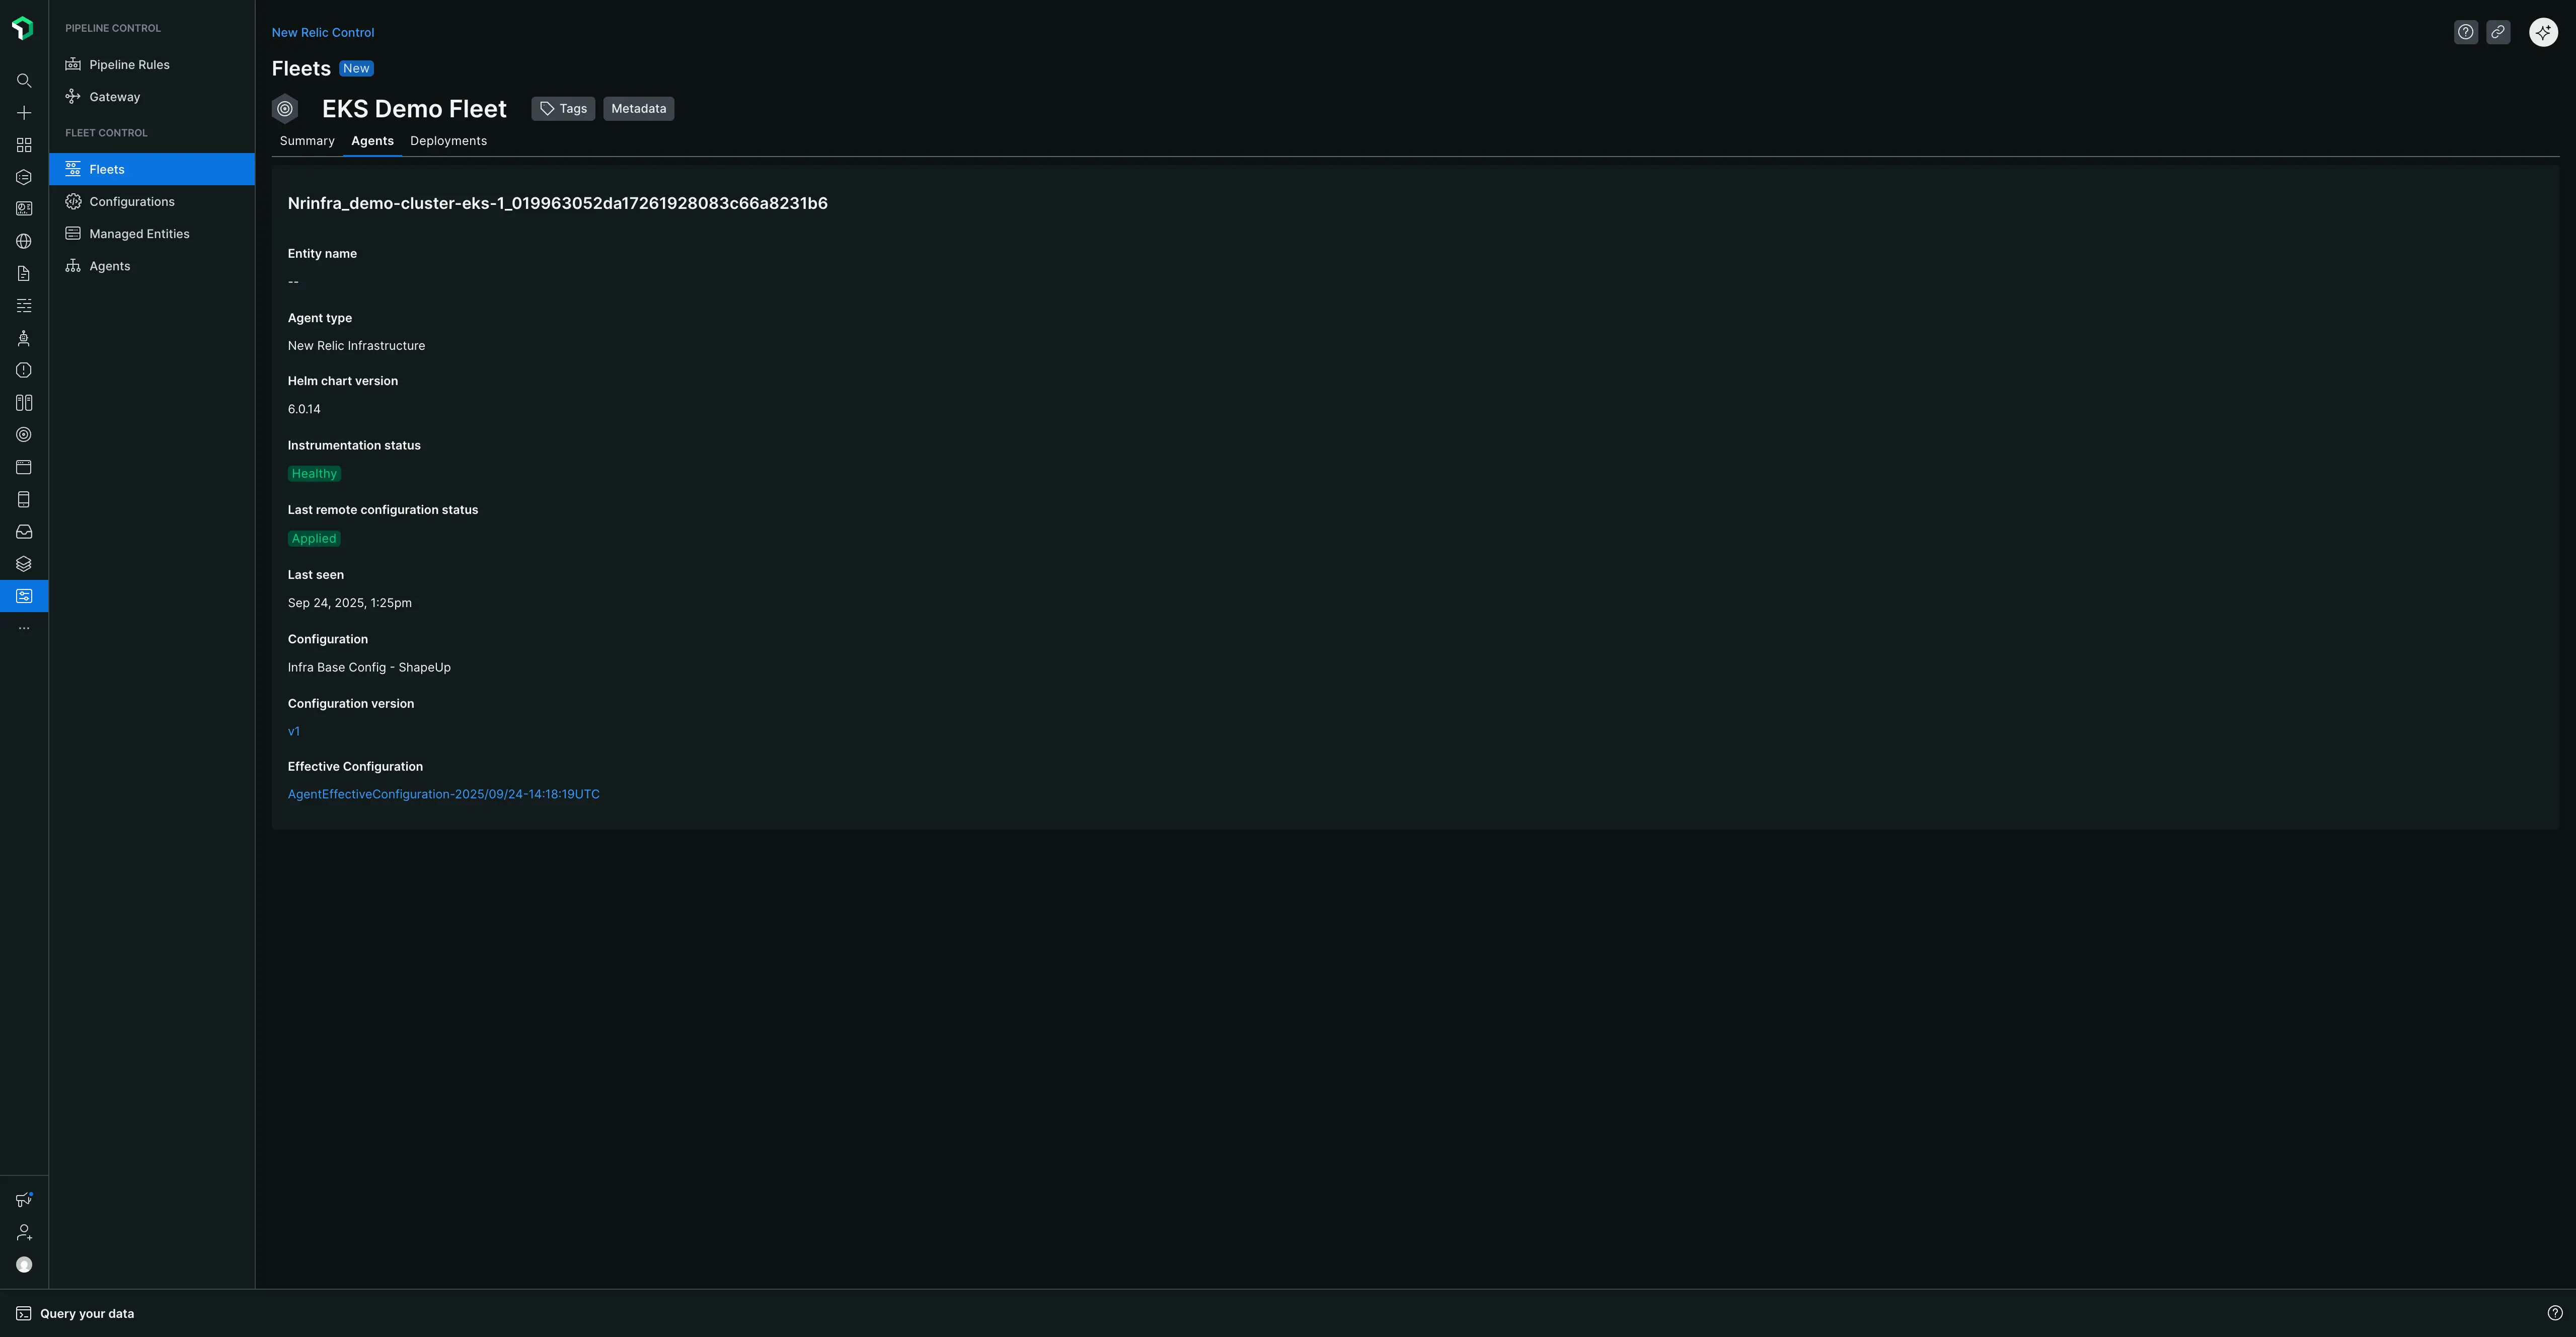
効果的な設定を見る
Agents [エージェント]タブの主な機能は、エージェントの効果的な設定を確認できることです。 エージェントの名前をクリックすると、詳細ビューが開きます。ここではHelmチャートのバージョンなどのメタデータを確認できますが、最も重要なのは、ラケットのエージェントで実行されている正確な設定を表示できることです。
有効な設定は、ローカル環境変数などのソースからのオーバーライドを考慮しているため、プロイメントした設定とは異なる場合があります。 このビューは、トラブルシューティング設定関連の問題にとって非常に貴重です。
デプロイメントタブ
このタブには、フリートの完全な配備履歴が含まれています。 検索バーを使用して、特定のデプロイメントをその名前で検索できます。表には、各デプロイメントの名前、ステータス、エージェント/構成の数、最終更新日がリストされます。最新の成功したデプロイメントには、それが現在フリートに適用されているものであることを示すActiveラベルが付けられます。
デプロイメントの名前をクリックすると、その特定のデプロイメントの概要ページに移動し、次の情報を確認できます。
- デプロイメント メタデータ (名前、タイプ、説明、開始/終了時刻、およびトラブルシューティングのデプロイメント ID)。
- エージェントのタイプ、実行されたアクション (インストール、更新など)、設定バージョンを示すAgent table 。
- どのエンティティがデプロイメントの影響を受けたかを正確に示すManaged Entities [管理されたエンティティ]表。
デプロイメントの理解
デプロイメントは、フリート内の管理対象エンティティに対するエージェントとその設定をインストール、削除、または更新できる、制御された一連のアクションです。 このセクションでは、さまざまなデプロイメント ステータスの理解、 Agent Controlの自動アップグレード プロセス、変更を安全に管理するためのドラフトやカナリア デプロイメントなどの高度な機能の使用方法など、デプロイメント ライフサイクルの重要な側面について説明します。
デプロイメントステータスの理解
各デプロイメントのステータスは、その結果を理解するのに役立ちます。考えられるステータスとその意味は次のとおりです。
| ステータス | 説明 |
|---|---|
| 進行中 | デプロイメントは、フリート内の管理対象エンティティに積極的に展開されています。 |
| 完了 | デプロイメントは正常に完了し、意図したすべてのアクションが適用されました。 |
| 失敗した | デプロイメントは完了しましたが、管理対象エンティティ上の少なくとも 1 つのエージェントが問題を報告しました。これは、エージェントの起動、正常なシャットダウン、または新しい設定の適用に失敗したことを意味する可能性があります。 他の管理対象エンティティでは、デプロイメントは部分的に成功する可能性があります。 |
| 内部障害 | Fleet Controlシステム内の予期せぬ問題により、デプロイメントを完了できませんでした。 これはエージェントや設定のエラーではありません。 もう一度デプロイメントをお試しください。問題が解決しない場合は、New Relic サポートにお問い合わせください。 |
自動Agent Controlアップグレード
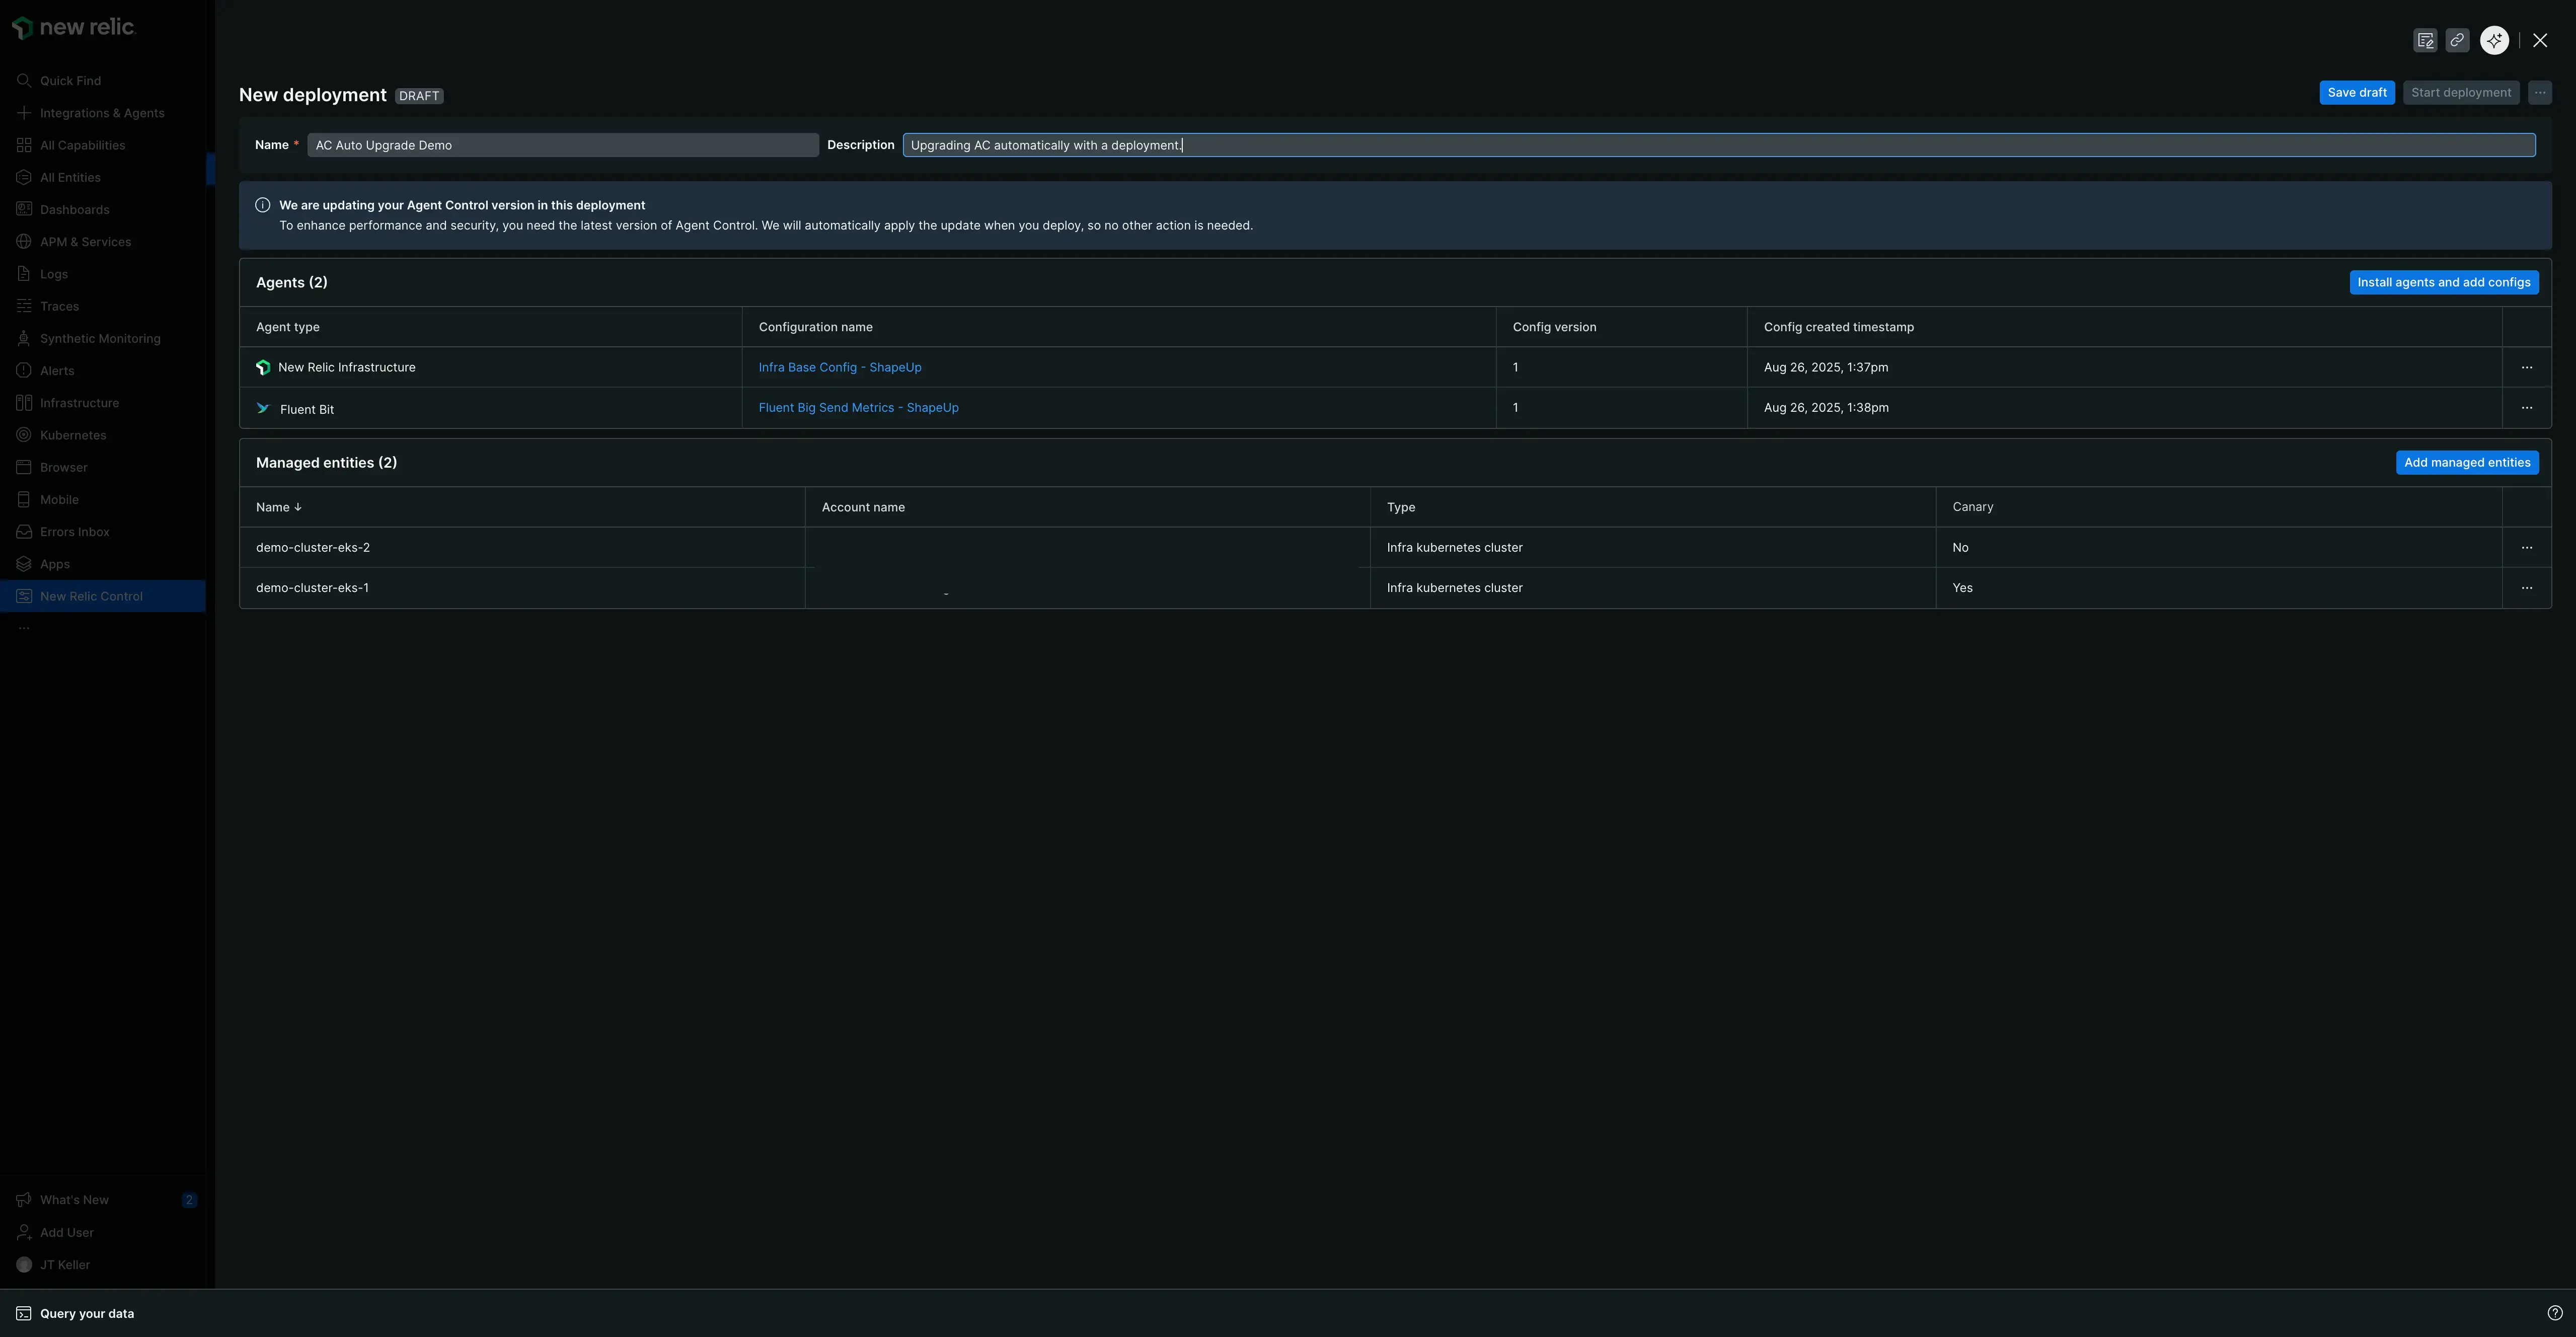
管理対象エンティティが最新のセキュリティ パッチ、パフォーマンス強化、および機能のメリットを享受できるように、Fleet Control は Agent Control のアップグレード プロセスを自動的に管理します。デプロイメントを開始すると、 Fleet Control 、フリート内の管理対象エンティティで新しいバージョンのAgent Controlが利用可能かどうかを確認します。
アップグレードが必要な場合は、デプロイメントの一部として自動的に組み込まれます。デプロイメント プロセス中にUIに、 Agent Controlがアップグレードされることを知らせる通知が表示されます。 この暗黙的なアップグレードは、実行中のデプロイメント アクション (エージェントのインストール、エージェントの削除、エージェント設定の変更など) と並行して行われ、最小限の労力で環境を最新の状態に保つことができます。
重要: アップグレードの失敗と回復
現在、失敗したAgent Controlアップグレードに対する自動ロールバックはありません。 アップグレードが失敗した場合、デプロイメントはFAILEDとしてマークされ、管理対象エンティティで手動による介入が必要になる場合があります。ガイダンスについては、 Agent Controlを手動でアップグレードする方法についてのドキュメントを参照してください。
将来のリリースでは、自動ロールバックを提供し、アップグレードの失敗の修復を簡素化する機能を積極的に開発しています。
デプロイメントの下書きの作成と管理
デプロイメントを下書きとして保存し、変更をすぐにデプロイせずに、時間をかけて作業することができます。
下書きを作成して再開する
- 特定のフリート内のDeployments[デプロイメント]タブに移動します。
- Create deployment[デプロイメントの作成]ボタンをクリックします。
- デプロイメント ペインで、必須のName [名前]とオプションのDescription [説明]を入力します。
- エージェントの追加や設定の更新など、必要な変更を加えます。
- デプロイメントを開始する代わりに、 Save draft[下書きを保存]をクリックします。
- その後、デプロイメント ペインを閉じることができます。新しいデプロイメントは、Deployments [デプロイメント]タブに
Draftのステータスで表示されます。
ドラフトの作業を続行するには、デプロイメント履歴テーブルでその名前をクリックするだけです。これにより、デプロイメント ペインが再度開き、変更を完了して準備ができたらStart deployment[デプロイメントの開始] をクリックできるようになります。
下書きを削除する
ドラフトデプロイメントが不要になった場合:
- Deployments [デプロイメント]タブから、削除するドラフトの名前をクリックします。
- 開いたデプロイメント ペインで、画面上部の Start deployment[デプロイメントの開始]ボタンの横にある省略記号 (
...) ボタンをクリックします。 - メニューからDelete draft [下書きを削除]を選択します。
- 下書きは完全に削除され、 [デプロイメント]タブに戻ります。
デプロイメントにおけるエージェントのアクション
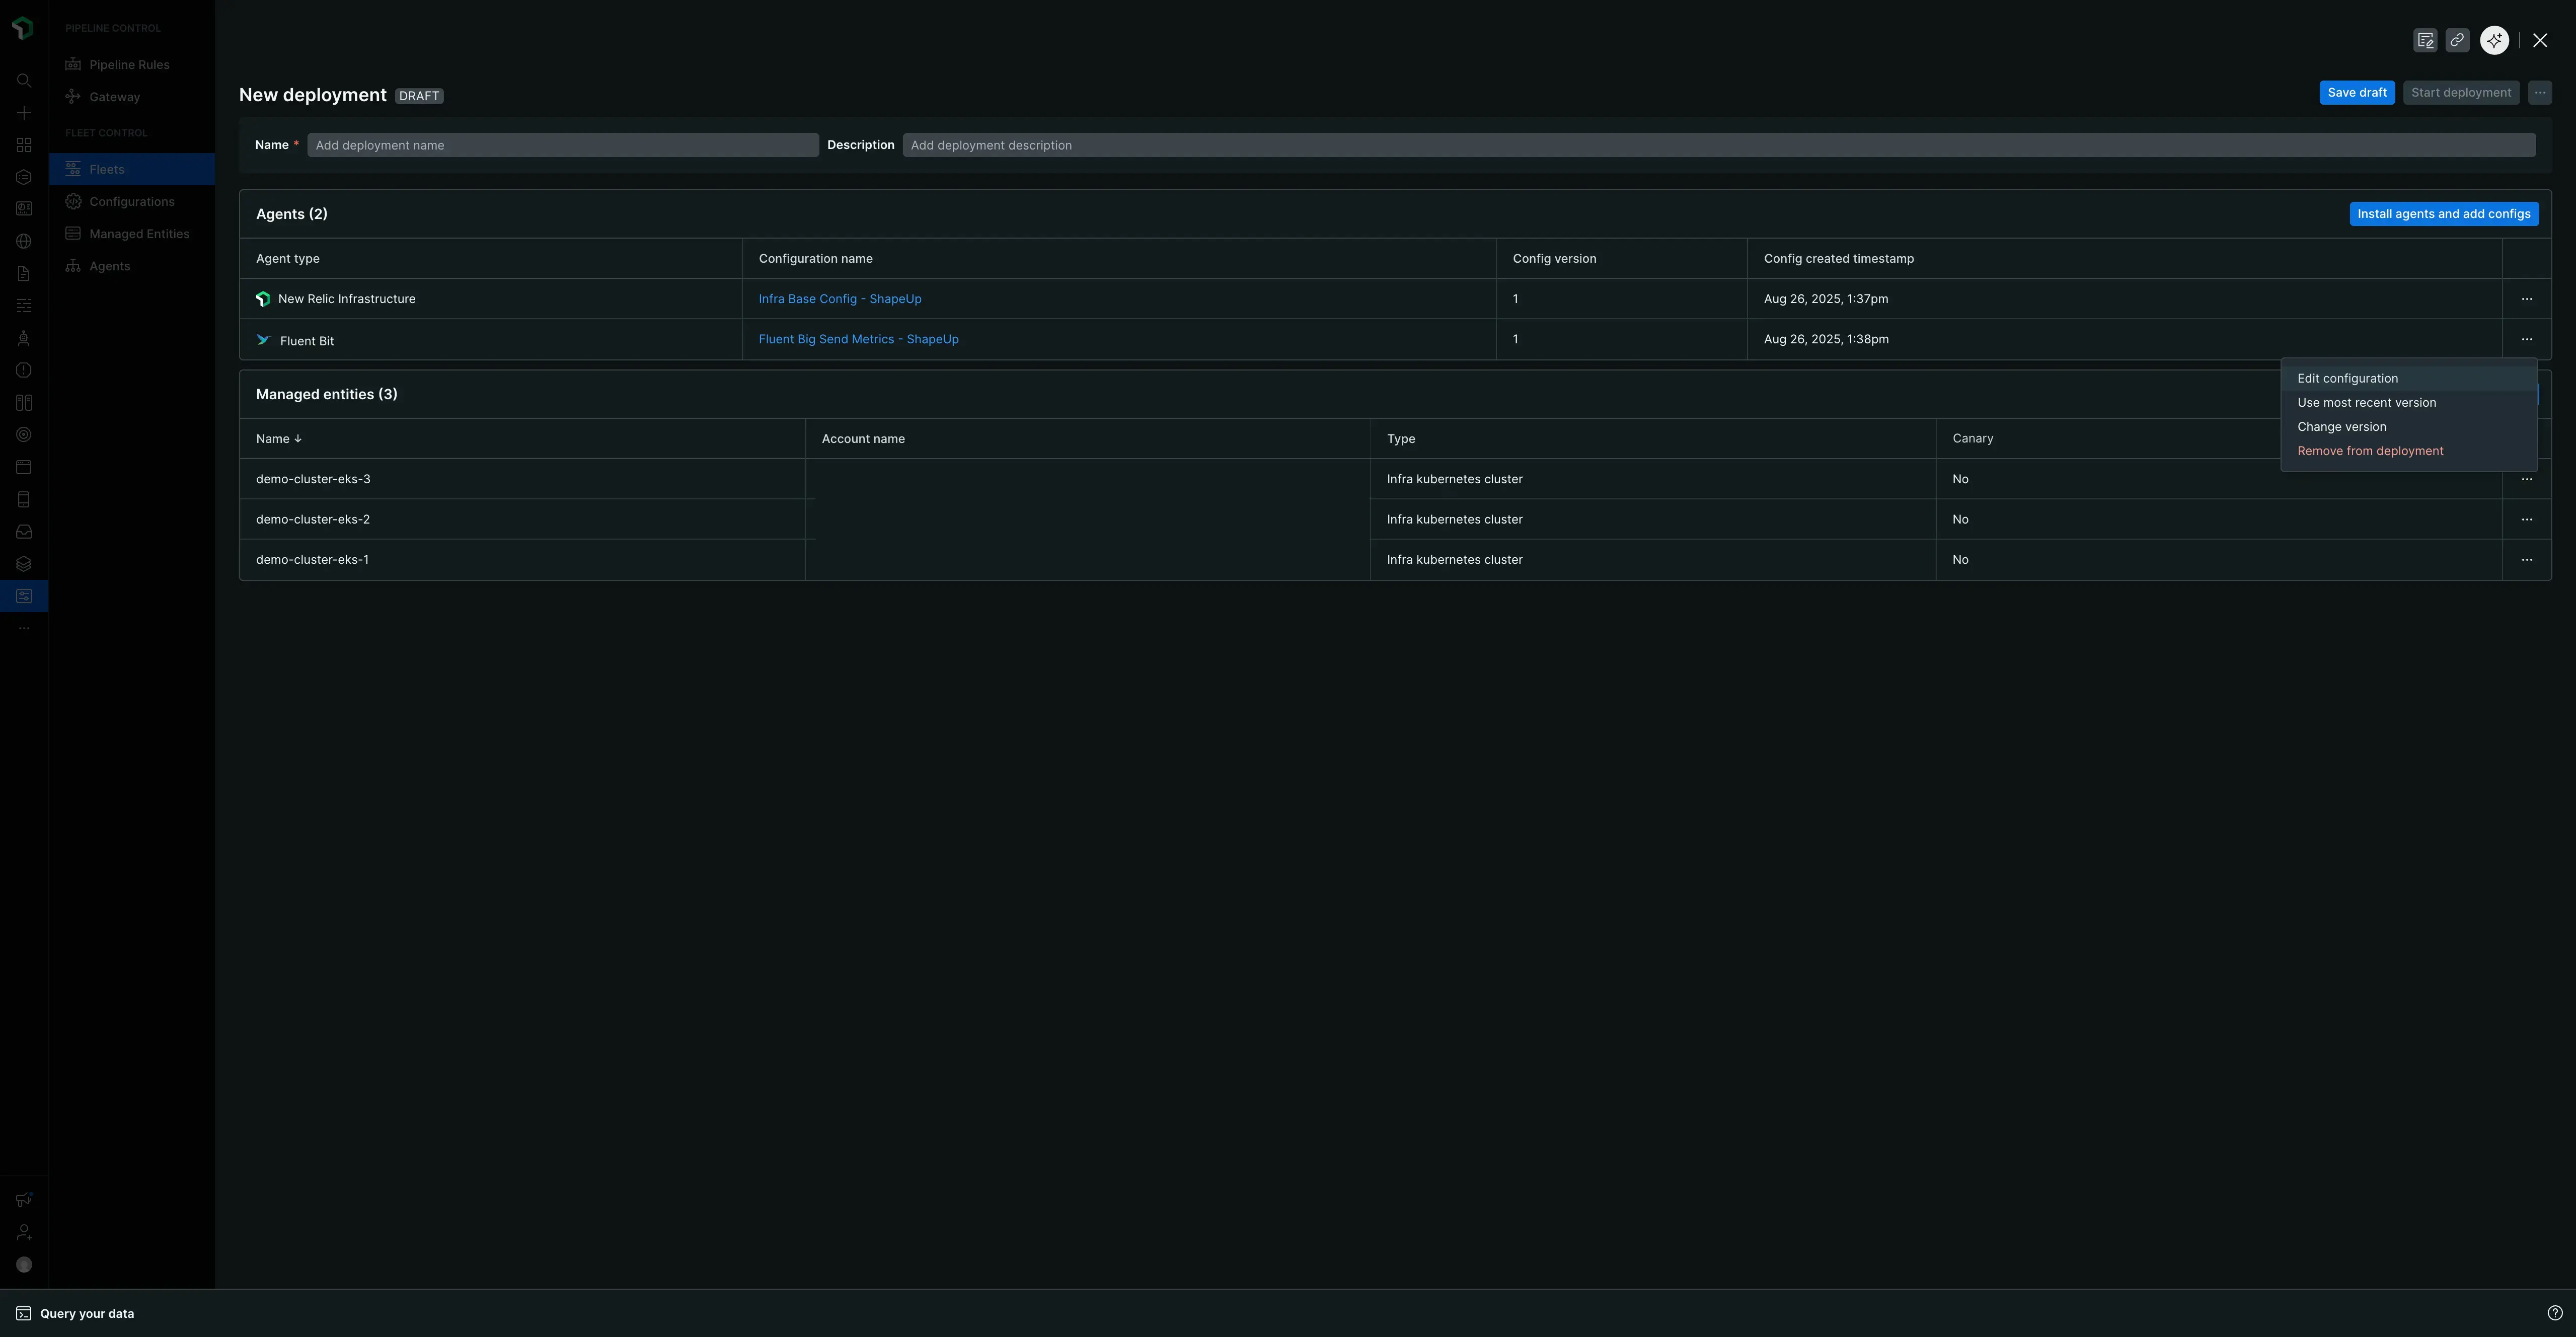
デプロイメントを作成または編集する場合、Agents [デプロイメント]ペインのエージェント表には、エージェントごとにいくつかのアクションが表示されます。 エージェントの行の右側にある省略記号 ( ... ) をクリックすると、次のオプションにアクセスできます。
- 設定の編集:設定エディターが開き、デプロイメントの一部としてこのエージェントの設定を変更できるようになります。
- 最新バージョンを使用する:設定の複数のバージョンを作成した場合、このオプションは、保存された最新バージョンを使用するようにデプロイメントを自動的に更新します。
- バージョンの変更:デプロイメントに使用する設定の特定の古いバージョンを手動で選択できます。
- デプロイメントから削除:エージェントとその設定をこのデプロイメントから完全に削除します。
艦隊内のエンティティを管理する
重要:艦隊継承の原則
艦隊は継承という基本原則に基づいて運営されます。これは、フリートに割り当てられた管理対象エンティティが、計装の一貫性を確保するために、そのフリートの最後にアクティブなデプロイメントに自動的に準拠することを意味します。 エンティティを追加または削除すると、エージェントが自動的にインストールまたはアンインストールされる可能性があるため、この動作を理解することが重要です。
艦隊からエンティティを削除する
- 現在エンティティが含まれているフリートのSummary[概要]タブに移動します。
- Managed Entities [管理対象エンティティ]表で、チェックボックスを使用して、削除する 1 つ以上のエンティティを選択します。
- 表示されるRemove[削除]ボタンをクリックします。
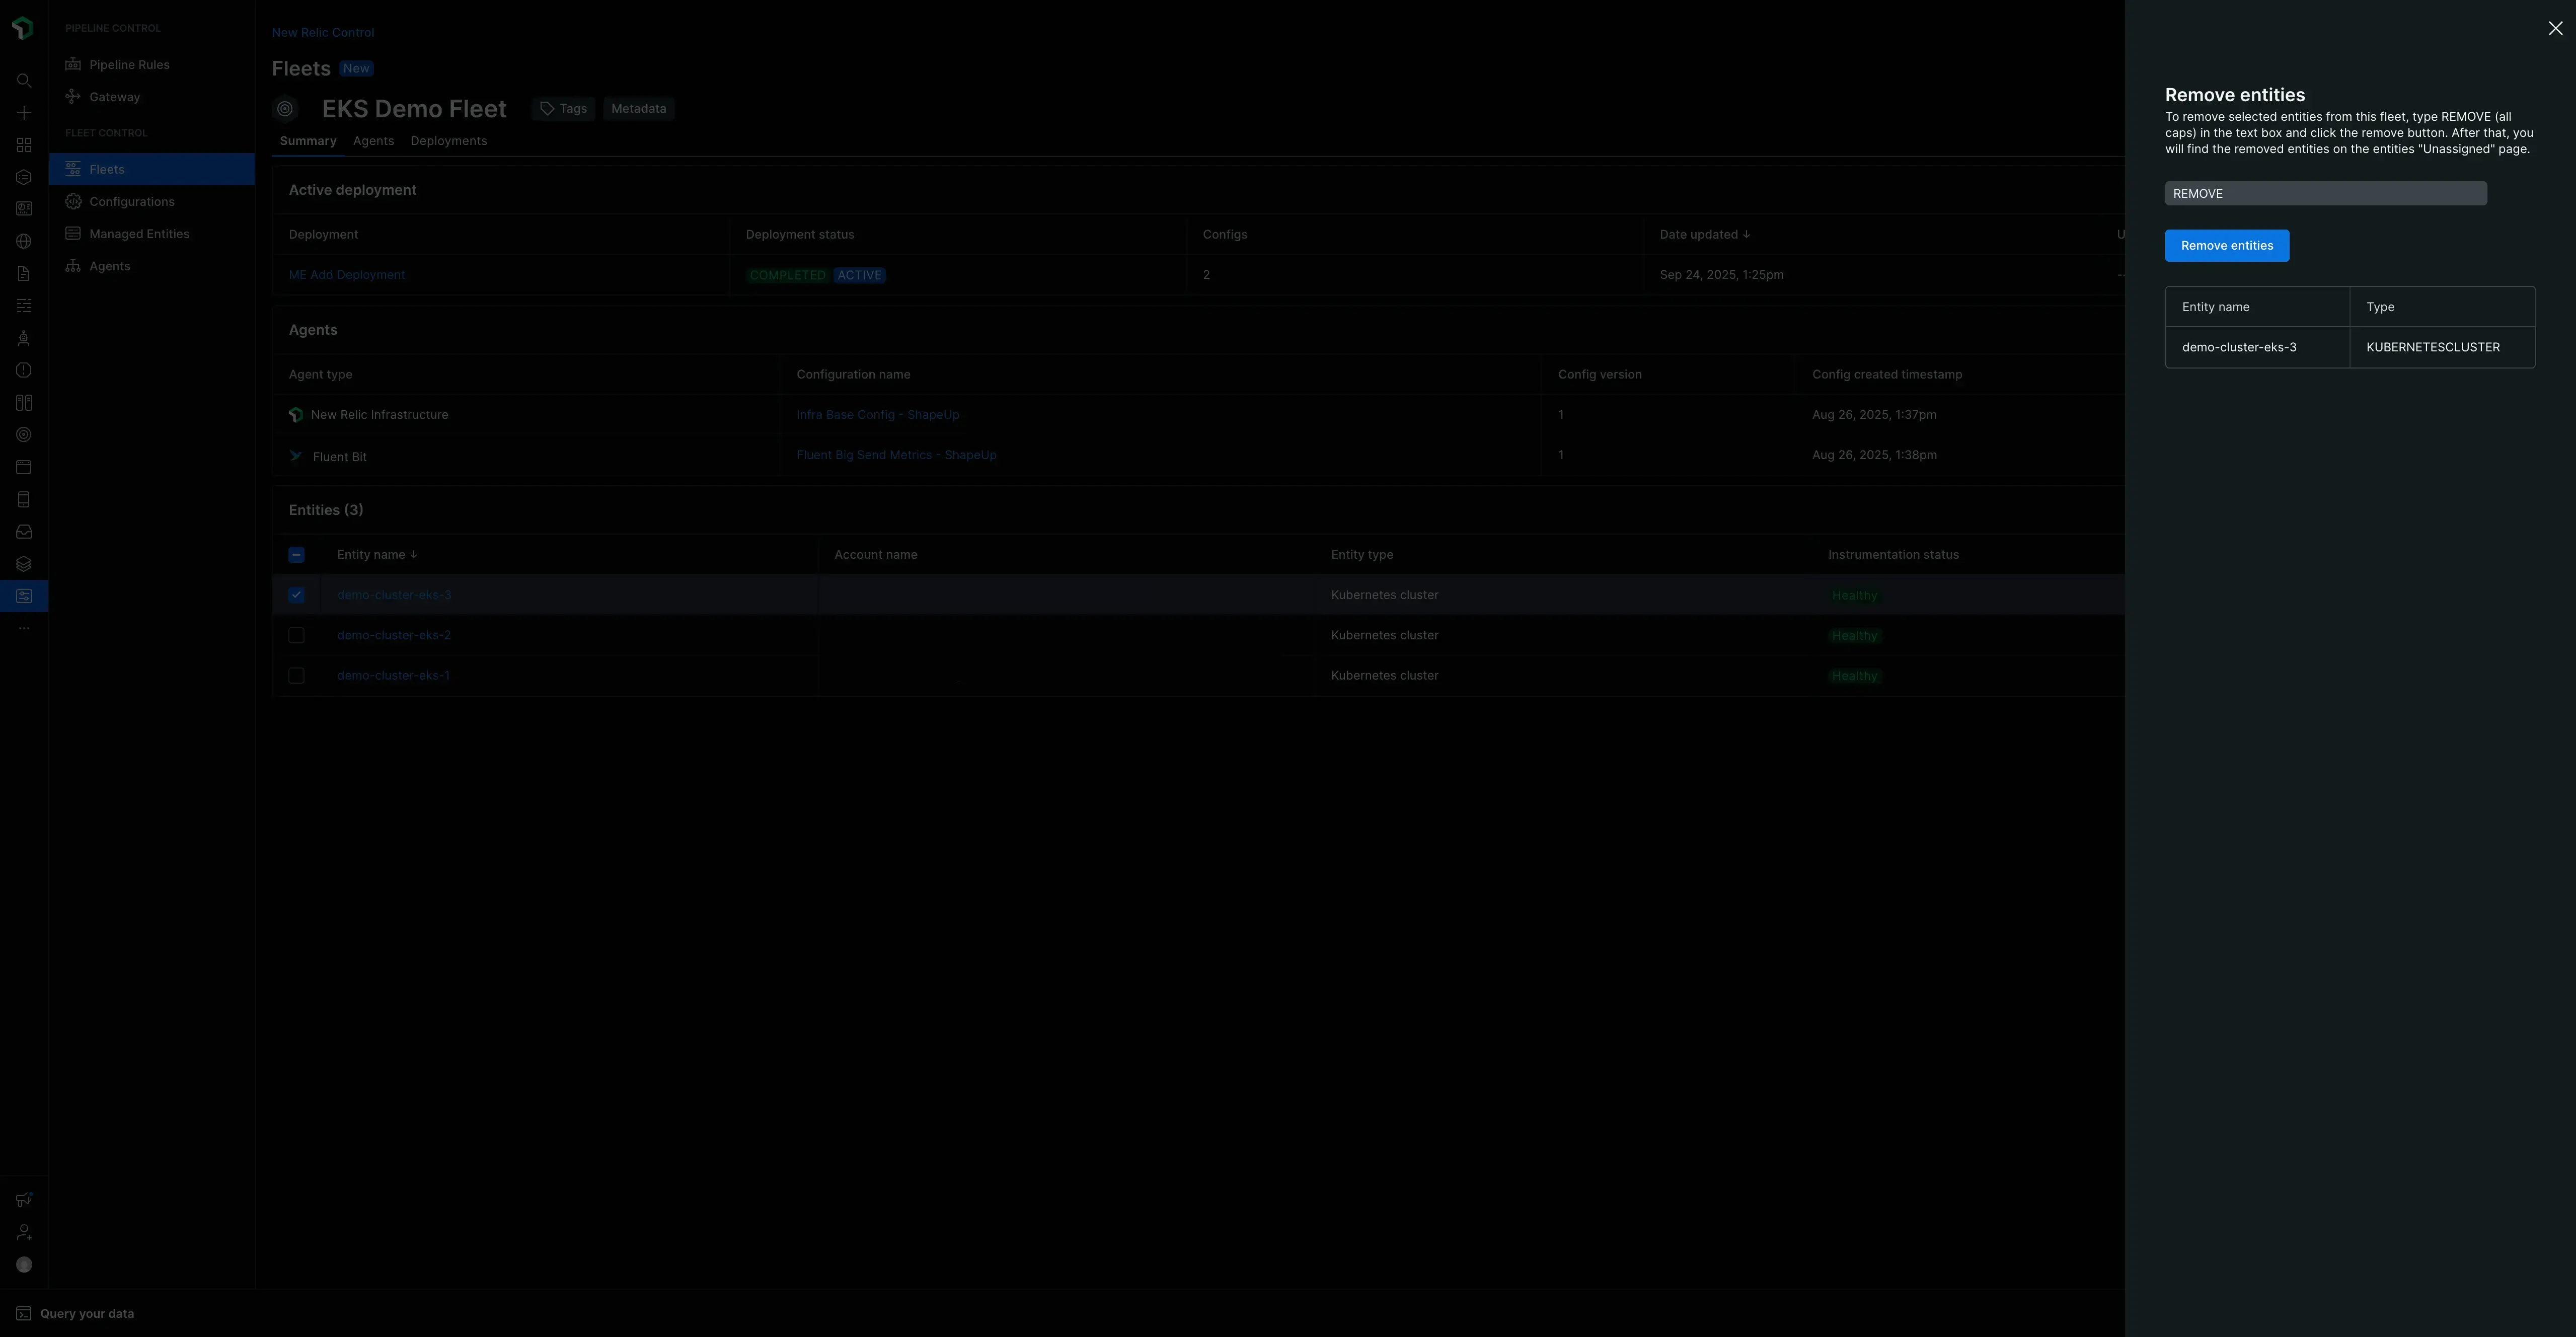
- 削除するエンティティをリストする検証モーダルが表示されます。確認するには、テキスト フィールドに
removeと入力します。 - Remove entities[エンティティの削除]をクリックします。エンティティは艦隊から割り当て解除されました。
重要: ローカル設定に戻す
管理対象エンティティがフリートから削除されると、元のローカル設定、つまりAgent Control最初にインストールされたときの状態に自動的に戻ります。 これにより、エージェントがアンインストールされる可能性があります。たとえば、フリートにインフラストラクチャとFluent Bitエージェントがインストールされているが、エンティティのローカル設定にはAgent Controlのみが含まれている場合、ローカルの状態と一致することを確認するために、削除時に両方のエージェントがアンインストールされます。
割り当てられていない管理対象エンティティをフリートに追加する
新しいデプロイメントを作成して、割り当てられていない管理対象エンティティをフリートに追加します。このプロセスにより、エンティティがフリートおよびそのデプロイ設定に関連付けられます。
- エンティティを追加するフリートに移動し、 Create a deployment [デプロイメントの作成]をクリックします。
- デプロイメントにわかりやすい名前と説明を付けます。
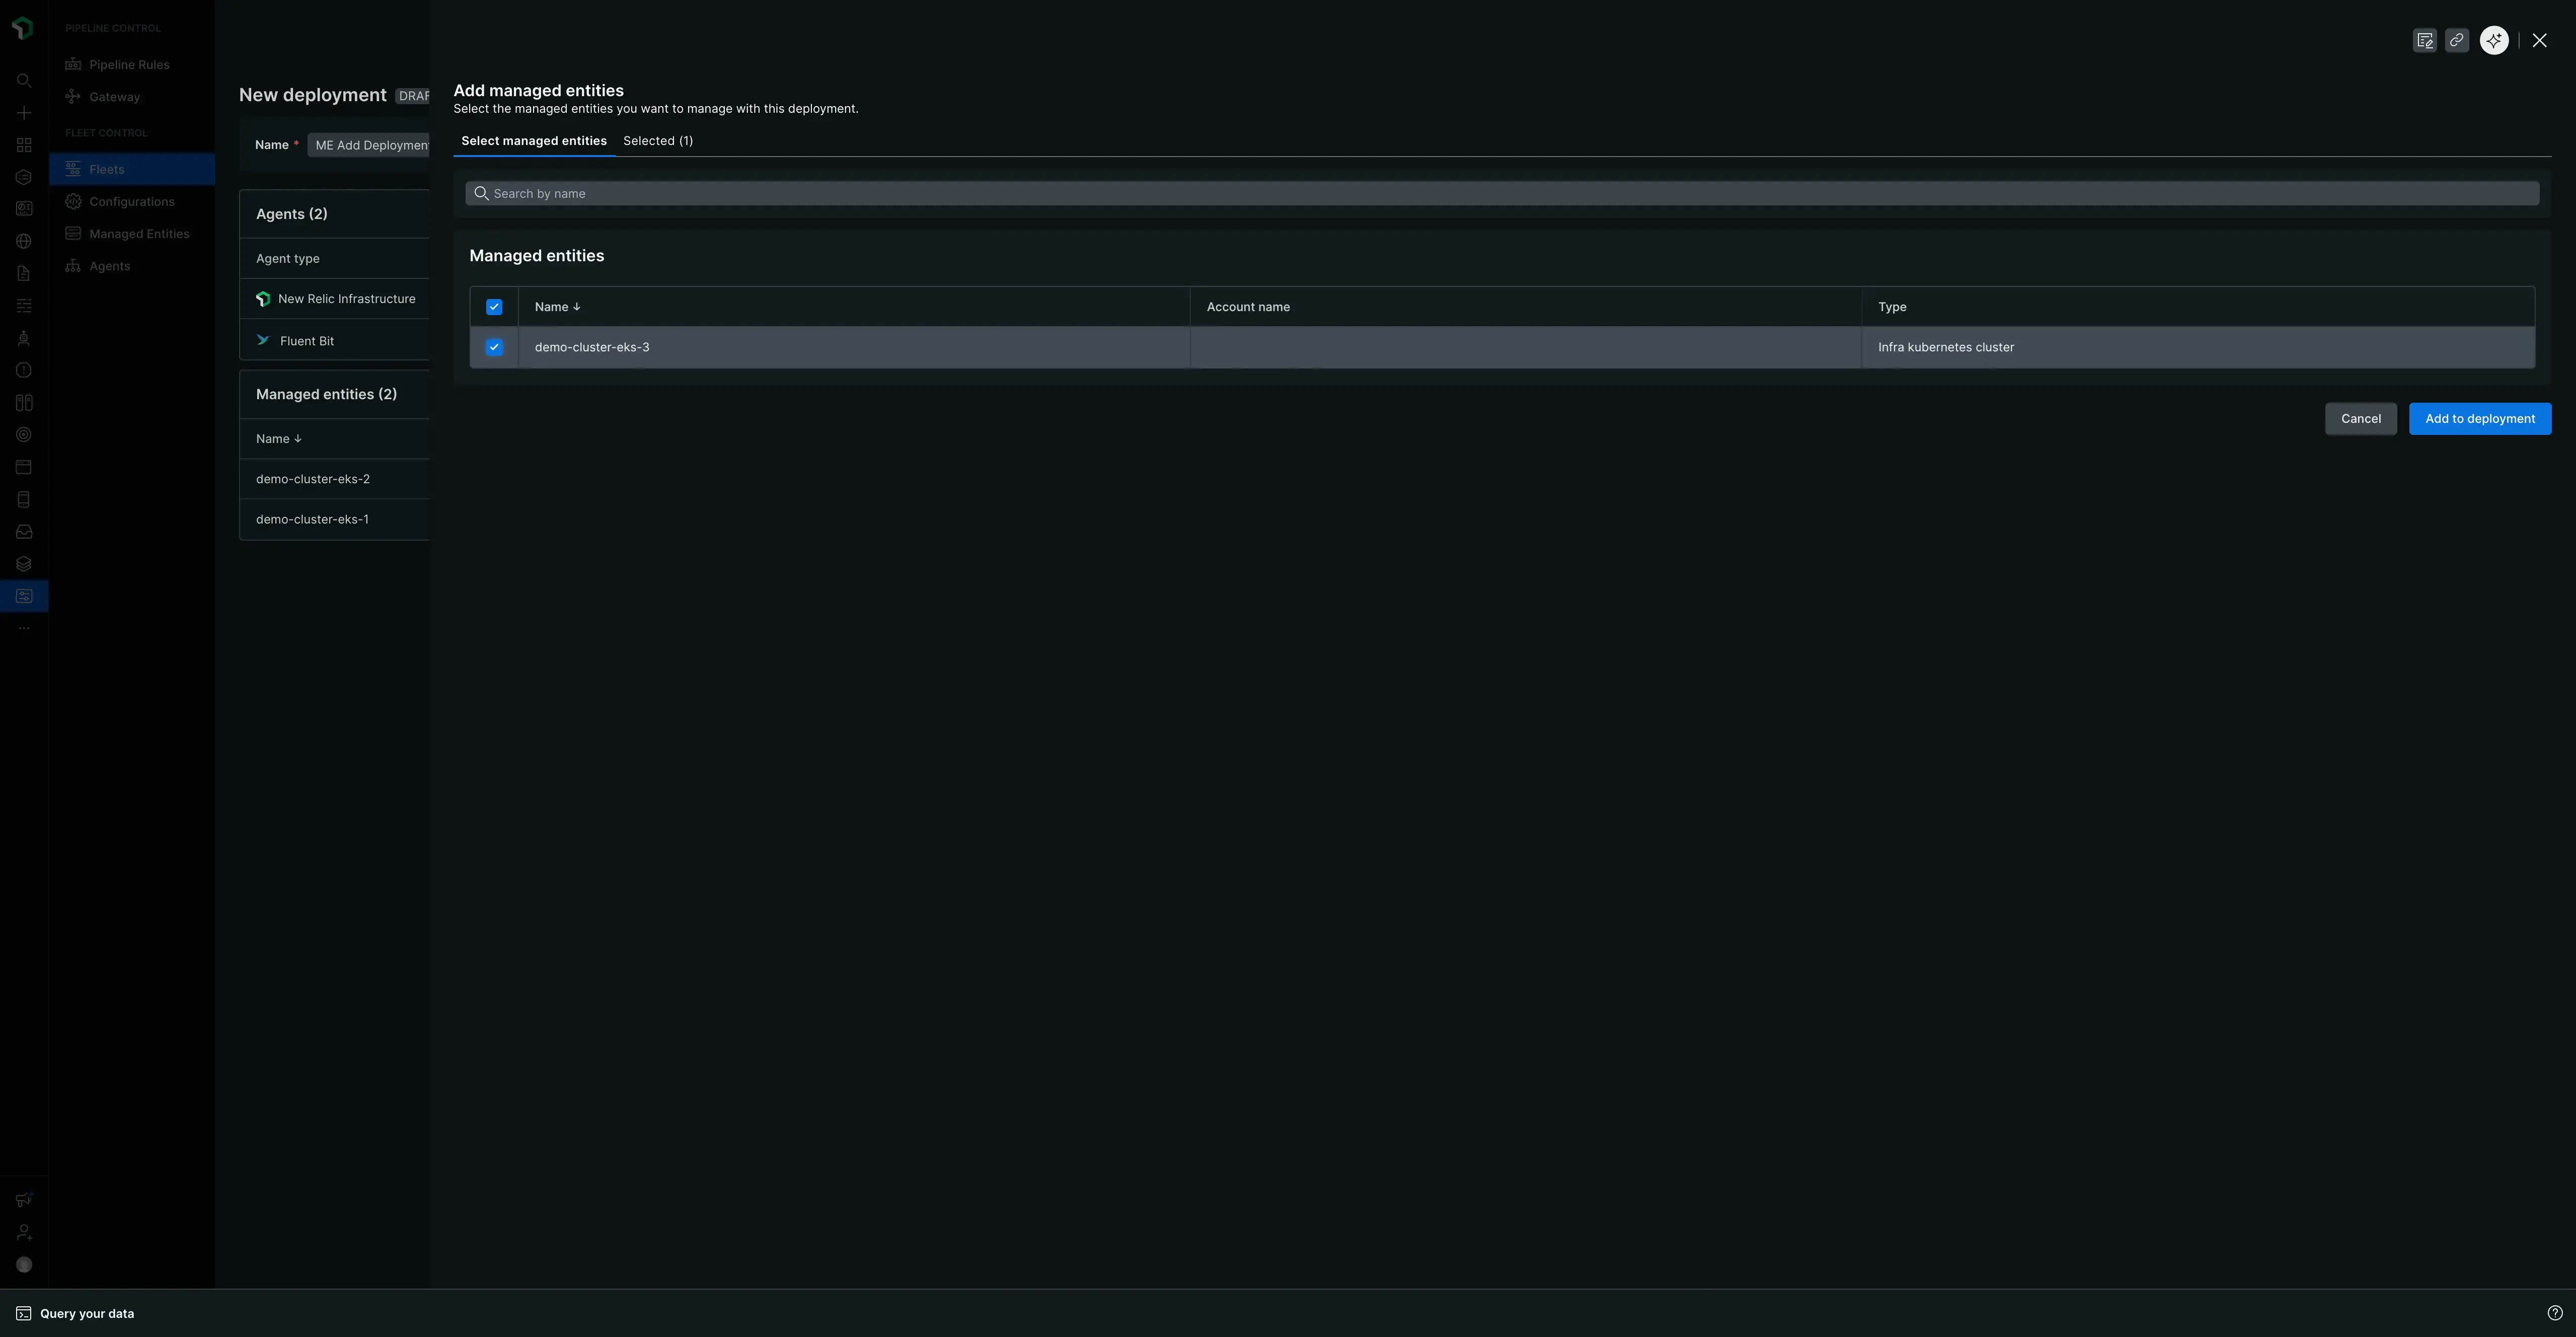
- 「デプロイメント」画面の下部にあるManaged Entities [管理対象エンティティ]テーブルで、 Add managed entities [管理対象エンティティの追加]ボタンをクリックします。
- ペインが開き、割り当てられていないすべての管理対象エンティティのリストが表示されます。
- 選択ボックスを使用して、艦隊に追加する 1 つ以上のエンティティを選択します。
- Add to deployment[デプロイメントに追加]をクリックします。選択したエンティティが、このデプロイメントのManaged Entities [管理対象エンティティ]テーブルに表示されます。
- Save draft [下書きを保存] をクリックし、次に Start deployment [デプロイを開始] をクリックしてプロセスを完了します。エンティティは新しい艦隊に割り当てられます。
重要: 最後にアクティブだったデプロイメントを継承する
管理対象エンティティをフリートに追加すると、バックグラウンドで暗黙的なデプロイメントが実行されます。このデプロイメントは、新しいエンティティの計装を自動的にインストール、更新、または削除し、フリートの最後のアクティブなデプロイメントと完全に一致することを保証します。 たとえば、フリートのアクティブなデプロイメントにインフラストラクチャとFluent Bitエージェントが含まれているが、新しいエンティティに以前は OTel エージェントしかなかった場合、OTel エージェントは削除され、インフラストラクチャとFluent Bitエージェントがインストールされます。
カナリアデプロイメントを使用する
Fleet Control使用すると、デプロイメント プロセス中に 1 つ以上の管理対象エンティティを「カナリア」として指定できます。 これにより、変更を展開するための重要な安全メカニズムが提供されます。
新しいデプロイメントを作成するときに、リスト内の任意の管理対象エンティティの横にある省略記号 ( ... ) を使用して、それをカナリアとして指定できます。
デプロイメントが開始されると、次のようになります。
- 変更は、カナリアとしてマークされた管理対象エンティティに対してのみデプロイされます。
- デプロイメント プロセスは一時停止し、カナリア デプロイメントが成功するのを待ちます。
- いずれかのカナリア デプロイメントが失敗すると、デプロイメント全体が直ちに停止し、他の管理対象エンティティは影響を受けません。
- すべてのカナリア デプロイメントが成功すると、デプロイメントはフリート内の残りの管理対象エンティティに進みます。
重要: 失敗したカナリアの自動ロールバックはありません
カナリア デプロイメントが失敗した場合、デプロイ先の管理対象エンティティはFailed [失敗]状態のままになります。 以前の設定への自動ロールバックはありません。 変更を元に戻したり問題を修正したりするには、新しいデプロイメントを作成する必要があります。
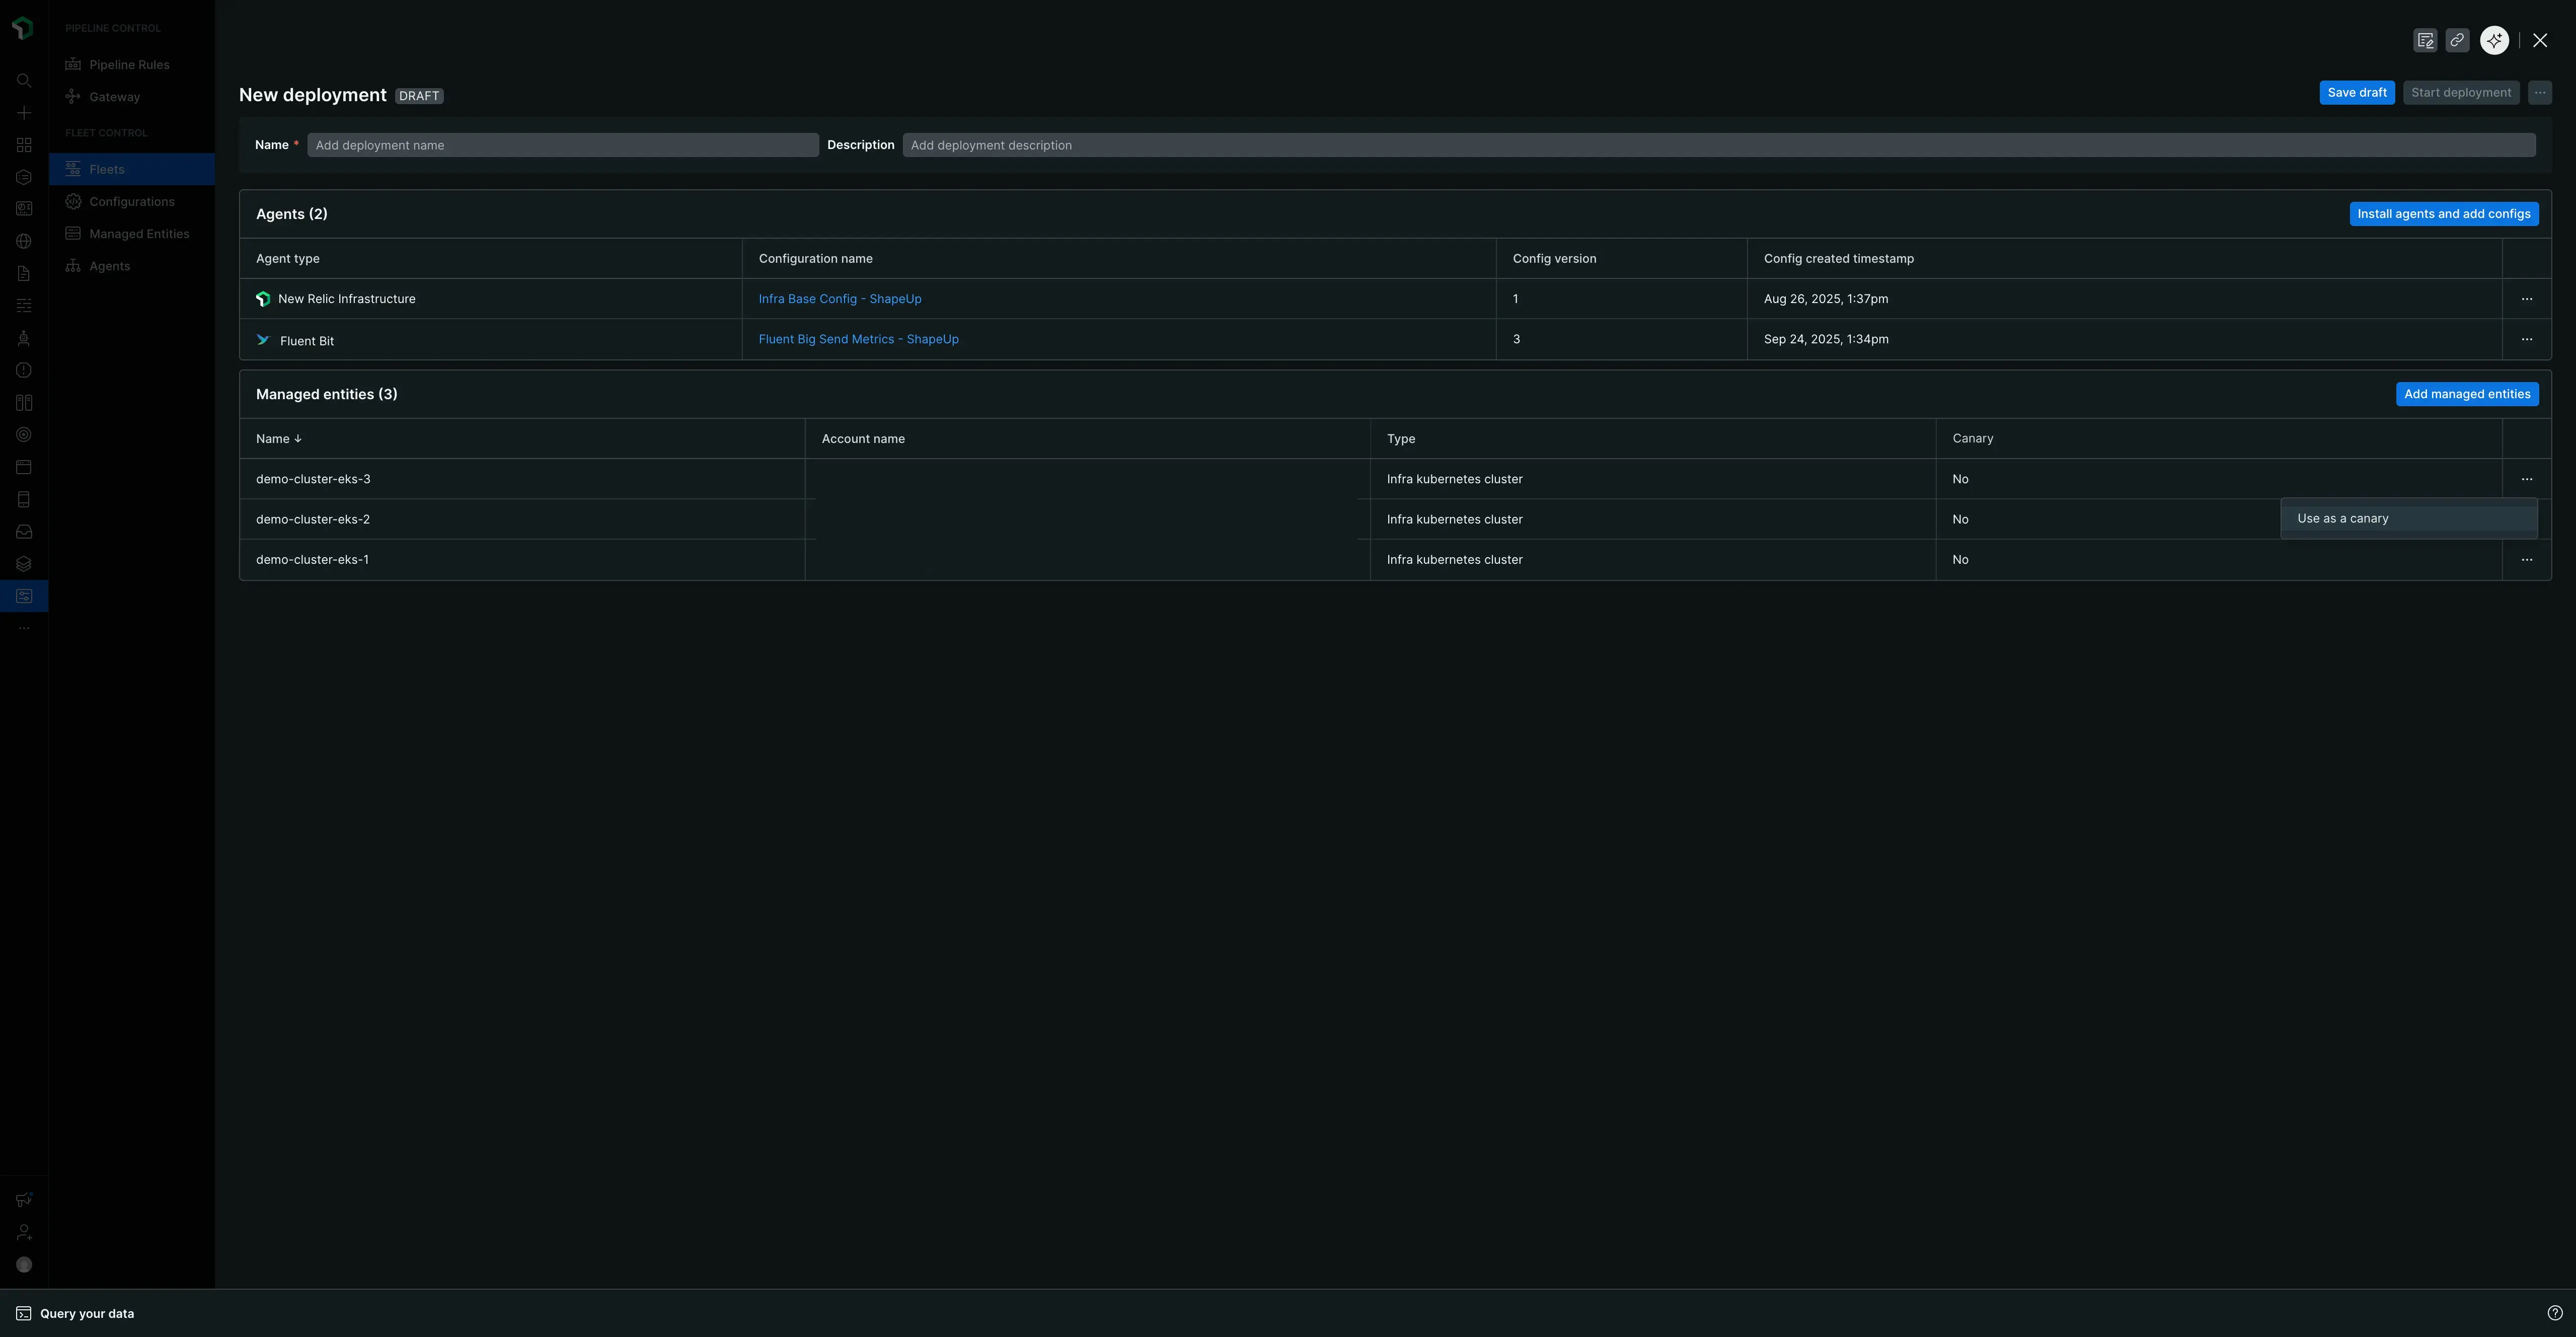
艦隊制御カナリアアクション
設定ページ
重要: 設定はグローバルです
Fleet Controlで作成したすべての設定はグローバルです。 つまり、これらはNew Relic組織全体で使用可能であり、設定を作成したユーザーに関係なく、必要なすべてのフリートにデプロイできます。
New Relic Control → Configurationsに移動すると、すべてのエージェント設定を管理するための中心ハブであるメインの設定ページに移動します。
メインページの概要
このページでは、アカウントで利用可能なすべての設定の概要を説明します。 ここから、次のことができます。
- 概要カウントを表示:合計設定数を表示します。
- 「設定のディストリビューション」を参照してください。エージェント タイプ別の設定の内訳を表示します (たとえば、 New Relic Infrastructure 、 Fluent Bit 、 NRDOT Collector )。
- 設定の検索:検索バーを使用して、名前または関連するエージェント タイプで特定の設定を検索します。
- リストを更新します。新しい設定を作成したばかりで、それがテーブルに表示されない場合は、 Create configuration[設定の作成]ボタンの左側にある更新ボタンをクリックします。
このページには、次の列を含む設定の表が表示されます。
- 設定:設定の名前。
- エージェント:設定が適用されるエージェントのタイプ。
- リビジョン:設定に存在するバージョンの数。
- タイプ:管理対象エンティティのタイプ (Kubernetes やホストなど)。
- 最終更新日:最終更新のタイムスタンプ。
設定アクション
メイン設定テーブルから、設定の右端にある省略記号 ( ... ) をクリックしてEdit [編集]できます。 これにより、設定ファイルを変更できるメイン編集ペインが開きます。 このビューには、構成ファイルをローカル マシンに Download [ダウンロード] したり、その内容をクリップボードに Copy [コピー] したりするためのボタンもあります。
設定を理解する
設定ファイルの構造は、選択したEnvironment [環境]( Kubernetesまたはホスト) によって異なります。
- Kubernetesの場合、 UIで作成する設定は
values.yamlファイルです。 デプロイメント中に、 Fleet ControlこのファイルをエージェントのHelmチャートとともにパッケージ化し、クラスタ上で構成します。 Kubernetes エージェントのテンプレートは、標準的な Helm チャートvalues.yamlファイルとして構造化されています。テンプレートの上部近くに、 New Relic Helm Charts GitHub リポジトリにあるエージェントのHelmチャートへのコメントアウト リンクがあります。 これにより、スキーマ、使用可能な値、その他のエージェント固有のドキュメントを簡単に参照できます。 - ホストの場合、設定ファイル形式はデプロイであるエージェントに固有です。
重要: Kubernetes の自動挿入値
Kubernetes環境にデプロイする場合、設定でlicenseKey 、 cluster 、 lowDataMode 、またはverboseLog値を手動で指定する必要はありません。 これらは、 Agent Control設定から環境変数として自動的に挿入されます。 詳細については、シークレット管理に関するドキュメントをご覧ください。
コンフィギュレーションの作成
新しいグローバル設定を最初から作成するには:
メインの設定ページから、 Create configuration [設定の作成]ボタンをクリックします。
表示されるモーダルで、次の操作を行う必要があります。
- Environment [環境](Kubernetes またはホスト) を選択します。
- Agent type [エージェントの種類](New Relic Infrastructure、NRDOT コレクター、Fluent Bit など) を選択します。
- 設定に意味のある一意のName [名前]を付けます。
Continue[続行]をクリックします。これにより、2 つのペインに分割された設定編集ビューが開きます。
- 左ペイン (アクティブな設定):ここで設定を作成します。 このペインに直接入力したり、別のソースからコンテンツを貼り付けたりすることができます。
- 右ペイン (テンプレート):このペインには、選択したエージェント タイプの最新のデフォルト テンプレートが含まれています。これらのテンプレートは、エージェントを実行するために必要な最小限の設定を提供しますが、コメントアウトされた追加のオプションも多数含まれています。これらの例を参考にすることも、コメントを解除してよりカスタマイズされた設定を構築することもできます。
一般的なワークフローとしては、テンプレート ペインのCopy[コピー]ボタンをクリックし、その内容を左側のアクティブな設定ペインに貼り付けて、開始点として使用することが挙げられます。
左側のペインで設定が完了したら、 Save [保存]をクリックします。編集ビューが閉じて、新しい設定を見つけることができるメインの設定ページに戻ります。
特定の設定の表示とバージョン管理
設定の詳細を表示し、そのバージョンを管理するには、メイン リストで設定の名前をクリックします。 これにより、特定の設定の詳細ペインが開きます。
このビューには次の内容が表示されます。
- 設定の名前、エージェントのタイプ、および利用可能なバージョンのリスト。
- Deployment status [デプロイメント ステータス]。設定がいずれかのフリートにデプロイされたかどうか、また、デプロイされている場合はどのフリートにデプロイされたかを示します。
このペインからは、Download [ダウンロード]、Copy [コピー]、Clone [複製]などのいくつかのアクションを実行することもできます。ここでの主なアクションは、設定の新しいバージョンを作成することです。
新しいバージョンを作成するには:
- Create config version [構成バージョンの作成]ボタンをクリックします。
- これにより、設定を変更できる編集ペインが開きます。
- 編集が完了したら、 Save [保存]をクリックします。
- メインの設定ページに戻り、その設定のRevisions [リビジョン]数が 1 つ増加していることがわかります。
設定に戻ってクリックすると、リストから新しいバージョンを選択して表示できるようになります。
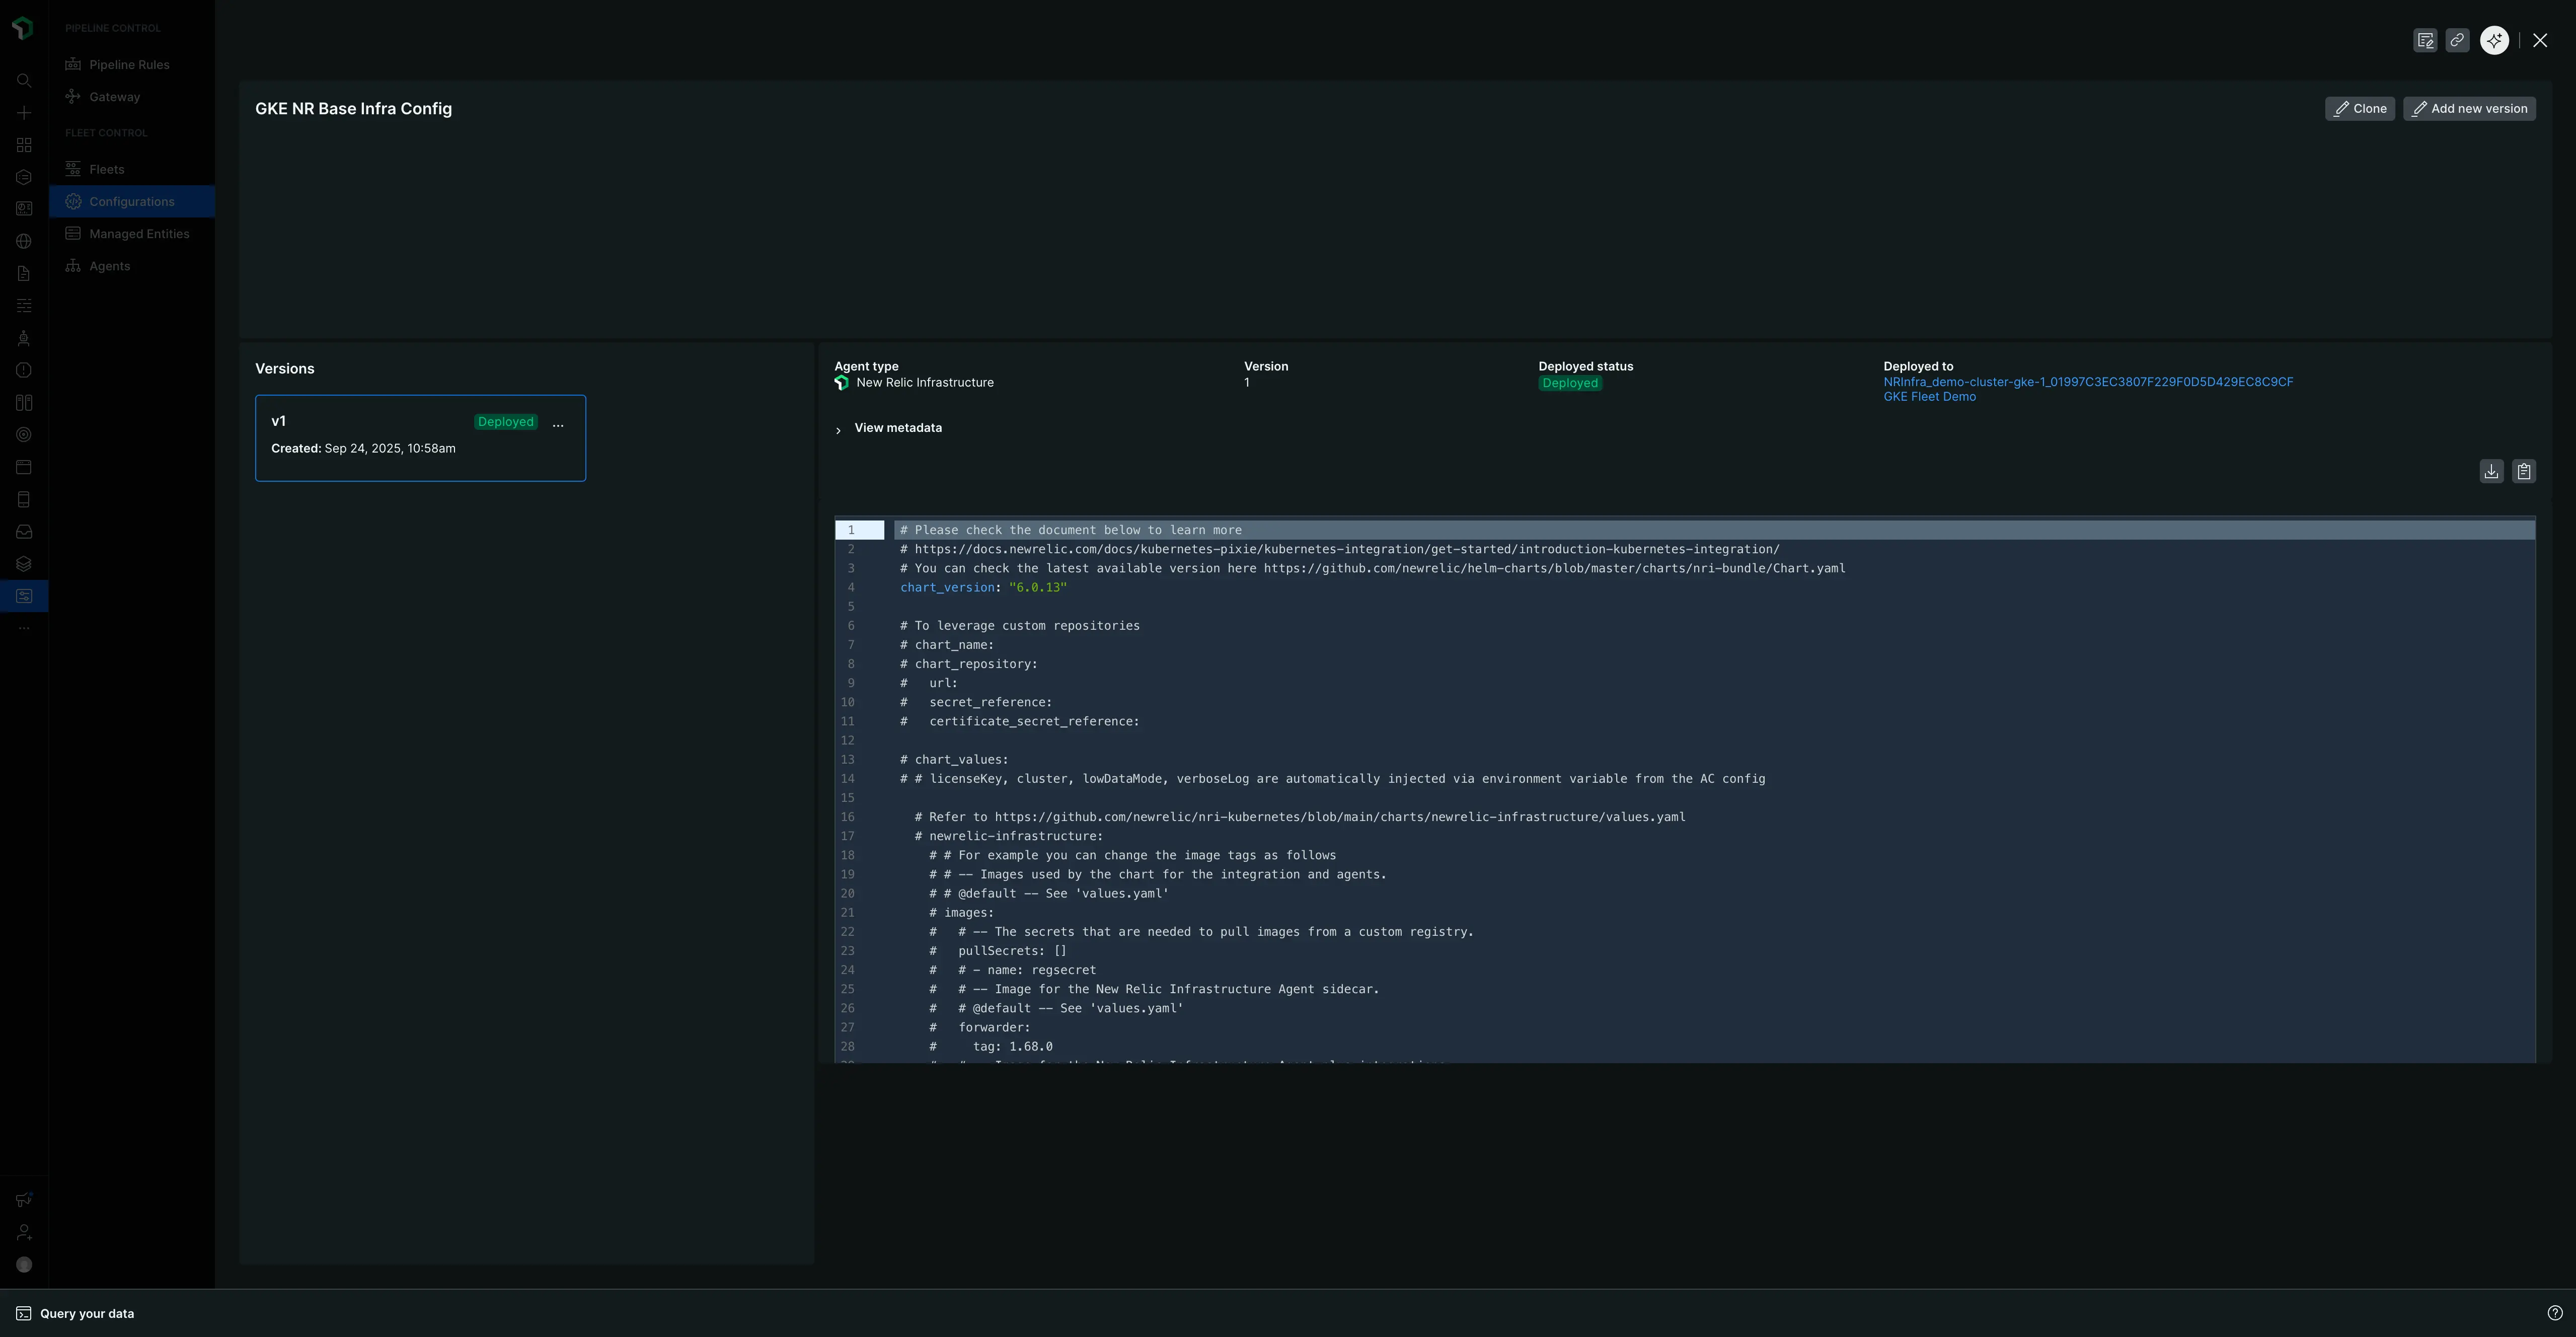
設定とそのバージョンを削除する
設定を削除するには、まずその個々のバージョンをすべて削除する必要があります。 最後のバージョンが削除されると、親設定は自動的に削除されます。
重要: 削除制限
現在アクティブなデプロイメントの一部である設定バージョンは削除できません。 設定の詳細ペインのデプロイメント ステータス セクションには、バージョンがどのフリートにデプロイされているかが表示されます。 削除する前に、異なる設定バージョンを使用するフリート用の新しいデプロイメントを作成する必要があります。
- 設定バージョンを削除するには:
- 設定ページに移動します。
- 変更したい設定の名前をクリックして、詳細ペインを開きます。
- 左側に、すべてのバージョンのリストが表示されます。削除したいバージョンにマウスを移動し、表示される省略記号 (...) をクリックします。
- メニューから「削除」を選択します。
- 残りのすべてのバージョンに対してこのプロセスを繰り返します。最後のバージョンが削除されると、親設定はメイン設定ページのリストから削除されます。
設定のクローンを作成する
クローン作成は、既存の設定に基づいて新しい設定を素早く作成する方法です。
- メイン設定ページで、メインのCreate configuration [設定作成]ボタンの横にある省略記号 (
...) ボタンをクリックします。 - ドロップダウンから、クローンの開始点として使用する既存の設定を選択します。
- これにより、選択した設定の内容が事前に入力された、同じ 2 つのペインの編集ビューが開きます。
- これで、新しい設定を作成して保存できます。
管理対象エンティティのメインページ
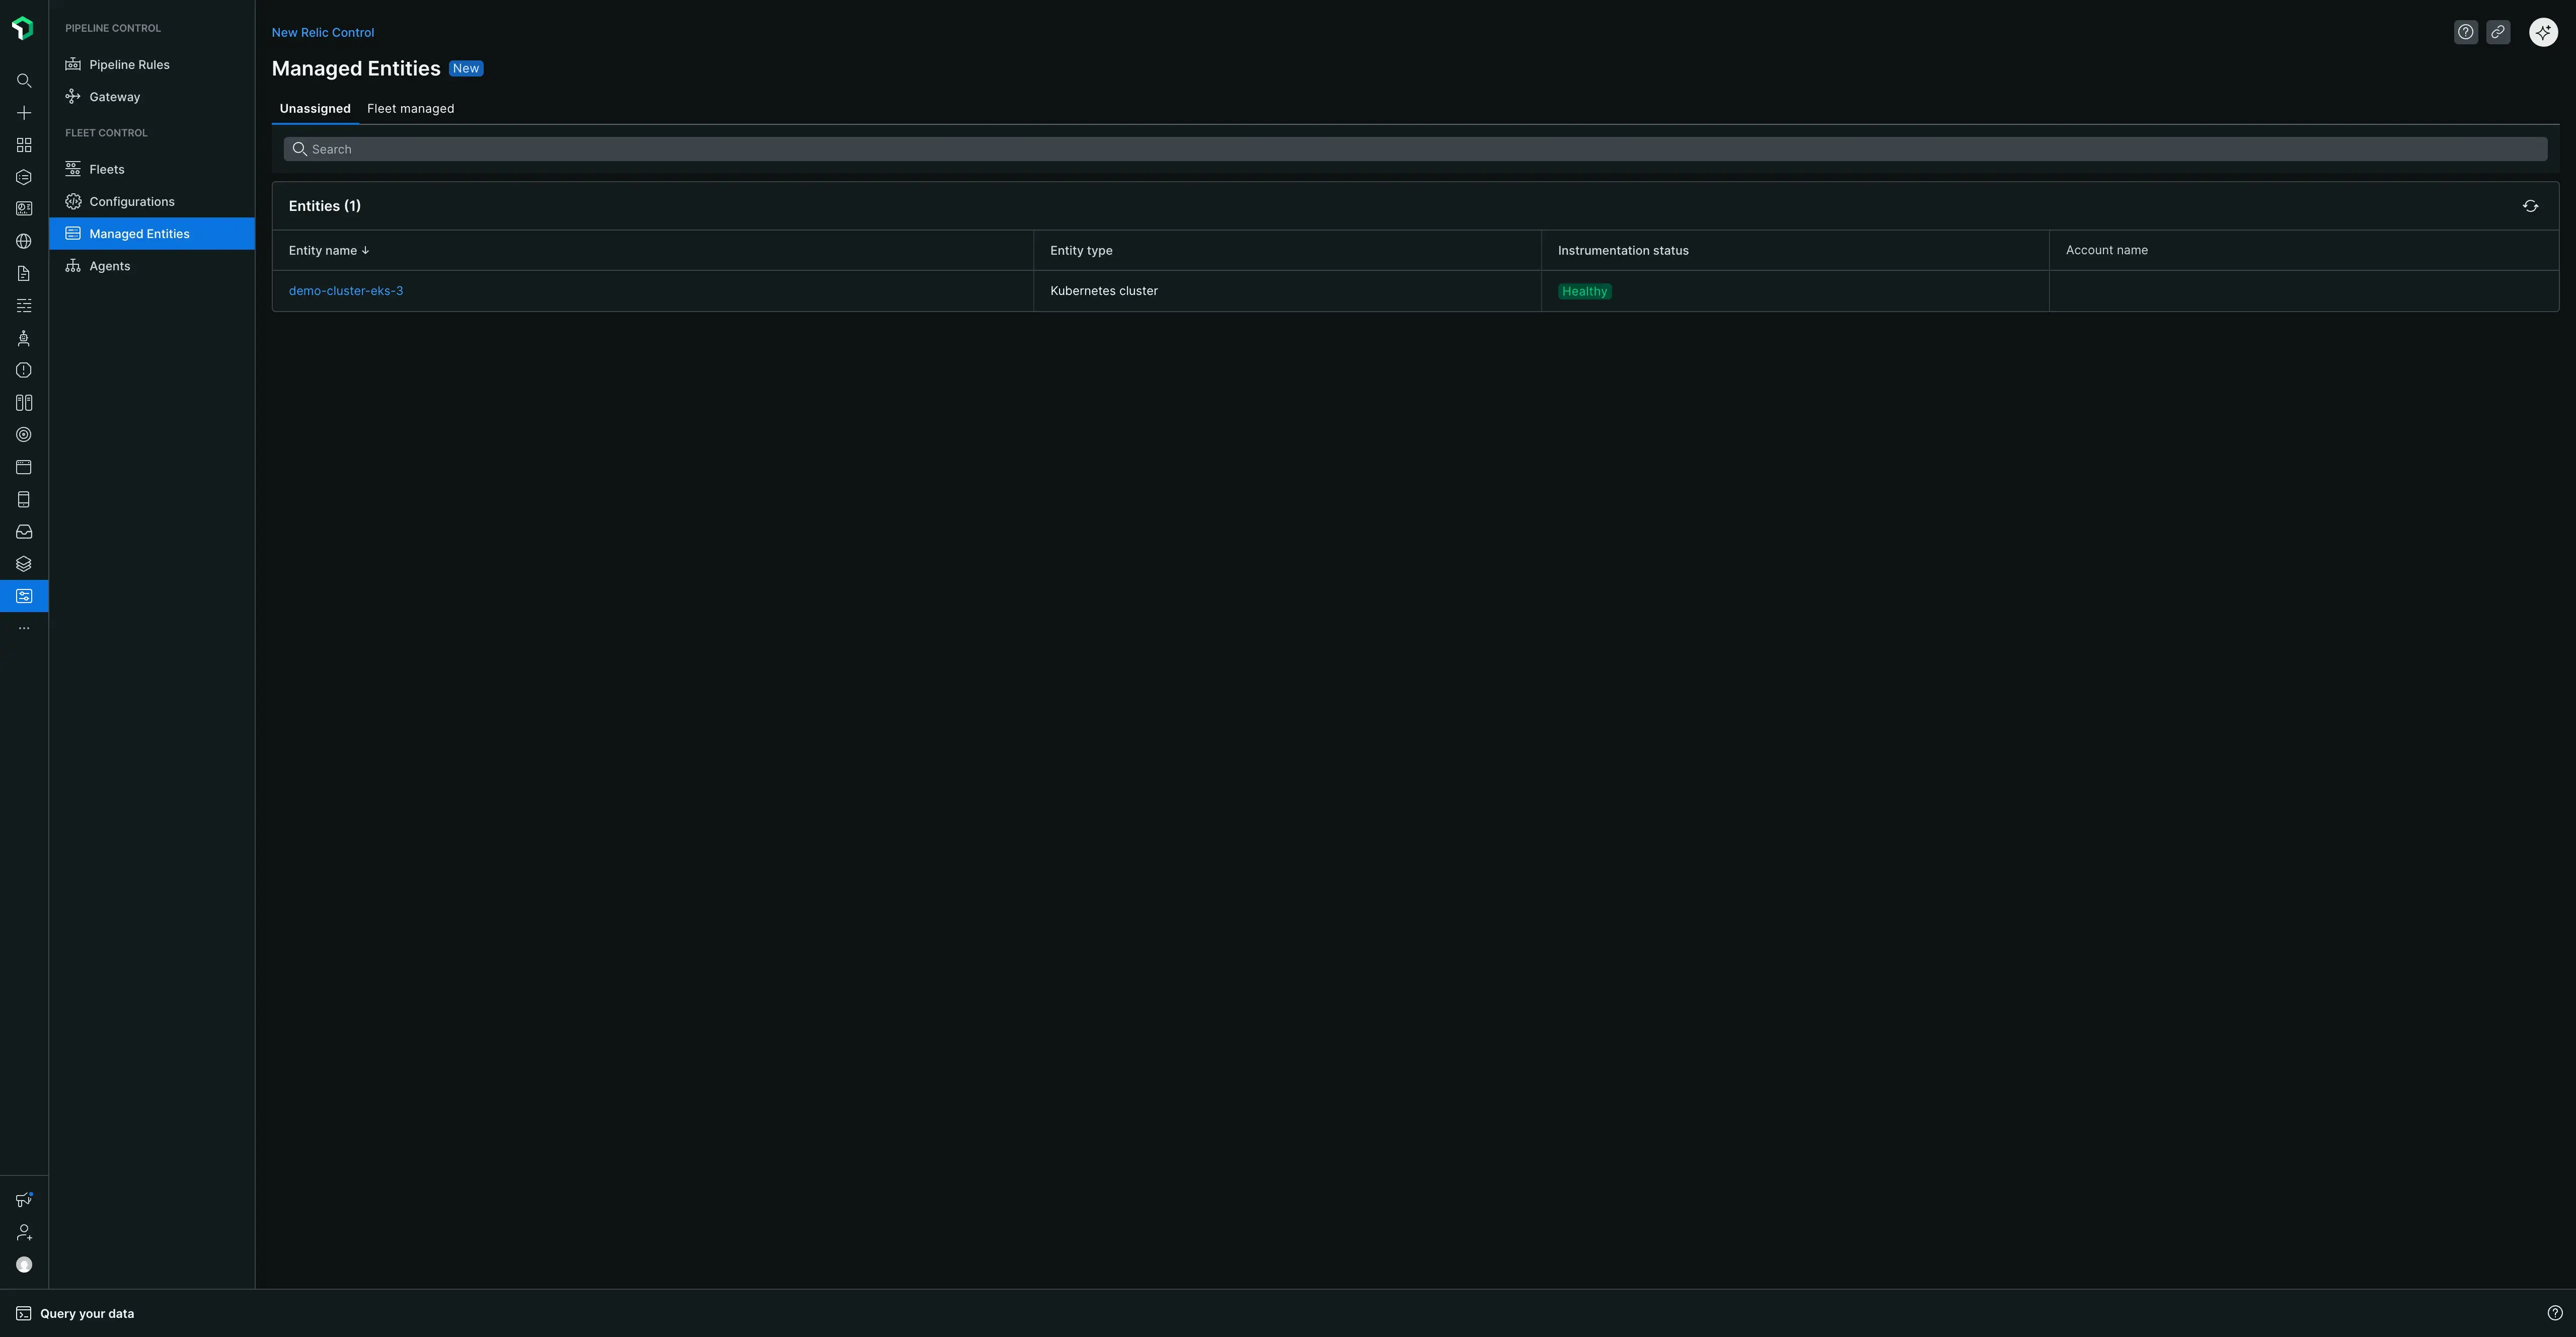
New Relic Control → Managed Entitiesに移動すると、すべてのマネージド エンティティ ( KubernetesクラスタまたはAgent Controlがインストールされているホスト) の一元的なビューが表示されます。 このページは、Fleet Control で管理できるすべてのエンティティの完全な資産インベントリとして機能し、 Fleet managedとUnassignedの2 つのタブで構成されています。
フリート管理タブ
このタブには、現在フリートに割り当てられているすべての管理対象エンティティが一覧表示されます。表には次の情報が記載されています。
- エンティティ名:名前をクリックするとNew Relicプラットフォームのエンティティのエクスプローラー エクスペリエンス ( Kubernetesクラスタ エクスプローラーなど) に直接移動します。
- エンティティ タイプ:管理対象のエンティティのタイプ ( Kubernetesクラスタやホストなど)。
- 計装ステータス:エンティティ上の計装の現在の稼働ステータス。
- 艦隊:エンティティが現在割り当てられている艦隊。フリート名をクリックすると、そのフリートの管理ページに直接移動できます。
- アカウント名:管理対象エンティティに関連付けられた New Relic アカウント。
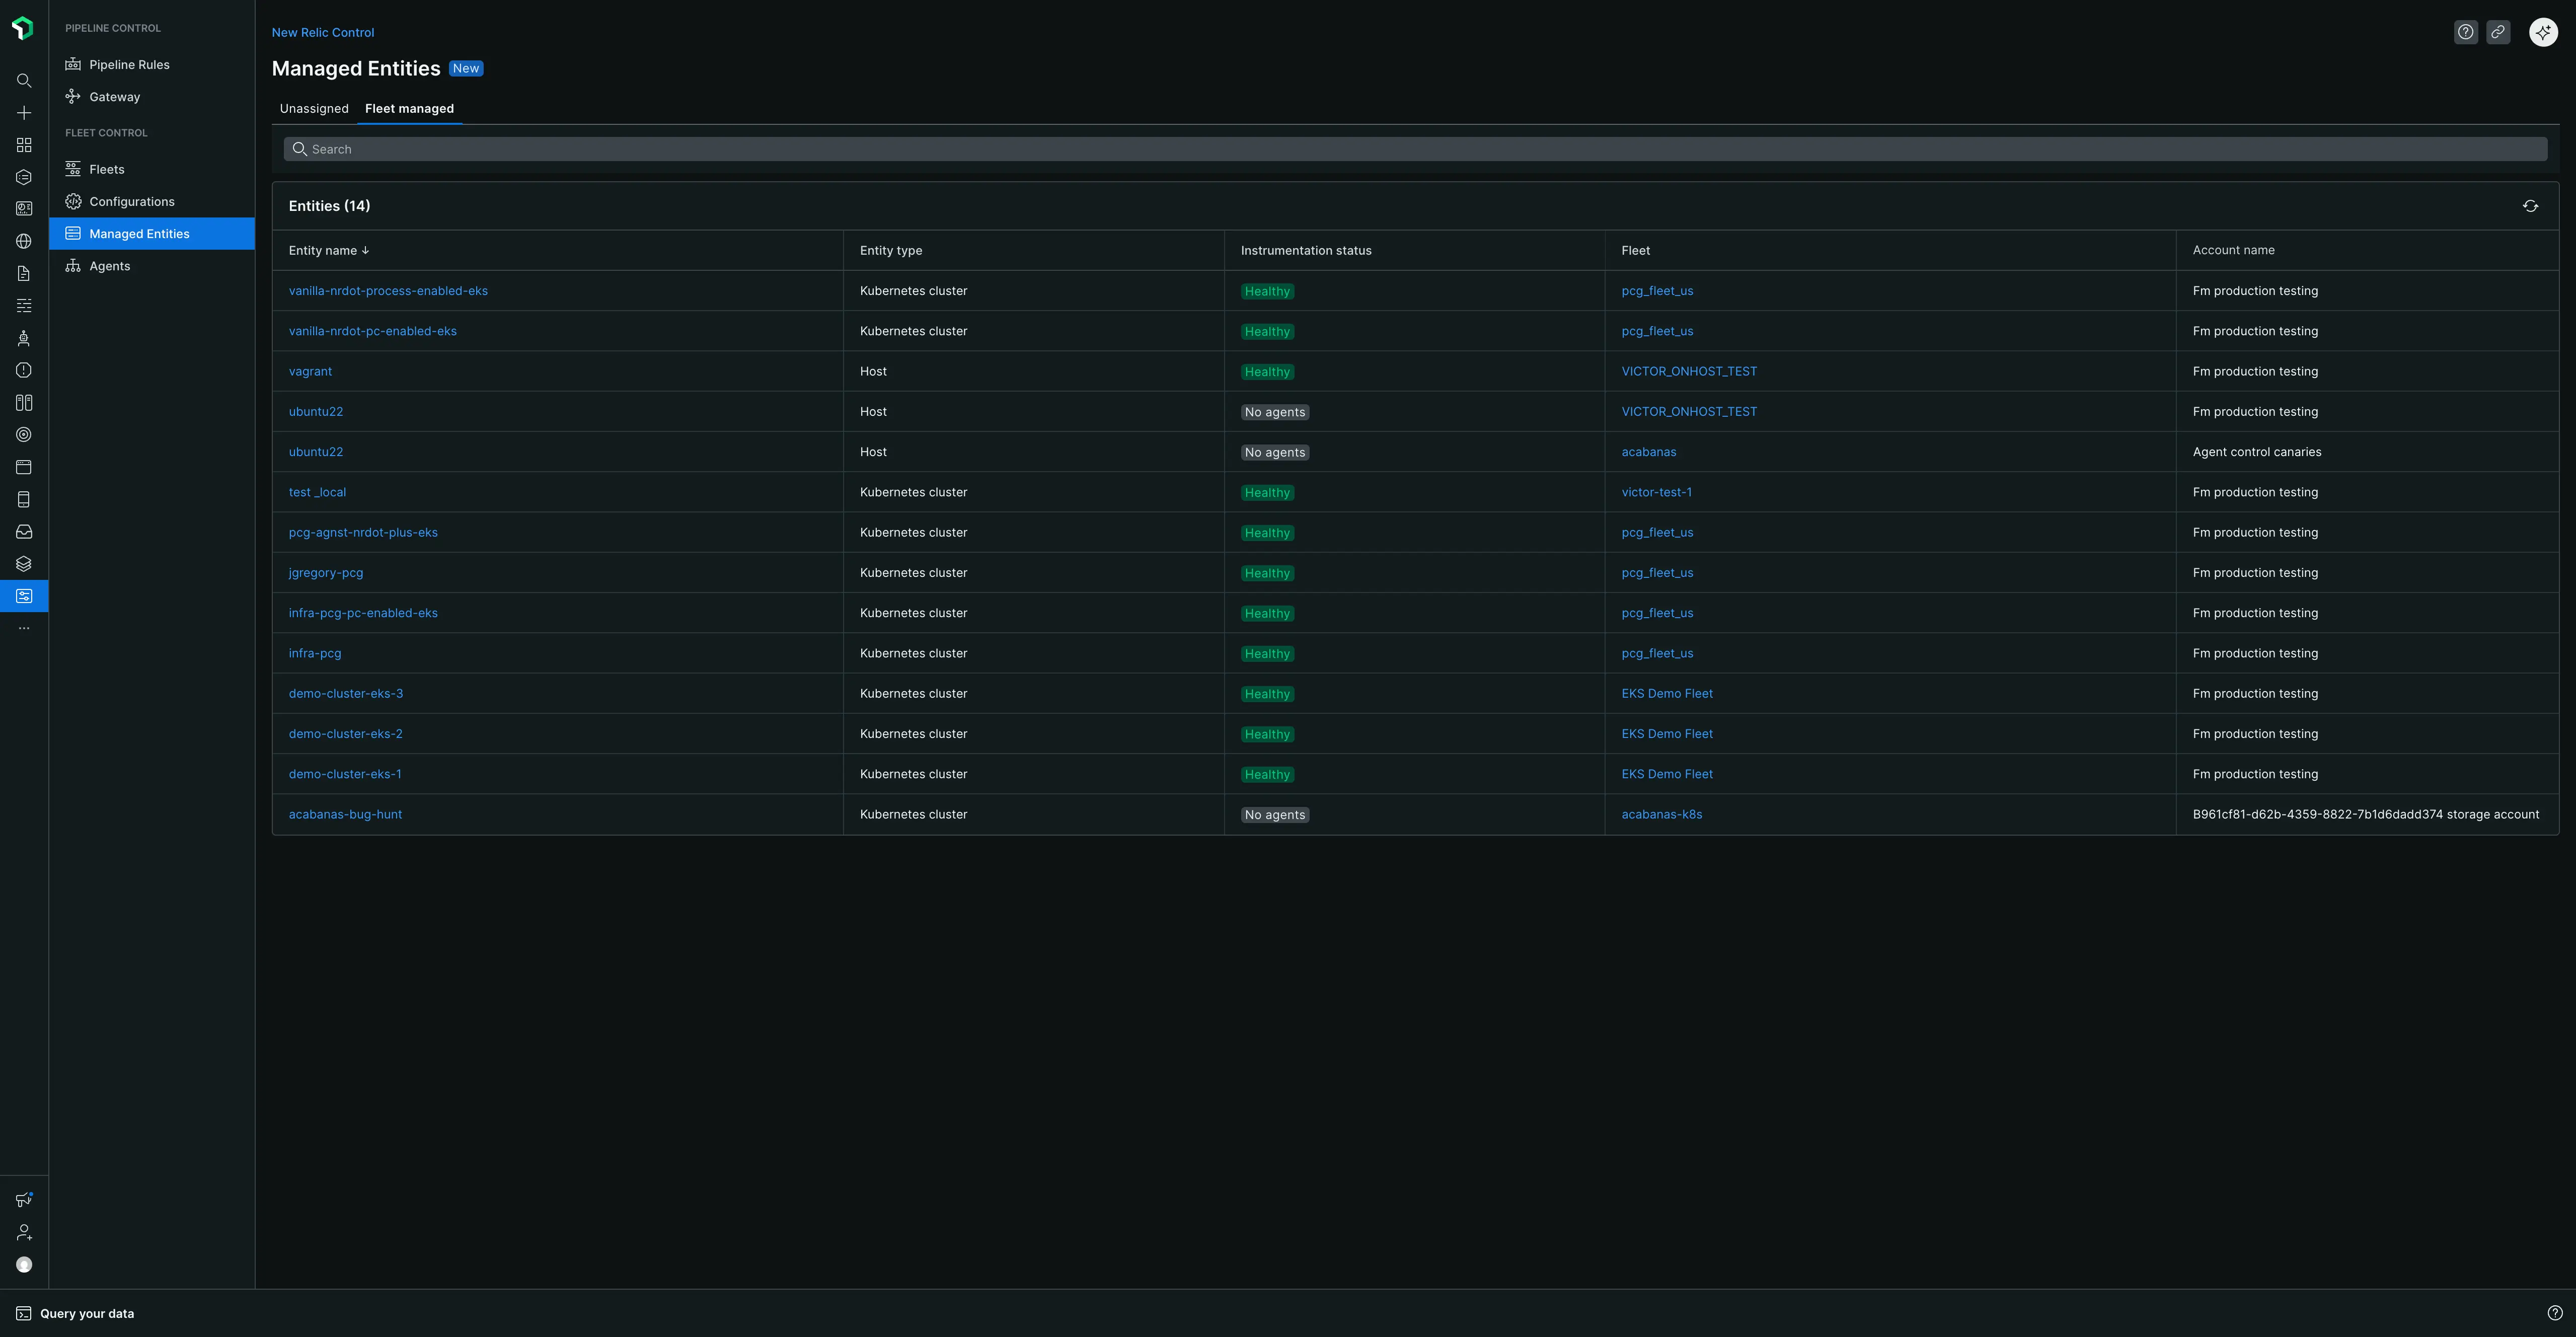
未割り当てのタブ
このタブにはAgent Controlがインストールされているが、現在どのフリートにも割り当てられていないすべての管理対象アプライアンスのリストが表示されます。 表には次の情報が記載されています。
- エンティティ名:名前をクリックするとNew Relicプラットフォームでのそのエンティティのエクスプローラー エクスペリエンスに直接移動します。
- エンティティ タイプ:管理対象のエンティティのタイプ。
- 計装ステータス:計装の現在の稼働ステータス。
- アカウント名:管理対象エンティティに関連付けられた New Relic アカウント。
このビューは、Fleet Control によってまだ管理されていない資産を特定するのに特に役立ちます。すべての管理対象エンティティをフリートに割り当てて、それらが一貫して構成され、監視されていることを確認することがベストプラクティスです。
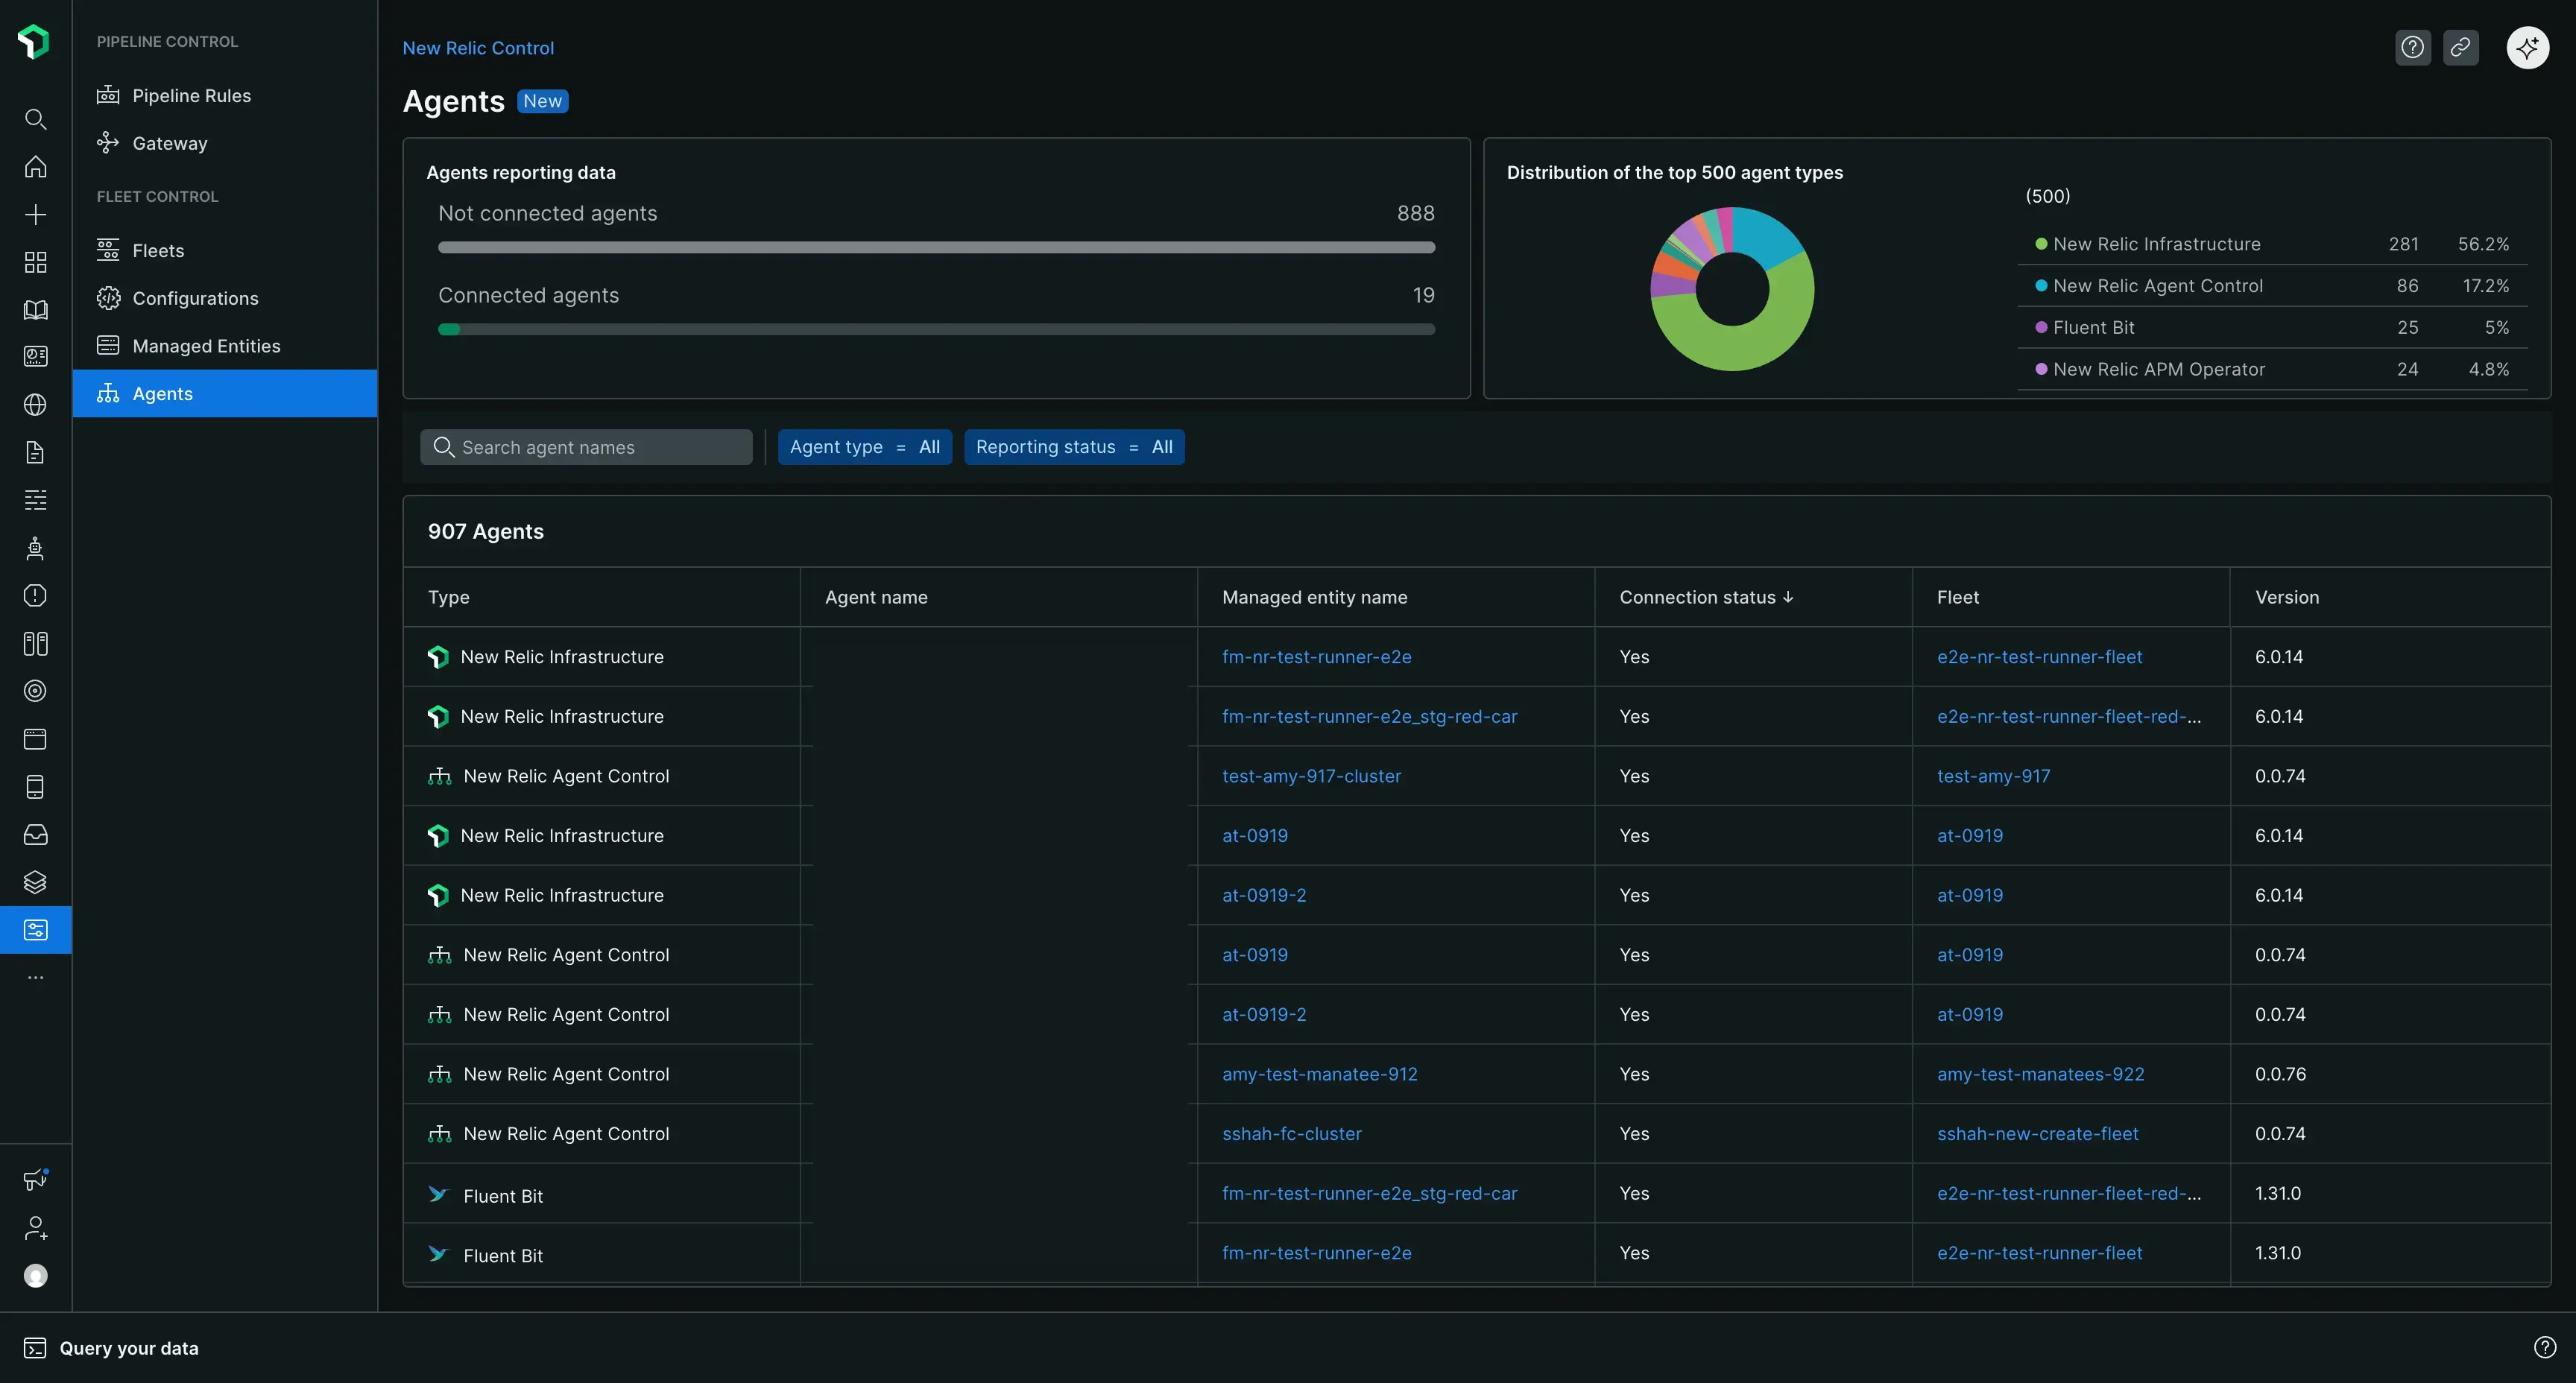
メインエージェントページ
New Relic Control → Agentsに移動すると、組織全体でFleet Controlによって管理されているすべてのエージェントのグローバルな概要が表示されます。
ページの上部には、エージェントの健全性を簡単に確認できる次のような概要カードがあります。
- 接続されているすべてのエージェントの数。
- 切断されたエージェントの数。トラブルシューティングが必要な可能性のあるエージェントを迅速に特定するのに役立ちます。
- 上位 500 のエージェント タイプの分布。
概要カードの下には、管理対象エージェントがすべて一覧表示された包括的な表が表示されます。このテーブルはエージェント名で検索でき、エージェントの種類またはレポートのステータスでフィルタリングできます。表には次の列が含まれます。
- Type:エージェントのタイプ (例: New Relic Infrastructure)。
- エージェント名:エージェントの特定の名前。
- 管理対象エンティティ:エージェントが関連付けられている管理対象エンティティ。
- 接続ステータス:エージェントの現在の接続ステータス。
- フリート:エージェントが所属するフリート。
- エージェントのバージョン:エージェントのバージョン番号。
