Fonctionnalité d'aperçu
Nous développons encore activement Session Replay mobile, mais nous sommes impatients que vous puissiez essayer cette nouvelle fonctionnalité puissante ! Cette fonctionnalité est actuellement proposée dans le cadre d'un programme d'aperçu conformément à nos politiques de pré-sortie.
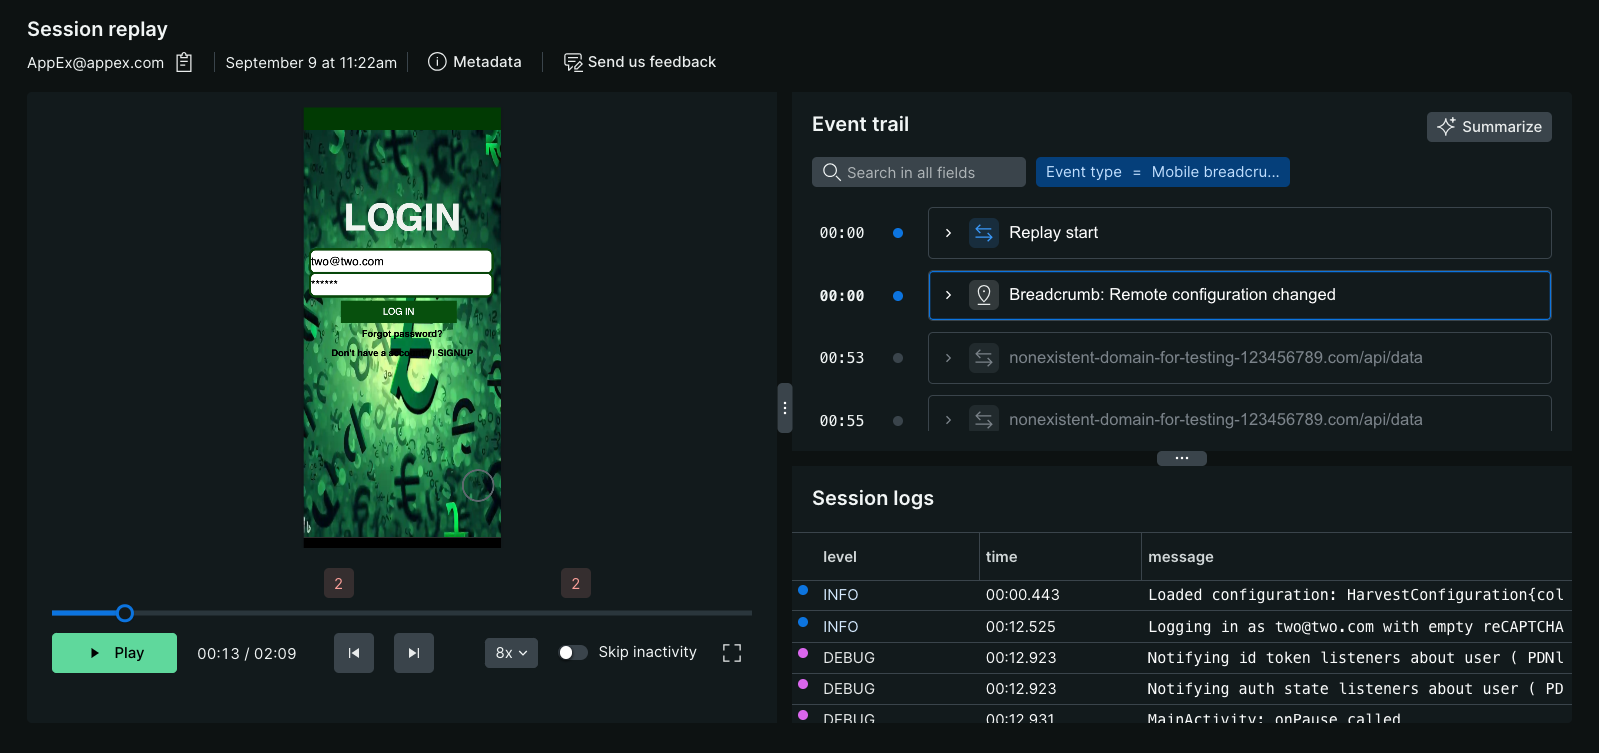
Pourquoi passer des heures à essayer de reproduire des bugs d'applications mobiles difficiles à cerner alors que vous pouvez voir exactement ce que votre utilisateur a vécu ? La fonction Mobile Session Replay élimine les conjectures lors du dépannage en fournissant une rediffusion vidéo de ce que l'utilisateur a vu en dernier sur son téléphone ou sa tablette, synchronisée avec toutes les données télémétriques de cette session. Cela signifie que vous pouvez rapidement évaluer l'impact réel des erreurs sur vos utilisateurs, identifier les points de blocage en termes de performances et les points de friction de l'expérience utilisateur, et résoudre les problèmes plus rapidement sans avoir besoin de rapports de bogues ni de reproduction locale.
Exigences et compatibilité
Avant de configurer Session Replay mobile, assurez-vous que votre application répond à ces exigences.
Prérequis techniques
Pour utiliser Session Replay mobile, vous avez besoin de :
- Un compte New Relic avec monitoring des applications mobiles activée
- Une application mobile active configurée dans New Relic
- La connectivité réseau de votre application mobile au point de terminaison d'ingestion de données de New Relic
Considérations relatives aux performances
Avant d'activer Session Replay mobile, tenez compte de l'impact suivant sur votre application et vos utilisateurs :
- Performances de l'application: Session Replay capture et transmet les données de la fenêtre d'affichage, ce qui peut impacter les performances de l'application sur les appareils plus anciens.
- Consommation de données: La transmission des données de relecture consomme des données utilisateur, notamment lors de la capture d'images.
- Exigences de stockage: Les données capturées nécessitent une capacité de stockage adéquate sur les appareils des utilisateurs entre les cycles de transmission.
- Optimisation du réseau: Toutes les données sont compressées côté client avant transmission afin de minimiser l’utilisation du réseau.
- Stratégie d'échantillonnage: Réfléchissez attentivement à vos taux d'échantillonnage afin d'équilibrer les besoins de collecte de données et l'impact sur la performance
Cadre d'interface utilisateur pris en charge
Session Replay est actuellement prise en charge par certains frameworks d'interface utilisateur pour les applications iOS, Android et React Native. Nous travaillons activement à la prise en charge d'une plus grande variété d'interfaces utilisateur et de frameworks hybrides.
Actuellement pris en charge :
- iOS UIKit
- iOS SwiftUI
- Modèles XML Android
- Compose Jetpack Android
- Vues React Native
Soutien prévu :
- Vues Web
- Flutter
- Cordova
- Capacitor
- MAUI
Versions minimales de l'agent
Important
Cette fonctionnalité est en cours de développement actif ; il est donc fortement recommandé de mettre à jour l'agent mobile vers la dernière version pour bénéficier de la meilleure expérience possible et des fonctionnalités les plus récentes.
Voici les premières versions de l'agent qui prenaient en charge la capture Session Replay de base :
- Agent iOS v7.5.10, sortie le 15 septembre 2025
- AgentAndroid v7.6.8, sortie le 29 juillet 2025
- AgentReact Native v1.5.10, sortie le 15 septembre 2025
Comment fonctionne la relecture de session mobile
Comprendre le fonctionnement Session Replay mobile vous aide à prendre des décisions éclairées concernant les paramètres de confidentialité et le dépannage.
Lorsqu'un utilisateur lance votre application, l'agent mobile appelle les serveurs New Relic pour vérifier si Session Replay est activée et, le cas échéant, quels sont les taux d'échantillonnage et les paramètres de confidentialité. L'agent prend la décision concernant l'échantillonnage et commence à capturer les données de relecture.
Contrairement à Session Replay Browser, les applications mobiles ne possèdent pas de DOM pouvant être capturé et recréé. L'agent mobile, quant à lui, monitore le cycle de vie de l'affichage et transforme la fenêtre d'affichage en HTML. Vos paramètres de masquage sont appliqués à la reproduction HTML de la fenêtre d'affichage, qui est ensuite sérialisée en JSON et stockée côté client jusqu'à ce que la transmission des données soit déclenchée toutes les minutes, moment auquel la charge utile est compressée au format gzip et envoyée à New Relic.
Si l'application plante ou se bloque de manière inattendue, les données collectées entre le dernier cycle de transmission réussi et la fermeture inattendue de l'application sont stockées côté client jusqu'au prochain lancement de l'application, lorsque l'agent mobile tentera de restaurer et de télécharger les données orphelines. En raison de la manière dont iOS et Android gèrent les fermetures inattendues, nous ne pouvons pas toujours récupérer toutes les données après la fermeture inattendue d'une application.
Lorsqu'une rediffusion est visionnée dans l'interface utilisateur de New Relic, le JSON est récupéré de NRDB et désérialisé en un flux de mises à jour HTML qui constitue la « vidéo » lue dans votre navigateur Web.
En raison de la transformation du framework de vue de la plateforme native en HTML, la relecture des sessions mobiles est généralement précise, mais pas parfaite au pixel près. Nous travaillerons sans cesse à améliorer la précision des rediffusions.
Configurer la rediffusion de session mobile
L'activation Session Replay, les taux d'échantillonnage et la plupart des paramètres de confidentialité sont gérés côté serveur sur la page Paramètres de l'application dans New Relic, de sorte que les mises à jour ne dépendent pas du déploiement et de l'adoption d'une nouvelle version de l'application. Seuls certains types de substitutions de masquage doivent être gérés dans votre code.
Activer la relecture de session mobile
Dans l'interface web de New Relic :
Rendez-vous sur one.newrelic.com > All Capabilities > Mobile.
Sélectionnez votre application mobile.
Dans le menu de gauche, cliquez sur Settings > Application.
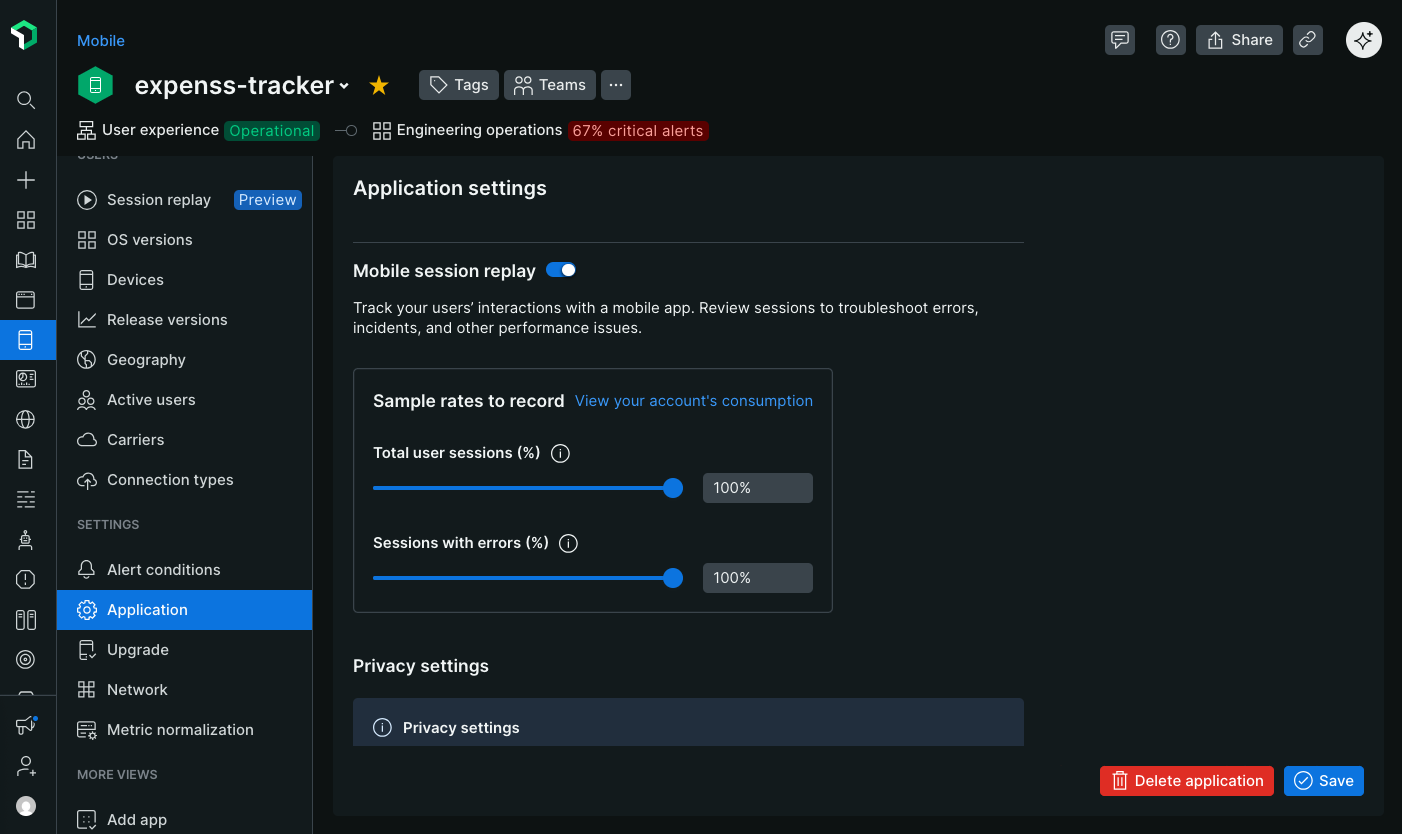
Activer Mobile Session Replay.
Configurer les taux d’échantillonnage
Définissez les fréquences d'échantillonnage pour contrôler la fréquence de capture des sessions de relecture. Les taux d'échantillonnage peuvent être aussi faibles qu'un millionième de pour cent pour les applications à haut débit. Actuellement, une seule fréquence d'échantillonnage est disponible :
Nombre total de sessions utilisateur: Enregistre un échantillon aléatoire de toutes les sessions utilisateur.
À venir
Les sessions avec échantillonnage d'erreurs seront disponibles plus tard au cours de la période de prévisualisation. Cette fonctionnalité enregistrera un échantillon aléatoire de sessions où au moins une erreur se produit, en mettant en mémoire tampon une fenêtre glissante de données pendant une durée maximale de 30 secondes côté client. En cas d'erreur, les données mises en mémoire tampon seront téléchargées et le reste de la session sera enregistré.
Configurer les paramètres de confidentialité
La protection de la vie privée des utilisateurs est essentielle lors de l'enregistrement de la relecture de session. Les paramètres par défaut protègent les informations sensibles en masquant tous les textes et images, mais vous pouvez les ajuster en fonction de vos besoins spécifiques en matière de confidentialité.
Tout le masquage est effectué côté client, de sorte que les informations sensibles ne quittent jamais l'appareil de l'utilisateur final. Cette section vous montre comment utiliser les stratégies de masquage, les modes et les règles de remplacement pour respecter vos normes de confidentialité tout en conservant l'utilité de la relecture de session pour améliorer l'expérience utilisateur et diagnostiquer les problèmes.
confidentialité et masquage
Choisissez la stratégie de masquage qui correspond le mieux à vos exigences en matière de confidentialité.
Stratégies de masquage
Session Replay mobile propose deux stratégies de masquage pour équilibrer la protection de la vie privée et l'utilité de la relecture. Votre choix détermine la manière dont les données sensibles sont traitées dans les enregistrements de session.
Stratégie de masquage par défaut
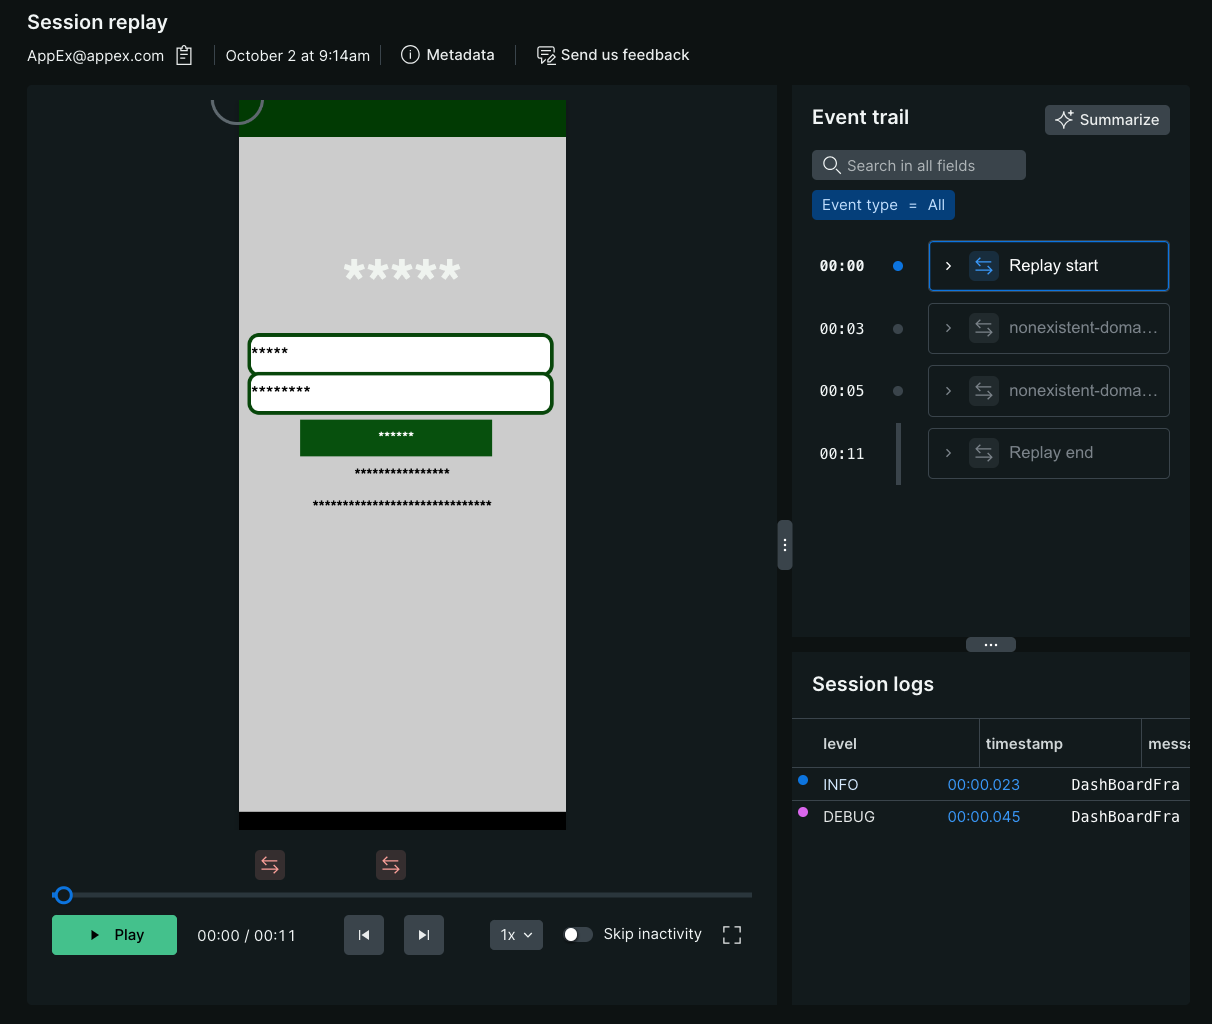
La stratégie de masquage par défaut assure une protection maximale de la vie privée en masquant tous les textes et images sans exception. Choisissez cette stratégie lorsque :
- Votre application traite des données hautement sensibles (santé, services financiers, etc.).
- La conformité réglementaire exige une protection stricte des données
- Vous souhaitez un risque zéro de capture d'informations privées
Ce qui est masqué :
- Tout le texte est remplacé par des astérisques (par exemple, « bonjour » devient « ***** »)
- Toutes les images sont remplacées par des blocs d'espace réservé de mêmes dimensions.
- Les clics et les glissements de l'utilisateur sont toujours enregistrés (sauf si vous les masquez).
Cela garantit que même si vous ajoutez accidentellement du code de démasquage, la stratégie par défaut masquera toujours tout.
Principales limitations de la stratégie de masquage par défaut :
- Les modes de masquage ne sont pas configurables.
- Les masquages en ligne (comme la balise
nr-unmask) sont ignorés. - Les règles de masquage côté serveur sont sans effet.
Stratégie de masquage personnalisée
La stratégie de masquage personnalisée vous offre un contrôle précis sur ce qui est masqué et ce qui reste visible. Utilisez cette stratégie lorsque :
- Votre application contient à la fois du contenu public et du contenu sensible.
- Vous devez visualiser des éléments d'interface utilisateur spécifiques pour diagnostiquer efficacement les problèmes.
- Vous souhaitez dévoiler sélectivement des zones non sensibles
Une stratégie personnalisée se compose de :
- Modes de masquage: règles de base de référence pour différents types de contenus (texte, images, interaction)
- Règles de remplacement: Exceptions pour masquer ou dévoiler des composants spécifiques
Pour passer au masquage personnalisé :
Dans l'interface web de New Relic :
- Accédez à Mobile > [votre entité] > Settings > Application > Session Replay
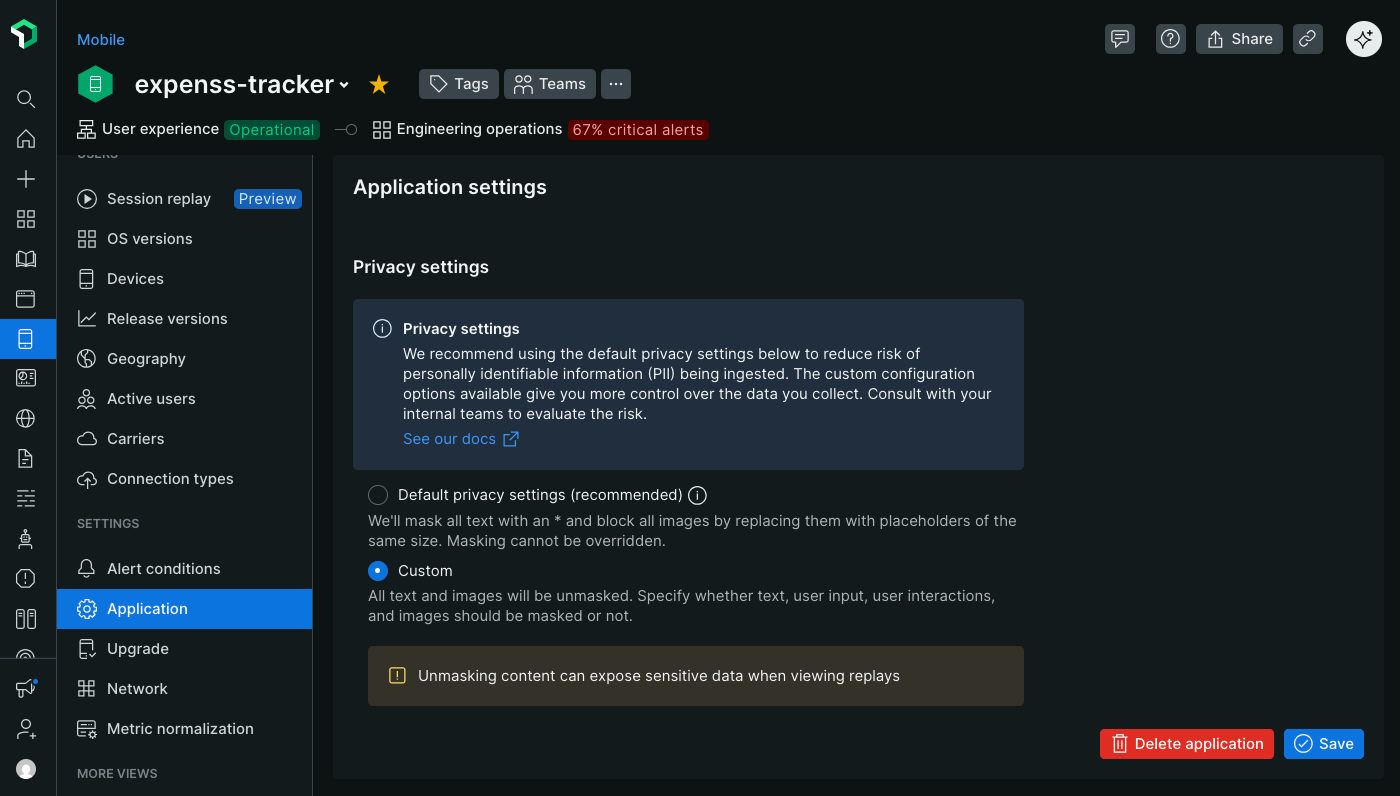
- Dans la section Masking strategy, sélectionnez Custom
- Configurez vos modes de masquage (voir section suivante)
- Vous pouvez également ajouter des règles de remplacement pour des composants spécifiques.
Modes de masquage
Lorsque vous utilisez la stratégie de masquage personnalisée, les modes de masquage établissent le comportement de confidentialité de référence pour votre relecture de session. Ces modes s'appliquent globalement à l'ensemble de votre application, sauf s'ils sont remplacés par des règles spécifiques pour chaque composant.
Pour configurer les modes de masquage :
Dans l'interface web de New Relic :
- Accédez à Mobile > [votre entité] > Settings > Application > Session Replay
- Assurez-vous que la stratégie de masquage Custom est sélectionnée.
- Dans la section Masking modes, activez ou désactivez chaque mode selon vos besoins.
- Les modifications prennent effet immédiatement pour tous les nouveaux enregistrements de session.
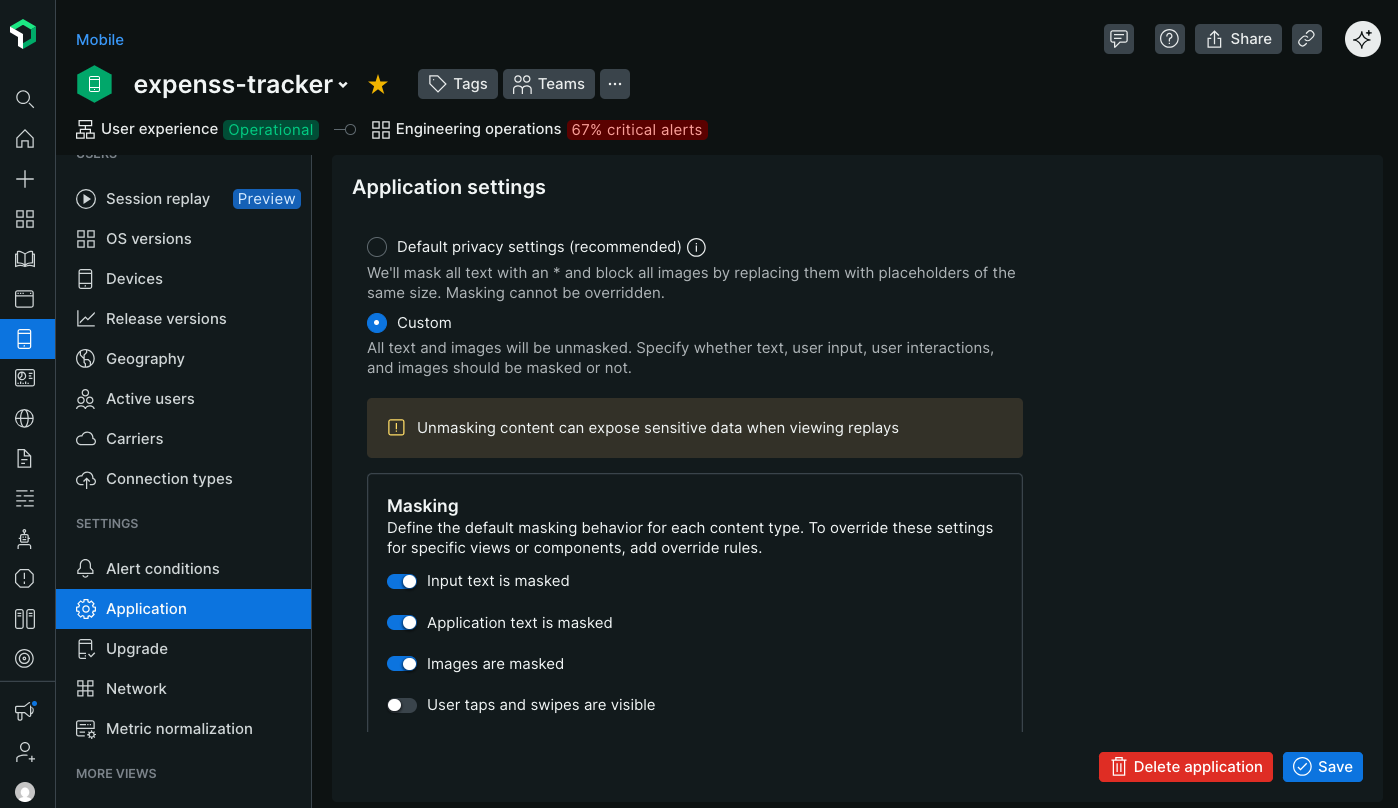
Les quatre modes de masquage contrôlent différents types de contenu :
masquer utilisateur saisie du texte
Contrôle si le texte saisi par l'utilisateur dans les champs de saisie est visible dans les rediffusions.
Lorsqu'elle est activée (recommandé) :
- Tous les caractères saisis par l'utilisateur sont remplacés par des astérisques.
- Exemple : L'utilisateur saisit « john.doe@email.com» → apparaît comme "*******************" dans la relecture
- Protège les noms d'utilisateur, les adresses e-mail, les requêtes de recherche, les données de formulaires et autres contenus saisis par l'utilisateur.
En cas de désactivation :
- Le texte saisi par l'utilisateur apparaît exactement tel qu'il a été saisi dans la rediffusion.
- À utiliser uniquement lorsque les champs de saisie contiennent des informations non sensibles.
- Utile pour le débogage des problèmes de validation de formulaires ou de la fonction de recherche
Important
Les champs de mot de passe sont toujours masqués, quel que soit ce paramètre. SecureField (iOS), les types de saisie de mot de passe (Android) et les champs de saisie de texte sécurisés n'afficheront jamais de texte en clair dans les replays.
Paramètre par défaut : Activé dans la stratégie de masquage personnalisée.
Quand désactiver ce mode :
- Barres de recherche publiques où les requêtes ne sont pas personnellement identifiables
- Filtres non sensibles ou sélections de catégories
- Débogage des problèmes de saisie semi-automatique ou de validation des entrants
texte de l'application du masque
Contrôle si le texte affiché par votre application (étiquettes, boutons, en-têtes, contenu) est visible dans les rediffusions.
Lorsque activé :
- Tout le texte statique et dynamique affiché par votre application est remplacé par des astérisques.
- Exemple : l’étiquette « Prénom : » devient « *********** » en replay
- Protège tout texte susceptible de contenir ou de révéler des informations sensibles
En cas de désactivation :
- Tout le texte de l'application apparaît exactement comme l'utilisateur le voit.
- Les étiquettes, les boutons, les titres et le contenu sont parfaitement lisibles.
- Rend les rediffusions beaucoup plus faciles à comprendre et à parcourir
- Essentiel pour identifier les écrans ou fonctionnalités avec lesquels l'utilisateur a interagi.
Paramètre par défaut : Activé dans la stratégie de masquage personnalisée.
Recommandation pour la plupart des applications : désactivez ce mode sauf si vous affichez des informations hautement sensibles. L'affichage du texte de l'interface utilisateur est crucial pour :
- Comprendre les chemins de navigation des utilisateurs
- Identifier sur quels boutons ou fonctionnalités l'utilisateur a cliqué
- Affichage du message d'erreur
- Diagnostic des problèmes de mise en page ou de localisation
- Corrélation des rediffusions avec des fonctionnalités spécifiques de l'application
Gardez ce mode activé lorsque :
- Applications de santé affichant des informations sur les patients
- Applications financières affichant les détails du compte ou les transactions
- Applications contenant du contenu généré par les utilisateurs qui pourrait être sensible
- Les exigences de conformité imposent le masquage de tout le texte affiché
Conseil
Si vous désactivez ce mode mais devez masquer des éléments de texte sensibles spécifiques, utilisez des règles de remplacement pour masquer sélectivement ces composants tout en conservant la visibilité du reste de votre interface utilisateur.
images de masques
Important
Versions minimales de l'agent prenant en charge la capture d'images :
- Agent iOS v7.5.10 (sortie le 15 septembre 2025)
- Agent Android v7.6.9 (sortie le 15 septembre 2025)
- Agent React Native v1.5.10 (sortie le 15 septembre 2025)
Contrôle si les images de votre application sont capturées et affichées lors des replays.
Lorsqu'elle est activée (recommandé) :
- Toutes les images sont remplacées par des blocs d'espace réservé de même dimension.
- espace réservé préserver la structure de mise en page afin que vous puissiez voir les positions des images
- Aucune donnée d'image n'est transmise à New Relic.
- Protège les photos, les photos de profil et les images potentiellement sensibles téléchargées par les utilisateurs.
En cas de désactivation :
- Les images sont capturées, compressées, encodées en base64 et incluses dans la charge utile de relecture.
- Les images apparaissent dans les rediffusions, mais en qualité inférieure à celle vue par l'utilisateur.
- Augmente considérablement les coûts de transmission et de stockage des données
- Permet de diagnostiquer les problèmes liés au chargement, au rendu ou à la mise en page des images.
Éléments importants à prendre en compte lors de la prise de photos
L'activation de la capture d'images a un impact significatif sur l'utilisation des données et les performances :
Utilisation des données: Les images augmentent considérablement la taille de la charge utile de relecture, consommant ainsi beaucoup plus de données utilisateur et votre quota de stockage New Relic.
Qualité: Les images sont fortement compressées côté client afin de minimiser leur impact, ce qui entraîne une qualité inférieure à celle de l'original.
Performances: La capture et la compression d'images peuvent impacter les performances de l'application sur les appareils plus anciens.
Confidentialité: Déterminez si les images peuvent contenir des informations sensibles ou privées.
Désactivez le masquage d'image uniquement lorsque le débogage visuel est essentiel à votre cas d'utilisation.
Paramètre par défaut : Activé dans la stratégie de masquage personnalisée.
Quand désactiver ce mode :
- Diagnostic des échecs de chargement d'images ou des problèmes de rendu
- Recherche des problèmes de mise en page liés aux dimensions des images
- Comprendre l'interaction de l'utilisateur avec les galeries d'images ou le contenu multimédia
- Votre application affiche uniquement des images publiques et non sensibles (icônes, logos, illustrations).
Gardez ce mode activé lorsque :
- Photos de profil ou photos téléchargées par l'utilisateur
- Documents ou captures d'écran réalisées dans l'application
- Imagerie médicale ou imagerie liée aux soins de santé
- Tout contenu visuel généré par l'utilisateur
Masquer les clics et les glissements de l'utilisateur
Permet de contrôler si les interactions tactiles de l'utilisateur sont visualisées dans les rediffusions.
Lorsqu'il est désactivé (recommandé) :
- Les clics de l'utilisateur apparaissent sous forme de cercles gris sur la rediffusion.
- Les gestes de balayage apparaissent sous forme de lignes rouges indiquant le trajet du mouvement.
- Essentiel pour comprendre avec quels éléments d'interface utilisateur les utilisateurs ont interagi.
- Permet d'identifier les problèmes d'utilisabilité, les clics manqués ou les interactions confuses.
Lorsque activé :
- Aucune visualisation par tapotement ou glissement n'apparaît dans la rediffusion.
- L'utilisateur semble naviguer dans votre application sans interactionvisible.
- À utiliser lorsque les schémas tactiles pourraient révéler des informations sensibles.
Conseil
Le clavier du système d'exploitation et les frappes et glissements effectués dessus ne sont jamais capturés dans les replays, quel que soit ce paramètre. Cela assure une protection automatique lors de la saisie de mots de passe et de textes sensibles.
Paramètre par défaut : Désactivé dans la stratégie de masquage personnalisée (les appuis et les glissements sont visibles).
Quand masquer les interactions : Masquer le texte est généralement suffisant, mais masquer les clics/glissements peut s’avérer nécessaire dans les cas suivants :
- Votre application intègre un clavier PIN ou un clavier numérique dont les combinaisons de touches révèlent les codes de sécurité.
- Les schémas de balayage sont utilisés pour l'authentification (verrous à schéma, mots de passe gestuels).
- L'interaction tactile sur des écrans spécifiques pourrait permettre de déduire des choix sensibles (sélection de symptômes médicaux, décisions financières).
Recommandation pour la plupart des applications : Gardez l’interaction visible à :
- Visualisez précisément les zones cliquées par l'utilisateur, y compris les zones non cliquées ou ne répondant pas.
- Comprenez les schémas de navigation et le parcours utilisateur au sein de votre application.
- Identifiez les problèmes d'utilisabilité liés à une petite zone tactile ou à des boutons peu visibles.
- Diagnostiquer les fonctionnalités basées sur les gestes (glisser pour supprimer, tirer pour actualiser, etc.).
configurationde masquage avancée
Utilisez les substitutions de masquage lorsque vous souhaitez que certaines parties de votre application aient des paramètres de masquage différents de ceux de vos modes de masquage spécifiés. Par exemple, si la majorité de votre application ne contient pas de données sensibles, vous pouvez configurer vos modes pour démasquer et spécifier des substitutions afin de masquer uniquement les parties de votre application qui contiennent des données sensibles.
Méthodes de remplacement du masquage
Nous proposons trois façons de créer des règles de remplacement de masquage :
attribut en ligne
Les substitutions de masquage en ligne sont appliquées dans votre code en balisant le composant que vous souhaitez masquer ou démasquer. Vous devrez déployer une nouvelle version de votre application et la faire adopter par l'utilisateur pour que les mises à jour soient appliquées. Elles sont donc à privilégier lorsque vous souhaitez que la supervision de votre processus de contrôle des changements permette de gérer les modifications masquées.
SwiftUI
Utilisez NRConditionalMaskView pour envelopper le contenu qui doit avoir un comportement de masquage spécifique. Ce composant SwiftUI offre un contrôle précis sur le masquage des données dans Session Replay.
Exigences:
iOS 16.0+
Swift 5.0+
Importer:
import SwiftUIimport NewRelicUtilisation de base :
// Mask all text content within this viewNRConditionalMaskView(maskApplicationText: true) {VStack {Text("This text will be masked in session replay")Text("This text will also be masked")}}Démasquer le contenu :
// Explicitly unmask content (useful when parent views have masking enabled)NRConditionalMaskView(maskApplicationText: false) {Text("This text will be visible in session replay")}Masquage basé sur les identifiants :
// Use an identifier to control masking via API or dashboard settingsNRConditionalMaskView(sessionReplayIdentifier: "unmasked-section") {Text("This text masking is controlled by the identifier")}Paramètres:
maskApplicationText: Lorsquetrue, masquer tout le contenu textuel de la vue. Lorsquefalse, garantit que le texte est visible. Lorsquenil, hérite de parent.maskUserInputText: Lorsquetrue, masquer les champs de saisie utilisateur dans la vue. Lorsquefalse, affiche le contenu saisi. Lorsquenil, hérite de parent.maskAllImages: Lorsquetrue, masquer toutes les images dans la vue. Lorsquefalse, affiche des images. Lorsquenil, hérite de parent.maskAllUserTouches: Lorsquetrue, masquer l'interaction tactile de l'utilisateur dans la vue. Lorsquefalse, affiche l'événement tactile. Lorsquenil, hérite de parent.sessionReplayIdentifier: Identifiant optionnel pour contrôler le masquage viaaddSessionReplayMaskedAccessibilityIdentifier,addSessionReplayUnmaskedAccessibilityIdentifier, ou via le dashboard de l'application New Relic.activated: Lorsquefalse, désactive entièrement la fonctionnalité de masquage pour cette vue. La valeur par défaut esttrue.Exemple avancé - Masquage mixte dans un formulaire :
struct RegistrationForm: View {@State private var firstName = ""@State private var email = ""@State private var password = ""var body: some View {VStack(alignment: .leading, spacing: 16) {// Public form labels remain visibleNRConditionalMaskView(maskApplicationText: false) {Text("Create Your Account").font(.title)}// Personal informationNRConditionalMaskView(sessionReplayIdentifier: "personal-info") {TextField("First Name", text: $firstName)TextField("Email", text: $email)}// Highly sensitive - mask everythingNRConditionalMaskView(sessionReplayIdentifier: "password-section") {SecureField("Password", text: $password)Text("Password must be at least 8 characters")}Button("Sign Up") {// Handle registration}}.padding()}}UIKit
Ajoutez ou ajoutez
nr-maskounr-unmaskauaccessibilityIdentifierduUIViewà masquer ou à démasquer. L'ajout d'un identifiant existant est utile si vous devez conserver un identifiant unique pour les tests automatisés, mais vous devrez probablement mettre à jour vos tests après avoir modifié les valeurs.Exemple d'ajout d'un
accessibilityIdentifier:let myView = UIView()myView.accessibilityIdentifier = "nr-mask"Exemple d'ajout à un
accessibilityIdentifierexistant :let myView = UIView()myView.accessibilityIdentifier = "someExistingId.nr-unmask"
Jetpack Compose
Utilisez les extensions de modification pour contrôler le comportement de masquage dans Jetpack Compose.
Exemple:
// Mask a composableText(    text = "Sensitive information",    modifier = Modifier.newRelicMask())
// Unmask a composableText( text = "Public information", modifier = Modifier.newRelicUnmask())Modèles XML
Ajoutez une tag nr-mask ou nr-unmask aux vues ou composants à masquer ou à démasquer.
Exemple:
<EditText    android:id="@+id/editTextEmail"    android:layout_width="390dp"    android:inputType="text"    android:tag="nr-mask"    android:importantForAutofill="no" />
<EditText android:id="@+id/editTextEmail" android:layout_width="390dp" android:inputType="text" android:tag="nr-unmask" android:importantForAutofill="no" />Utilisez les composants <NewRelicMask> et <NewRelicUnMask> pour masquer ou dévoiler des vues ou des composants.
Exemple:
<View>  <NewRelicMask>    <Text>Sensitive information</Text>  </NewRelicMask></View>
<View> <NewRelicUnmask> <Text>Non-sensitive information</Text> </NewRelicUnmask></View>Méthodes de l'API locale
Les substitutions de masquage des méthodes d'API locales sont également appliquées dans votre code au sein de la configuration de l'agent New Relic. Elles sont utiles lorsque les vues cibles possèdent déjà un identifiant unique et que vous souhaitez les gérer dans une liste centralisée au lieu d'étiqueter chaque vue individuellement dans votre code.
SwiftUI
Pour les vues SwiftUI, utilisez le paramètre sessionReplayIdentifier dans NRConditionalMaskView avec ces méthodes :
addSessionReplayMaskedAccessibilityIdentifieraddSessionReplayUnmaskedAccessibilityIdentifierExemple:
// In your app initializationNewRelic.addSessionReplayMaskedAccessibilityIdentifier("sensitive-section")NewRelic.addSessionReplayUnmaskedAccessibilityIdentifier("public-section")// In your SwiftUI viewsNRConditionalMaskView(sessionReplayIdentifier: "sensitive-section") {Text("This will be masked")}NRConditionalMaskView(sessionReplayIdentifier: "public-section") {Text("This will be visible")}UIKit
Masquer ou démasquer les vues en ajoutant leur
classouaccessibilityIdentifieraux méthodes suivantes :addSessionReplayMaskViewClassaddSessionReplayUnmaskViewClassaddSessionReplayMaskViewAccessibilityIdentifieraddSessionReplayUnmaskViewAccessibilityIdentifierExemple:
NewRelic.addSessionReplayMaskViewClass("SecureLabel")NewRelic.addSessionReplayUnmaskViewClass("UnsecureLabel")NewRelic.addSessionReplayMaskViewAccessibilityIdentifier("login")NewRelic.addSessionReplayUnmaskViewAccessibilityIdentifier("editTextEmail")
Jetpack Compose
Pour Jetpack Compose, vous pouvez utiliser les mêmes méthodes que pour les mises en page XML afin de cibler les éléments composables par leur balise de test ou leur nom de classe.
Exemple:
// In your application initializationNewRelic.addSessionReplayMaskViewTag("sensitive-data")NewRelic.addSessionReplayUnmaskViewTag("public-data")
// In your composablesText(    text = "Sensitive information",    modifier = Modifier.testTag("sensitive-data"))
Text( text = "Public information", modifier = Modifier.testTag("public-data"))Modèles XML
Masquer ou démasquer les vues en ajoutant leur class ou android:tag aux méthodes suivantes :
addSessionReplayMaskViewClassaddSessionReplayUnmaskViewClassaddSessionReplayMaskViewTagaddSessionReplayUnmaskViewTag
Exemple:
NewRelic.addSessionReplayMaskViewTag("login");NewRelic.addSessionReplayUnmaskViewTag("editTextEmail");NewRelic.addSessionReplayUnmaskViewClass("android.widget.Button");NewRelic.addSessionReplayMaskViewClass("android.widget.TextView");NewRelic.addSessionReplayMaskViewClass("com.yourpackagename.CustomView");Règles côté serveur
Important
Versions minimales des agents prenant en charge les règles côté serveur :
- Agent iOS v7.5.10 (sortie le 15 septembre 2025)
- Agent Android v7.6.9 (sortie le 15 septembre 2025)
- Agent React Native v1.5.10 (sortie le 15 septembre 2025)
Les règles de masquage côté serveur permettent de corriger rétroactivement les erreurs de masquage dans les versions d'applications déjà publiées. Elles prennent effet immédiatement à tous les nouveaux démarrages de session, sans nécessiter de mise à jour de l'application.
Les règles comportent trois éléments :
- Type: Détermine si les composants correspondants doivent être masqués ou non masqués
- identifiant: Spécifie comment vous souhaitez que l'élément cible (par exemple, par classe, tag, etc.)
- Valeur: La valeur de l'identifiant sélectionné auquel la règle s'appliquera.
Par exemple, une règle Mask class android.widget.EditText masquerait tous les champs de texte modifiables par l'utilisateur dans une application Android.
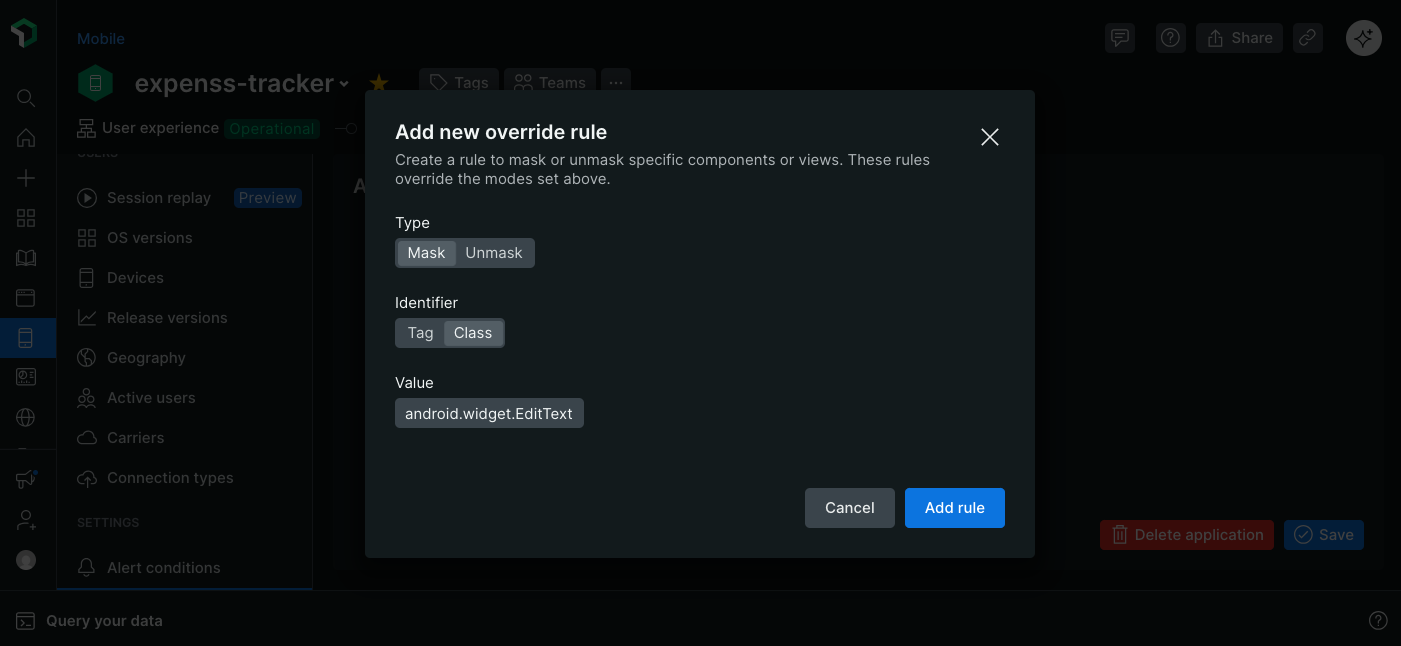
Définissez les paramètres de masquage pour Session Replay mobile dans les paramètres de l'application.
Pour créer une nouvelle règle :
Dans l'interface web de New Relic :
- Accédez à Mobile > [votre entité] > Settings > Application > Session Replay.
- Faites défiler jusqu'à Override rules et cliquez sur AAdd new override rule.
- Sélectionnez le type de règle (Masquer ou Démasquer).
- Choisissez l'identifiant que vous souhaitez utiliser pour cibler les composants.
- Saisissez la valeur de l'identifiant auquel vous souhaitez appliquer la règle.
- Cliquez sur Add rule.
La nouvelle règle est ajoutée au tableau des règles de remplacement et sera appliquée à toutes les nouvelles sessions.
Pour supprimer ou modifier une règle :
Dans l'interface web de New Relic :
- Accédez à Mobile > [votre entité] > Settings > Application > Session Replay.
- Repérez la règle que vous souhaitez modifier dans le tableau des règles de remplacement.
- Cliquez sur le menu
..., puis sélectionnez Delete ou Edit.
Priorité des règles de masquage
Lorsque plusieurs règles de masquage s'appliquent à une vue ou à un élément, l'ordre de priorité suivant détermine la règle appliquée :
La stratégie prime sur tout.
Si votre stratégie de masquage est
Default, les modes et les remplacements ne sont pas appliqués.Exemple : Si vous avez ajouté des remplacements d'attributs
nr-unmasken ligne dans votre code, mais que la stratégie de masquageDefaultest sélectionnée dans les paramètres, tout sera toujours masqué.Les modes de remplacement prévalent
Les modes déterminent le comportement standard lorsqu'aucune dérogation n'est présente ; par conséquent, si une dérogation est présente, elle prévaudra toujours sur le mode.
Exemple : Si le mode
Mask application textest activé et que vous ajoutez une surcharge d'attributnr-unmasken ligne à une vue dans votre code, cette vue sera démasquée mais toutes les autres vues seront masquées.Les masquages prioritaires prévalent sur les démasquages prioritaires.
Si une vue unique comporte à la fois des règles de masquage et de démasquage, elle sera toujours masquée.
Exemple : Si une vue comporte une substitution d'attribut en ligne
nr-unmasket une règle côté serveurnr-mask, la vue sera masquée.
Visualisez et analysez le replay de la session
Une fois que vous commencez à collecter les enregistrements de session, vous pouvez les utiliser pour améliorer vos expériences numériques en identifiant les tendances communes et les zones de friction pour l'utilisateur. Ils sont également utiles pour diagnostiquer et résoudre rapidement les problèmes en analysant les étapes suivies par l'utilisateur avant de rencontrer des erreurs ou un comportement inattendu.
Visionnez les rediffusions sur la page Session Replay
La page Session Replay fournit une liste de toutes les rediffusions enregistrées pendant la période sélectionnée. Par défaut, nous filtrons la liste pour ne retenir que les rediffusions d'une durée d'au moins 5 secondes. Le tableau fournit des données utiles comme le nombre d'erreurs, et les filtres vous permettent de restreindre la liste aux sessions qui vous aideront à résoudre votre problème.
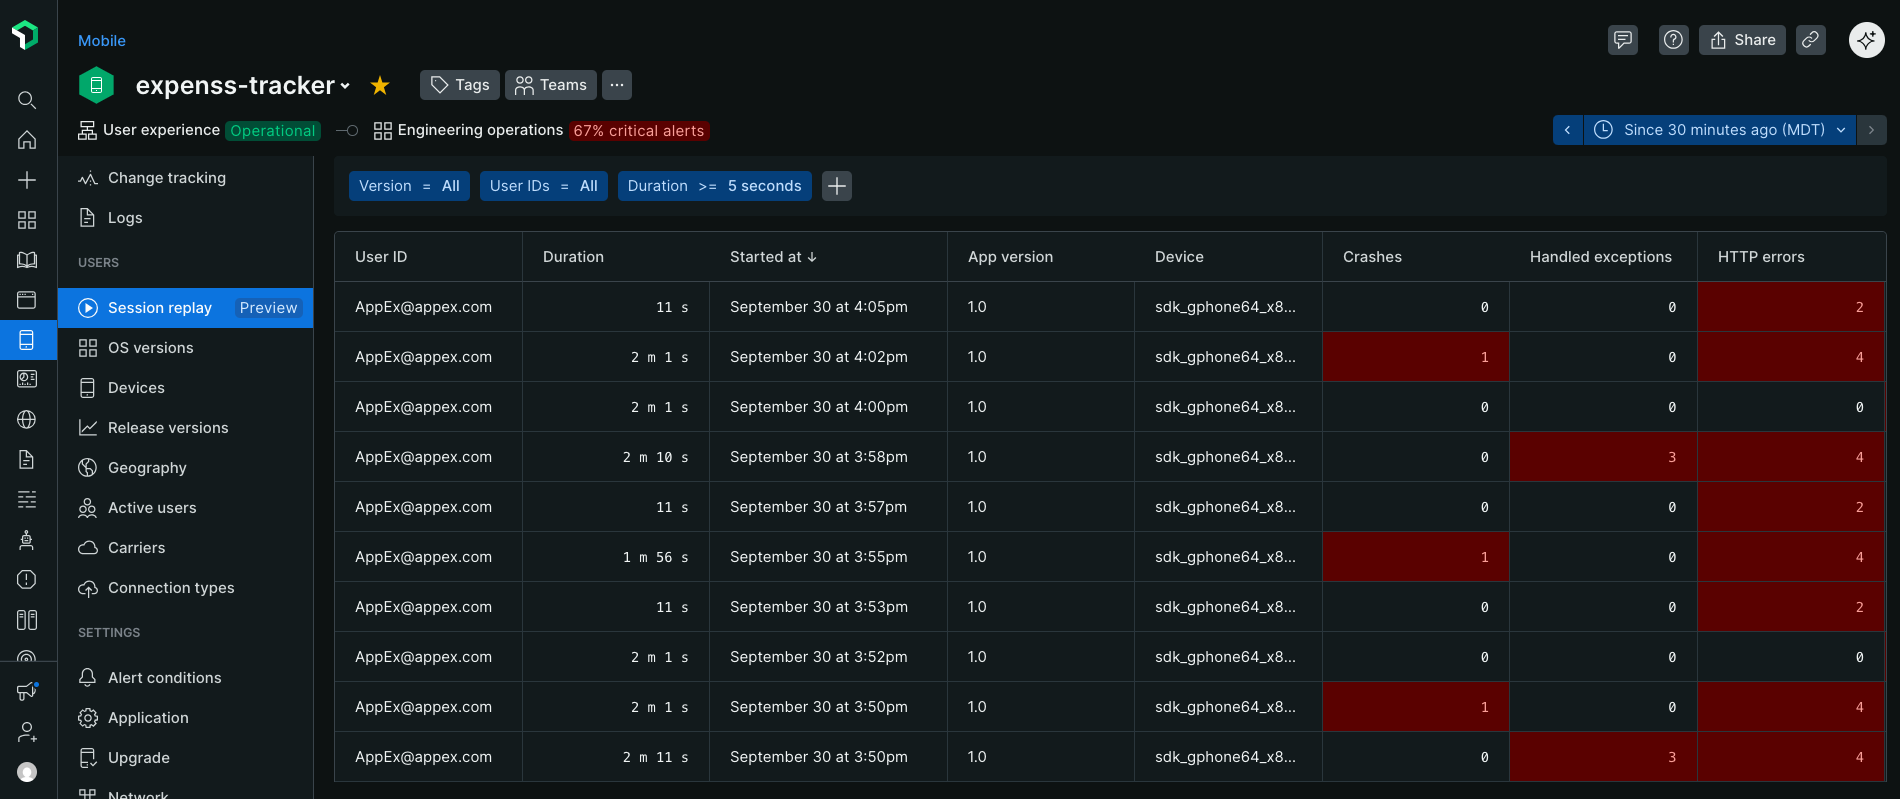
Consultez et filtrez les rediffusions dans Mobile > [votre_app] > Session replay.
Par exemple, vous pouvez ajouter un filtre countryCode pour voir les rediffusions d'une région spécifique afin de vérifier que la localisation fonctionne comme prévu, ou un filtre deviceModel pour voir les rediffusions d'un modèle de téléphone spécifique qui peut avoir des problèmes de compatibilité.
Pour accéder à la page de rediffusion de la session :
Dans l'interface web de New Relic :
- Rendez-vous sur one.newrelic.com > All Capabilities > Mobile.
- Sélectionnez votre application mobile.
- Dans le menu de gauche, faites défiler vers le bas et cliquez sur Session replay.
- Cliquez sur une ligne pour visionner le replay.
Visionnez les rediffusions présentant des erreurs et des problèmes de performance
Actuellement, vous pouvez visionner les rediffusions depuis la page principale Session Replay. L'intégration avec les fonctionnalités Plantages, Erreurs de requête, Exceptions gérées et ANR sera disponible plus tard au cours de la période de prévisualisation.
À venir
Le cas échéant, si un utilisateur a rencontré un problème pendant la capture de la relecture, un aperçu de celle-ci sera disponible sur l'occurrence de l'erreur dans les sections « Plantages », « Erreurs de requête », « Exceptions gérées » et « ANR ».
L'aperçu affichera 5 à 10 secondes avant le problème et, pour les problèmes non critiques, 5 à 10 secondes après sa survenue. Une icône sera superposée à la chronologie pour vous indiquer précisément le moment où l'erreur s'est produite dans la rediffusion. Cela vous permettra d'évaluer rapidement les actions des utilisateurs susceptibles d'avoir causé le problème, ainsi que la gravité de l'impact sur l'expérience utilisateur finale.
Si l'aperçu ne suffit pas à résoudre votre problème, vous pourrez cliquer sur le bouton View full session replay pour voir la session entière synchronisée avec les autres données télémétriques capturées.
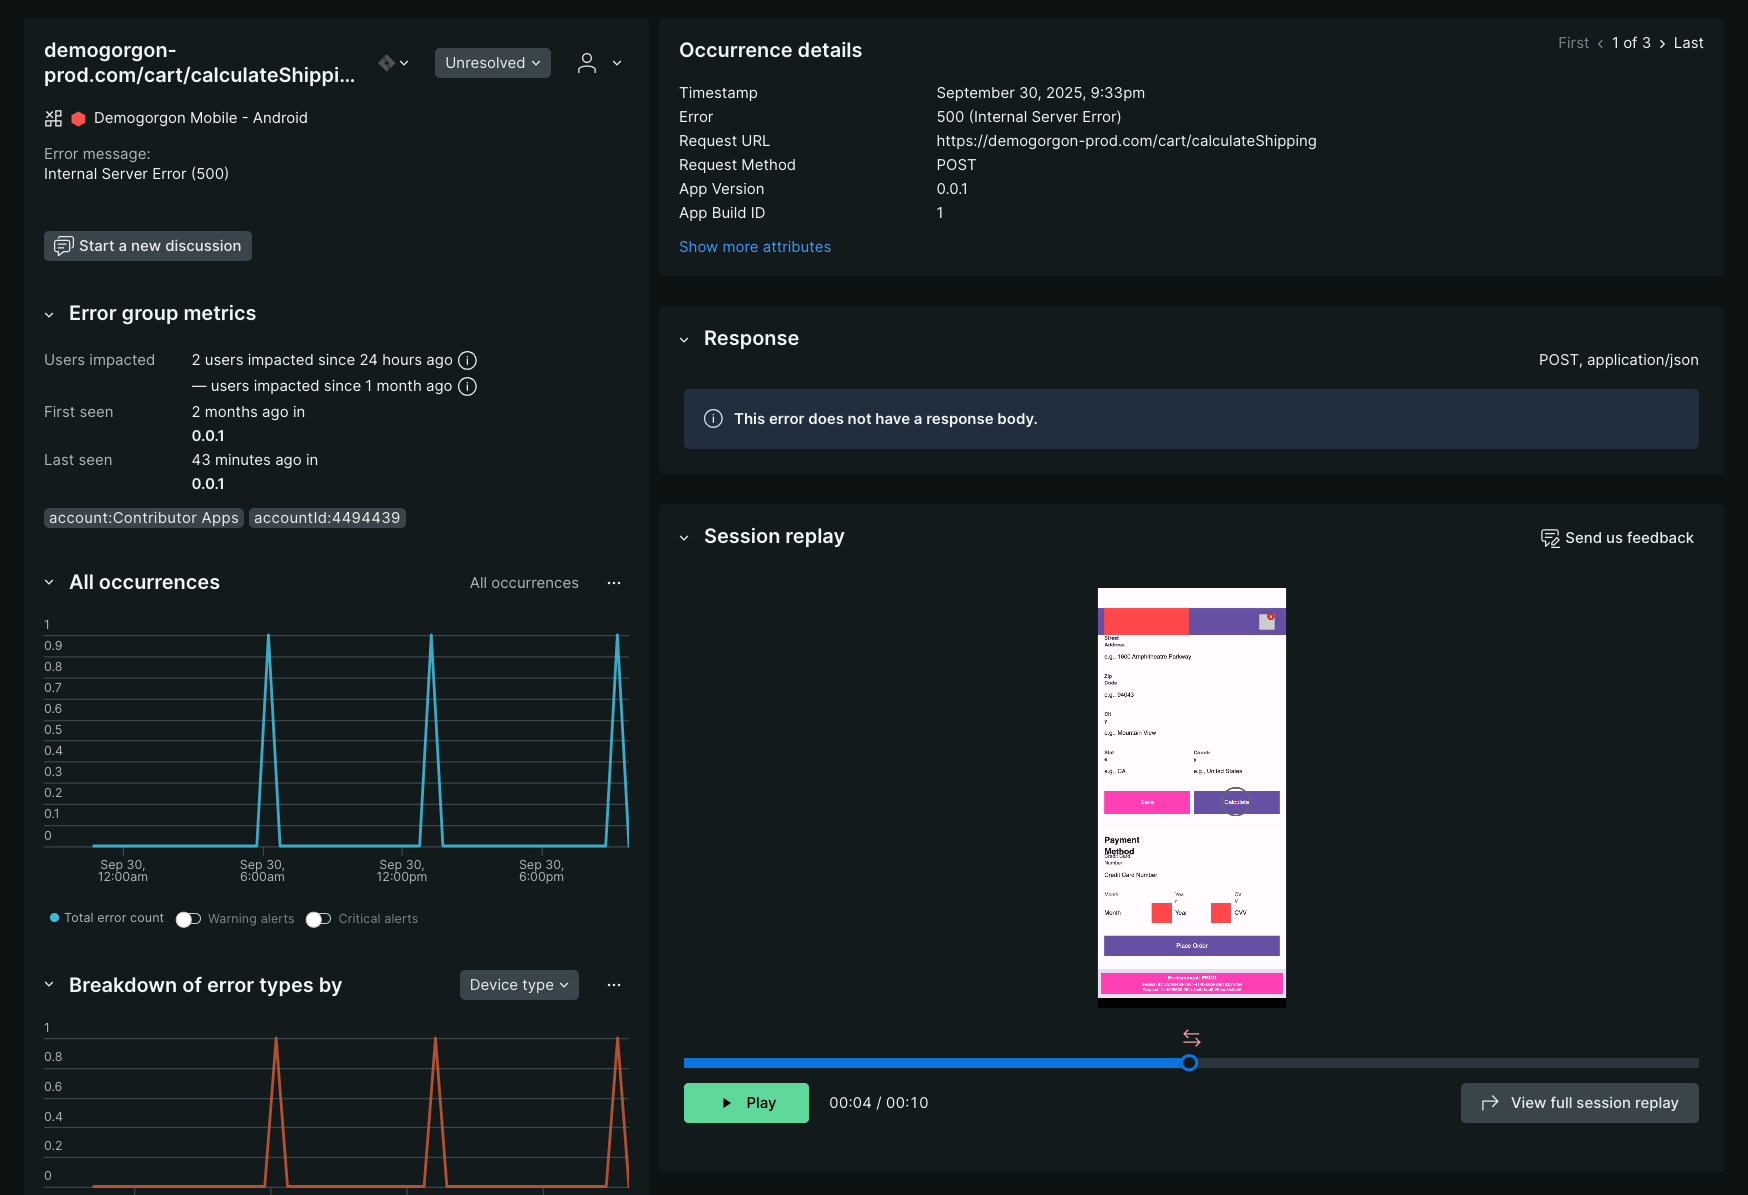
Aperçu : Les rediffusions seront disponibles dans leur contexte pour les plantages, les erreurs de requête, les exceptions gérées et les expériences ANR.
Gérer les autorisations et l'accès
La fonction de rediffusion de session mobile possède son propre ensemble d'autorisations, ce qui vous permet de contrôler précisément qui peut visionner les rediffusions et de mettre à jour ses paramètres. Tout utilisateur disposant d'un rôle standard peut consulter les rediffusions, mais seuls les administrateurs de produit peuvent modifier les paramètres Session Replay. Des rôles personnalisés peuvent être créés pour un contrôle plus précis des autorisations des utilisateurs.
Aperçu des autorisations
Les autorisations des utilisateurs sont gérées dans l'interface utilisateur de gestion des utilisateurs, que l'on trouve dans Administration > Access management > Roles.
Pour afficher ou modifier les paramètres Session Replay sur la page Paramètres de l'application, l'utilisateur doit disposer des autorisations Session Replay et Paramètres de l'application.
Autorisation | Description | Accordé à : |
|---|---|---|
Mobile / Session Replay / Afficher | Voir le replay de la session et la page de la liste. En complément des paramètres de l'application / Affichage, consultez les paramètres Session Replay actuels sur la page Paramètres de l'application. | Tous les administrateurs de produits |
Mobile / Session Replay / Modifier | En complément des paramètres de l'application / Modifier, mettez à jour les paramètres de Session Replay sur la page Paramètres de l'application. | Tous les administrateurs de produits |
Paramètres mobiles / de l'application / Afficher | Consultez les paramètres actuels sur la page Paramètres de l'application. L'utilisateur a également besoin de Session Replay / View pour voir la section Session Replay. | Tous les administrateurs de produits |
Paramètres mobiles / de l'application / Modifier | Mettez à jour les paramètres sur la page Paramètres de l'application. L'utilisateur a également besoin de l'option Session Replay / Modify pour mettre à jour la section Session Replay. | Tous les administrateurs de produits |